
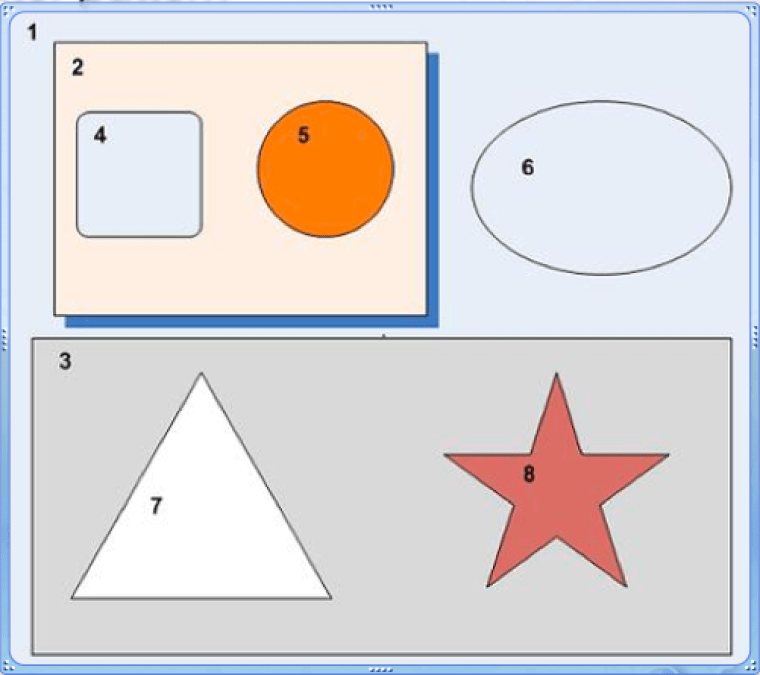
Any complex screen, more or less, of a business application consists of a number of layout containers (Panel, Canvas) and controls (Buttons, data grids, Comboboxes). In the best case scenario, a UI designer gives you a nice-looking screen prototype that s/he put together without bothering too much about which UI components you are going to select to implement the required functionality. Now what? Just look at this screen below that consists of a number of nested components and containers, which I numbered for easier reference. For simplicity (or should I say for better abstraction?) I did not use the actual components such as panels and dropdowns, but I’m sure you can extrapolate this image to your real-world business screen.
A simple (but wrong) approach is to just put all these components in one container (1), program the business logic and communication between these components and be done with it. This would produce a monolithic application with tightly coupled components that know about each other, and the removal of one component would lead to multiple code changes in the application. Talking about a string attached…
The better approach is to create loosely coupled custom components that are self-contained, do not know about the existence of each other, and can communicate with the external world by virtue of sending and receiving events. In this post I use code samples from Adobe Flex,which is a good framework for creating event-driven applications, and it has all you need for the creation of custom components. But the same principle can apply in any other programming language or a framework.
At this point, I could have just explained to you the essence of using custom components, but I’d rather make this essay more solid by introducing a little theory about object-oriented programming and explain the use of the design pattern called Mediator. People say that these days some smart employers are asking questions about design patterns during job interviews. So let’s get armed with this Mediator Pattern.
We’ll start with a definition of this pattern from Wikipedia:
“The mediator pattern is a software design pattern that provides a unified interface to a set of interfaces in a subsystem.”
Not clear? I know. Keep reading.
“The mediator pattern addresses this problem by promoting looser coupling between these classes by being the only class that has detailed knowledge of the methods of other classes. Classes send messages to the mediator when needed and the mediator passes them on to any other classes that need to be informed.”
This does not get much better either.
Okay, to put it simply: if you have Lego parts, they don’t know about each other and they don’t have any idea that some boy (a.k.a. Mediator) has decided to use these particular components to build a toy house. And tomorrow, the Mediator will decide to use the same components in a boat. You know where I’m going to with all this.
I would expect that some impatient readers have already scrolled down this article to see if I’ll ever show you some concrete code examples. I will. Promise.
In the diagram above, containers play the role of the Mediator. The top-level mediator is the container 1, which is responsible for making sure that components 2, 3, and 6 can communicate if need be. On the other hand, the number 2 is a mediator for 4 and 5. The number 3 is the mediator for 7 and 8.
Being a mediator is a very honorable mission, but it comes with responsibilities as you need to listen to events from one of your Lego parts and, possibly, fire the event on the other one.
For example, in the online store scenario, the number 6 can be a control where you select an item; number 4 is the button “Add To Shopping Cart”, and 5 is a shopping cart. Let’s forget about number 6 for a moment and look at the content of the mediator number 2. The button 4 has a specific look and feel and can do just one thing: broadcast the event “AddItemClicked”. To whom? To whomever is interested in receiving such an event. So expect to have the code:
dispatchEvent(new Event( "AddItemClicked"));
somewhere inside the component 4. If the mediator 2 is interested in receiving of this event (and it is, otherwise why even bother including number 4?) it will define an event listener for it, which will get the event and in turn will dispatch another event right on the number 5:
addEventListener( "AddItemClicked", addItemClickedEventHandler);

...

private function addItemClickedEventHandler(): void{

Number5.dispatchEvent(new Event("Add3ShoppingCart"));

}
Please note, that in the pseudo-code above, the mediator is choreographing how its little components will communicate. It’s time to get to the nitty-gritty coding details. Just read an article about creating custom components in Flex.
I’d like to stress that in the above example number 4 is shooting an event up in the sky: whoever wants to hear can listen. On the other hand, number 5 is just sitting quietly and listening to the incoming event. From whom? It has not an idea. This is what I mean by loose coupling of components. Number 4 does not know about number 5, but they talk anyway through the mediator.
However, as a developer of this screen, you have to take care of mediator-to-mediator communications as well. For instance, if number 6 is a widget where you can select your Sony TV, mediator 1 will be notified about it and need to talk to mediator 2, which in turn will arrange the flow between 4 and 5.
The Bottom Line
Don’t even think of starting to code UI unless you’ve identified your mediators, custom reusable components, and all communication between them via events.
