My presentations and workshops


This is a list of presentations and workshops that Yakov Fain offers. If you’d like to invite Yakov to deliver these talks/workshops at your organization, please send an email at training@faratasystems.com. To get familiar with Yakov’s teaching style, watch his Youtube Java tutorial.

Presentations

Modern JavaScript – 70 min

In this presentation, you’ll learn how to write code using the latest syntax of JavaScript. While most of the apps use the ES5 version of the language, majority of the modern web browsers fully support the ES6 specification. Some of them started supporting the ES7 and ES8 syntax. In this presentation you’ll learn how to use classes, fat arrow functions, destructuring, spread and rest operators, promises, async-await, and modules.

Mastering TypeScript – 90 min

In this presentation, you’ll learn how to write code in TypeScript, one of the most loved languages today.TypeScript is a superset of JavaScript, which allows you to be more productive in writing JavaScript applications. Per StackOverflow developers survey TypeScript is the 3rd place in the most loved languages and 5th in most wanted. The syntax of this language is pretty easy to pick up for anyone who’s familiar with such object-oriented languages as Java or C#. During this presentation, you’ll learn the syntax of TypeScript and will understand the benefits it brings to the table.

Angular Tooling – 90 min

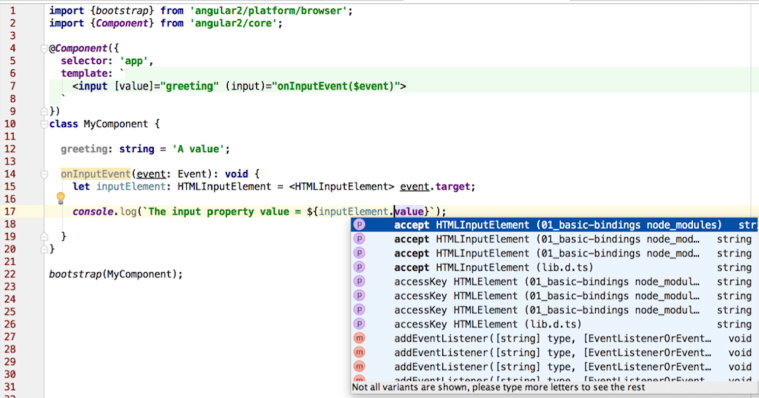
Learning Angular is easier than AngularJS, and developing in TypeScript is more productive than in JavaScript. But you need to know your tools to create, bundle, and deploy your app.This presentation is not about the Angular syntax. We’ll discuss the development process with Angular starting from setting up the project to deploying an optimized application. Most part of this presentation is about using Angular CLI. We’ll start with generating a new project, and then discuss such subjects as configuring proxies, working with environment variables, automating builds with npm scripts, and more.

Communication with the server via HTTP and WebSocket protocols in Angular – 90 min

In this session, you’ll see how to create an Angular 4 app that can communicate with the servers via a pull (HTTP) and push (WebSocket) modes. We’ll program a simple Node server and then will go through a number of code samples that communicate with it using HTTP and WebSocket protocols. We’ll start with creating a simple NodeJS server, and then will enable it to handle HTTP requests from an Angular app. Then you’ll see how to wrap a service into an observable stream. Finally, we’ll teach our server to perform a data push to an Angular client using the WebSocket protocol.

Angular for Java developers – 90 min

Angular is a complete re-write of the super popular Web framework AngularJS. Angular is a component-based framework that will have an effect in JavaScript community similar to what Spring framework did for Java. This presentation is a high-level overview of Angular, which in combination with TypeScript, finally made Web development understandable for Java developers. At the end of the presentation, you’ll see how to deploy Angular app can communicate with the Spring Boot backend.

Make a facelift to your Angular app with UI libraries – 90 min

In this presentation, you’ll see how to create a nice looking UI with Angular Material 2 and PrimeNG components.Commercial applications need to be good looking, which means that you should pick up a rich library of UI components for your app. While Angular Material 2 library offers two dozen of great looking components, this may not be enough for your application needs. The good news is that there are other libraries that you can use. In this presentation, we’ll start with an overview of Angular Material 2 components. Then we’ll proceed with another open-source library called PrimeNG, which offers more than 70 UI components.

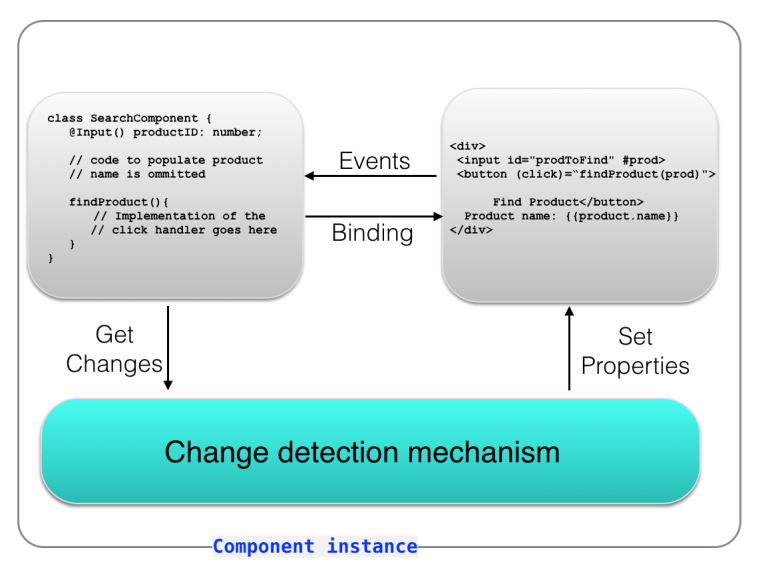
Implementing inter-component communication in Angular – 90 min

Angular is a component-based framework with a well-defined API for passing data to and getting data from a component. Any application is a tree of components that often need to communicate with each other. You’ll see how to create reusable application components that can exchange data with each other in a loosely-coupled manner. You’ll see how components can communicate via a common parent or via an injectable service. You’ll see how to pass data using the router, input and output parameters, events and callbacks. You’ll also learn how to use projection to pass HTML fragments to a component’s template. You’ll see how to pass parameters to routes. We’ll also touch upon the incorporation of the third-party JavaScript libraries into an Angular 4 app.

Working with the Angular router – 90 min

The Angular framework includes a powerful component router. In this session, you’ll see how to use the router that comes with Angular 4. We’ll start with configuring the navigation in a simple app. Then you’ll see how to pass data to routes, work child routes, and create apps with multiple router outlets (auxiliary routes). We’ll also review a unit-test configuration for testing the app router. Finally, you’ll see how to lazy load modules using the router.

Using Observable Streams in Angular – 90 min

Angular includes RxJS, which is a library of reactive extensions built on the premise that everything is an observable stream. Angular includes RxJS, which is a library of reactive extensions built on the premise that everything is an observable stream. Observables introduce the push model to your application. First, we’ll get familiar with the RxJS library, and then will continue reviewing observables in Angular.You’ll see how observables are used to handle events, forms, the router, and HTTP requests. We’ll talk about using subjects, implementing the mediator design pattern, and more.

RxJS essentials – 90 min

Libraries of reactive extensions exist in many programming languages. RxJS 5 is a popular library of reactive extensions for JavaScript. This library is used for transforming and composing streams of data. RxJS promotes the push model where the data flow through the algorithms of your application. RxJS is not a framework and can be used in any JavaScript app. Using RxJS allows writing certain portions of your app by composing functions where you see fit. You’ll learn how to create observable data streams, what are the roles of observers and subscribers, how to apply and compose operators to process the data emitted by observables, how to compose multiple data streams and more.

Reactive thinking with RxJava2 – 70 min

This presentation is about asynchronous programming in Java, where the streams of data are handled in a non-blocking fashion. We’ll talk about Reactive Streams and specifically about the RxJava2 library that may change the way you design Java applications. You’ll see how to consume streams of events, deal with backpressure, and apply a variety of operators offered by this library, which requires a different way of thinking about writing code.

JHipster: Bringing together Angular and Spring Boot – 70 min

JHipster is a popular open-source code generator that automates creation and configuration of a Web project that uses the Angular framework on the front and Java Spring Boot on the back. We’ll start with a simple example where an Angular app consumes the REST service from Spring Boot. Then we’ll proceed with an intro to JHipster followed by the generation of a new Angular/Spring Boot app from scratch. This will be a CRUD app of the following architecture: a gateway (the front end), a microservice (the back end), and a service discovery server.

Hands-on workshops

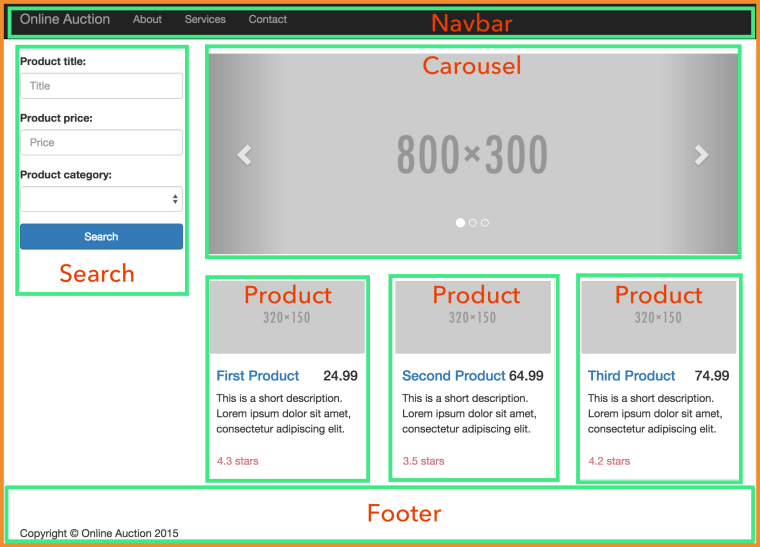
Developing Web apps with Angular and TypeScript – 3 days

Participants of this workshop will gain practical skills while exploring the best practices and principles of developing Angular applications and get familiar with multiple sample applications illustrating solutions for real-world challenges. During this course, we’ll cover all the latest APIs (routing, dependency injection, forms). At the end of each day, the participants will spend an hour working on the front end of a sample application “Online Auction”.

Angular Material 2 Applied – 1 day

This hands-on workshop is for developers who are already familiar with Angular. Under the instructor’s guidance, participants will work on the front end of the online store application, which uses Angular and the library of UI components Angular Material 2. By the end of the day, each participant will develop an online store with a shopping cart the will look and work like this one. This workshop assumes participants are already familiar with Angular. This workshop is NOT an Angular intro.


BIO

Yakov Fain works as a Solutions Architect at Farata Systems that offers consulting and training services in developing of the Web Apps with Angular and Java. A Java Champion, he has taught multiple classes and workshops on the web and Java-related technologies, presented at international conferences, and published more than a thousand blog posts (see https://yakovfain.com). Yakov authored and co-authored a number of technical books on programming including the Amazon bestseller “Angular 2 Development with TypeScript”. He leads Princeton Java Users Group.

Advertisement

TypeScript generics and animal workers

I’ve been using Java generics for years, and when I saw their syntax in TypeScript, I simply put a checkmark in the list of TypeScript features that I already know and understand.I was wrong. Let me show you something.

Below is a Java code sample that illustrates the use of generics. I’ve created a class Person and its subclass Employee. Then I created a standalone class Animal. Finally, I used the generic notation to ensure that if anyone would try to add an instance of Animal to the collection of workers, the Java compiler would complain, and it did:

Then I re-wrote the same program in TypeScript, and its compiler didn’t complain:

But if I’ll comment out the property name in the class Animal, the TypeScript compiler will complain:

This may lead to the following conclusions:

1. In TypeScript, if you use a type as a parameter in generics, it’ll allow any other type as long as it has the same properties (e.g. Person.name and Animal.name)
2. In TypeScript, animals can be workers

If there is something in TypeScript documentation that has different explanations to this behavior, please let me know. Generics is an interesting subject and I’ll write another blog soon.

My Angular 2 presentations for 2017

In 2017 I’m planning to speak at several conferences related to development of Web applications with the new Angular 2 framework. Below is the list of my presentations (each one is 90-min long). All of them can be delivered as a 2-day workshop in your organization.

Mastering TypeScript

TypeScript is a superset of JavaScript, which allows you to be more productive in writing JavaScript applications. The syntax of this language is pretty easy to pick up for anyone who’s familiar with such object-oriented languages as Java or C#. During this presentation you’ll learn the syntax of this language and will understand the benefits it brings to the table.

Make a facelift to your Angular 2 app with UI libraries

Commercial applications need to be good looking, which means that you should pick up a rich library of UI components for your app. While Angular Material library offers two dozen of great looking components, this may not be enough for your application needs. The good news is that there are other libraries that you can use. In this presentation we’ll start with an overview of Angular Material components. Then we’ll proceed with another open-source library called PrimeNG, which offers more than 70 UI components. Finally, we’ll review the code of an Angular 2 app that uses both Angular Material and PrimeNG components.

Angular 2 for Java developers

Angular 2 is a complete re-write of the super popular Web framework AngularJS. According to Pluralsight survey, Angular leads the list of what developers want to learn in 2016. Angular 2 is a component-based framework that will have an effect in JavaScript community similar to what Spring framework did for Java. This presentation is an overview of this hot framework, which in combination with TypeScript, finally made Web development understandable for Java developers. At the end of the presentation you’ll see a sample Web application written in Angular 2 on the front and Java on the server.

Angular 2: Working with the component router

In this session you’ll see how to use the router that comes with Angular 2 Final. We’ll start with configuring the navigation in a simple app. Then you’ll see how to pass data to routes, work child routes, and create apps with multiple router outlets (auxiliary routes). We’ll also review a unit-test configuration for testing router. Finally, you’ll see how how to lazy load modules using the router.

Angular 2: Communication with the server via HTTP and WebSocket protocols

In this session you’ll see how create an Angular 2 app that can communicate with the servers via a pull (HTTP) and push (WebSocket) modes. We’ll program a simple Node server and then will go through a number of code samples that communicate with it using HTTP and WebSocket protocols. We’ll start with creating a simple NodeJS server, and then will enable it to handle HTTP requests from an Angular 2 app. Then you’ll see how to wrap a service into an observable stream. Finally, we’ll teach our server to perform a data push to an Angular 2 client using the WebSocket protocol.

Implementing inter-component communication in Angular 2

Angular 2 is a component-based framework with a well-defined API for passing data to and getting data from a component. Any application is a tree of components that often need to communicate with each other.
In this presentation you’ll see how to create reusable application components that can exchange data with each other in a loosely-coupled manner. You’ll see how components can communicate via a common parent or via an injectable service. You’ll see how to pass data using component router, input and output parameters, events and callbacks. You’ll also learn how to use projection (formerly known as transclusion) to pass HTML fragments to a component’s template. We’ll also touch upon the incorporation of the third-party JavaScript libraries into an Angular 2 app.

Using Observable Streams in Angular 2

Angular 2 includes RxJS, which is a library of reactive extensions built on the premise that everything is an observable stream.

Observables allow to introduce the push model to your application. First we’ll get familiar with the RxJS library, and then will continue reviewing observables in Angular 2. In this presentation you’ll see how to treat UI events, HTTP, and WebSocket connections as observable streams that push data. You’ll see how to wrap up any service into an observable stream so your application components can subscribe to it.

Angular 2 Tooling

Learning Angular 2 is easier than AngularJS, and developing in TypeScript is more productive than in JavaScript. But setting up the project and deploying the application is not straightforward. This presentation is not about the Angular 2 syntax. We’ll discuss the development process with Angular 2 starting from setting up the project to deploying an optimized application. We’ll start with discussing the Angular/TypeScript project structure and the proceed with such topics as using the module loader SystemJS, installing type definition files, bundling the app with Webpack and deployment in dev and prod. Finally, we’ll go through the process of scaffolding and bundling projects using the Angular CLI tool.

Angular 2: High-Level Overview

This article was excerpted from the book “Angular Development With TypeScript” (see http://bit.ly/1QYeqL0). You may also look at my other high-level overview of Angular 2 published by InfoQ.

The Angular 2 framework is a re-write of popular framework AngularJS. In short, the newer version has the following advantages over AngularJS.

  • The code is simpler to write and read
  • It performs better  than AngularJS
  • It’s easier to learn
  • The application architecture is simplified as it’s component-based

This article contains a high-level overview of Angular highlighting improvements comparing to AngularJS. For a more detailed architecture overview of Angular visit product documentation at http://bit.ly/1TQJmwG.

Code Simplification

First of all, an Angular application consists of standard ES6 modules. Typically one module is one file. There is no need to use a framework-specific syntax for loading and using modules. Just use the universal module loader SystemJS (covered in Chapter 2) and add import statements to use functionality implemented in the loaded modules. You don’t need to worry about the proper order of the <script> tags in your HTML files. If a module A needs the functionality from a module B, just import the module B inside module A.

The HTML file of the landing page of your application just includes the framework modules, and your application code is bootstrapped by simple loading of the root component of your application. All child modules will be loaded automatically based on the import statements. Below is a typical content of the index.html of an Angular application. In the top portion you include the required framework modules, and at the bottom you configure the system loader and load the root component located in the file app/my_application.ts. The <app> tag is a selector defined in that root component.

<!DOCTYPE html>
<html>
<head>
  <script src="node_modules/angular2/bundles/angular2-polyfills.js"></script>
  <script src="node_modules/typescript/lib/typescript.js"></script>
  <script src="node_modules/systemjs/dist/system.src.js"></script>
  <script src="node_modules/rxjs/bundles/Rx.js"></script>
  <script src="node_modules/angular2/bundles/angular2.dev.js"></script>

</head>
<body>
  <app>Loading...</app>

  <script>
    System.config({
      transpiler: 'typescript',
      typescriptOptions: {emitDecoratorMetadata: true},
      packages: {app: {defaultExtension: 'ts'}}
    });
    System.import('app/my_application');
  </script>
</body>
</html>

The HTML fragment of each application component is either inlined inside of the component (the template property) or in the file referenced from the component using the property templateURL. The latter option allows designers to work on the UI of your application without the need to learn Angular.

An Angular component is a centerpiece of the new architecture. The next Figure shows a high-level diagram of a sample Angular application.

ch1_angular2_workflow

The simplest way of declaring a component is writing a class in TypeScript (you can use ES5, ES6, or Dart as well). Let’s do an experiment. We’ll give you a super brief intro on how to write Angular components in TypeScript followed by the sample code. See if you can understand the code with minimum explanations.

An annotated TypeScript class represents a component. The annotation @Component contains the property template that declares an HTML fragment to be rendered by the browser. The HTML piece may include the data binding expressions, which can be represented by double curly braces. If a view depends on other components, the @Component annotation has to list them in the property directives. The references to the event handlers are placed in the markup from the @Component section and are implemented as methods of the class.

The annotation @Component also contains a selector declaring the name of the custom tag to be used in HTML document. When Angular sees an HTML element with the name matching a selector, it knows which component implements it. The HTML fragment below illustrates a parent component with one child component :

<body>
  <auction-application>
    <search-product [productID]= "123"></search-product>
  </auction-application>
</body>

A parent component sends the data to its child components using property binding (note the square brackets above), and children communicate with their parents by sending events. The next Figure shows the main page (the parent component) with its child components surrounded with thick borders.

ch2_auction_home_page_components

Below is a code sample of a SearchComponent, and we can include it in an HTML document as <search-product> because its declaration includes the selector property with the same name.

@Component({
  selector: 'search-product',
  template:
     `
<form>
<div>
          <input id="prodToFind" #prod>
          <button (click)="findProduct(prod.value)">Find Product</button>
          Product name: {{product.name}}</div>
</form>

    `
})
class SearchComponent {
   @Input() productID: number;

   product: Product; // code of the Product class is omitted

   findProduct(prodName: string){
	// Implementation of the click handler goes here
   }
   // Other code can go here
}

If you are familiar with any object-oriented language that has classes you should understand most of the above code. The annotated class SearchComponent declares a variable product, which may represent an object with multiple properties, one of which (name) is bound to the view ({{product.name}}). The #prod will have a reference to the hosting <input type=”text” /> element so you don’t need to query DOM to get the entered value.

The (click) notation represents a click event, and the event handler function gets the argument value from the input parameter productID that will be populated by the parent component via binding.

This was just a quick look at the sample component, but we’ll be providing a detailed description of what components are made up of starting from the next chapter.

If you never worked with classes before, no worries. We’ll cover them in Appendices A and B. The next Figure illustrates the inner working of a component.

ch1_angular_component

A component uses the data from a model (the M in the MVC pattern), which can be also represented by a class. In TypeScript the model class for a SearchComponent could look like this:

class Product{
    id: number,
	name: string;
	description: string;
	bid: number;
	price: number;

	// constructor and other methods go here
}

Note that TypeScript allows you to declare class variables with types. To let the UI component SearchComponent know about its model you can refer to it by declaring a class variable, e.g. product:

@Component { // code omitted for brevity}
class SearchComponent {
   product: Product;  // the model

   findProduct(productID){
	   // The implementation of the click handler
	   // for the Find Components button goes here
   }
}

If the search component may return multiple products we can declare an array to store them:

products: Array<Product>;

The generics notation (explained in Appendix B) tells the TypeScript compiler that only the objects of the type Product are allowed to be stored in this array.

In Angular there are no separate controllers (the C in the MVC pattern). The component includes all required code. In our example, the SearchProduct class would contain the code performing the controller’s responsibilities in addition to being a UI component on the HTML view. For a cleaner separation of TypeScript and HTML, the content of the template section of the @Component annotation can be stored in a separate file by using templateURL instead of template, but it’s a matter of your preference.

Developers who know AngularJS can think of a component as a directive with a view, but writing directives without views is still allowed.

Now let’s see how the design of Angular is simpler than of AngularJS. In AngularJS all directives were loaded to the global memory, whereas in Angular you specify the required directives on the component level providing better encapsulation.

You don’t have to deal with the hierarchy of scope objects as in AngularJS. Angular is component based, and the properties are created on the this object, which becomes the component’s scope.

Dependency Injection is a design pattern that inverts the way of creating objects your code depends on. Instead of explicitly creating object instances (e.g. with new) the framework will create and inject them into your code. Angular comes with a dependency injection module. We’ll cover dependency injection in Chapter 4.

In AngularJS there were several ways of injecting dependencies, which could be confusing at times. In Angular you can inject dependencies into the component only via its constructor. The following TypeScript code fragment shows how to inject the ProductService component into the SearchComponent. You just need to specify a provider and declare the constructor argument with the type that matches provider’s type.

@Component({
  selector: 'search-product',
  viewProvider: [ProductService],
  template:[
<div>
...
<div>]
})
class SearchComponent {
  products: Array<Product> = [];

  constructor(productService: ProductService) {
    this.products = this.productService.getProducts();
  }
}

To summarize, Angular is simpler than AngularJS because of the following:

  • Each building block of your app is a component with well encapsulated functionality of a view, controller, and auto-generated change detector.
  • Components can be programmed as annotated classes.
  • A developer doesn’t have to deal with scope hierarchies.
  • Dependent components are injected via the component’s constructor.
  • Two-way binding is turned off by default.
  • Change detection mechanism was re-written and works faster.

The concepts of Angular are easy to understand for Java, C#, and C++ programmers, which represent the majority of enterprise software developers. Like it or not, but a framework becomes popular when it gets adopted by enterprises. Today AngularJS is widely adopted by the enterprises, and AngularJS skills are in big demand. Since developing applications with Angular is easier than with AngularJS this trend should continue.

Performance Improvements


To compare performance of AngularJS and Angular 2 the creators of these frameworks developed a benchmarking tool called Benchpress (see http://bit.ly/1IvgnKZ), which showed some serious performance improvements in the area of rendering and memory use.

The rendering improvements are mainly the result of the internal redesign of the Angular framework. The UI rendering and the application API were separated into two layers, which allows to run the non-UI related code in a separate Web Worker thread. Beside the ability to run the code of these layers concurrently, Web browsers allocate different CPU cores to these threads when available. You can find a detailed description of the new rendering architecture in the document titled Angular 2 Rendering Architecture available at http://bit.ly/1CEXjIl.

Creating a separate layer for rendering has an additional important benefit: an ability to use different renderers for different devices. Every component includes the @Component annotation that contains an HTML template defining the look of the component. If you want to create a component to display stock prices in the Web browser its UI portion may look as follows:

@Component({
  selector: 'stock-price',
  renderer: 'DOMRenderer',
  template: '
<div>The price of an IBM share is $165.50</div>
'
})
class StockPriceComponent {
...
}

Currently, DOMRenderer is the only renderer, so you don’t even need to include it in the @Component annotation. But the Angular team already works on creating native renderers for mobile devices running iOS and Android. Such renderers should be released in the near future, and Angular applications won’t need to run inside the Web View (embedded Web browser) on mobile devices – they’ll use native UI components.

A new and improved change detection mechanism is yet another contributor to better performance. Angular doesn’t use two-way binding unless you manually program it. One-way binding simplifies the detection of the changes in an application that may have lots of interdependent bindings. Now if a component has only internal immutable objects, you can mark it as such so it won’t be checked when a change is detected in another component.

Although Angular 2 is a complete re-design of Angular 1, those of you who use AngularJS can start writing code in Angular 2 style by using ng-forward (see http://bit.ly/1PNXFmH). The other approach is to start gradually switching to a newer version of this framework by running Angular 2 and Angular 1 in the same application (see http://bit.ly/1YixNzE), but this would increase the size of the application.

“To learn more about Angular see the book “Angular Development with TypeScript” at http://bit.ly/1QYeqL0 and save 39% with discount code faindz.  For the up to date information about our Angular 2 training visit this page.


Oracle starts catering to JavaScript community with JET

During the last several years Oracle was working on their cloud solution, and several internal teams were creating JavaScript-based Web interfaces for the cloud. At some point Oracle decided to standardize on the set of JavaScript libraries used internally, and they also developed a set of reusable Web UI components both simple (e.g. buttons and forms) as well as complex (data grids, charts, accordion, and fancy gauges). All these components are based on jQuery UI and are responsive, so they can be used on mobile devices.

Having a nice set of UI components is great, but is not enough for building Web applications, so Oracle selected several popular JavaScript libraries to support routing, data binding, module loading et al.

All these things packaged together got a name JET (see oraclejet.org), which is a toolkit for developing front end in JavaScript.

After downloading and unzipping one file you’ll get a set of well-known libraries (e.g. RequireJS, Knockout et al.) plus the library of the UI components developed by Oracle.

Based on the demo I’ve seen, it’s pretty easy to put up an application together using these components. Selecting any component from the JET Cookbook shows you a sample code that you can copy/paste in your HTML or JavaScript code.

I’ve asked Geertjan Wielenga, one of the JET product managers, if it’s possible to replace one of the libraries included into JET with another one. He responded positively and pointed me to this blog that shows how to use JET with AngularJS.

I’d be interested to see if JET’s UI components can be used together with other WebComponents-based libraries like Google Polymer. The other thing that I’d like to see if it’s possible to replace the module loader RequireJS with SystemJS that supports loading modules of different formats (including ES6 ones).

A JET plugin for the NetBeans IDE includes a convenient debugger that can be used inside the IDE. Oracle will offer support for JET, which is important for enterprise folks.

At the time of this writing the JET Website reads “Don’t use it in production (except if you’re an Oracle Cloud customer)”, but Oracle will open source it at some point in the near future, so everyone can use it both dev and prod. If I’m not mistaken, this will be the first organically open sourced Oracle product. By “organically” I mean that it came out of Oracle’s own initiative, rather than out of the takeover of another company. Try it out.

Why Java Developers Will Embrace Angular 2 and TypeScript

Most of the Java developers I know don’t like JavaScript. Initially. They would give you different reasons why, but the real one is simple: too much to learn to make it work. For many Java developers creating the front end of a Web application in JavaScript is a chore to write and a burden to maintain. Nevertheless JavaScript rules in Web development and the new version of JavaScript (ES6) will make it even more popular.

ES6 offers classes, standardized module definition, arrow expressions (lambdas), predictable “this” and a lot more. Firefox and Chrome already support most of the ES6 syntax, and other browsers are getting there as well.

But there is something better than ES6: the TypeScript language, which has most of what ES6 has to offer plus types, casting, interfaces, generics, and annotations. The TypeScript code analyzer will help you to see syntax errors even before you run the program. Code refactoring works as well. In this blog I stated the main reasons of why TypeScript is the right tool for JavaScript development.

Now let’s take a quick glance at Angular 2, a complete re-write of the popular open-source framework managed by Google. There were two Beta releases of Angular 2, and it’s safe to start using it for your next Web project unless your app has to go to prod in the first half of 2016. Angular 2 is stable enough for serious development, and I know this first hand after surviving a couple of dozens of alpha releases of Angular 2.

Disclaimer. You can write Angular applications in the current JavaScript (ES5), next JavaScript (ES6), Dart, or TypeScript. Based on my experience with all these languages using TypeScript is the best option.

What makes the Angular 2/TypeScript combo so appealing to Java folks?

First of all, the code looks clean and easy to understand. Let’s do an experiment. I’ll give you a two-paragraph intro on how to write an Angular component in TypeScript followed by the sample code. See if you can understand this code.

Any Angular application is a hierarchy of components represented by annotated classes. The annotation @Component contains the property template that declares an HTML fragment to render by the browser. The HTML piece may include the data binding expressions, which can be represented by double curly braces. If a view depends on other components, the @Component annotation has to list them in the property directives. The references to the event handlers are placed in the HTML from the @Component section and are implemented as the class methods.

The annotation @Component also contains a selector declaring the name of the custom tag to be used in HTML document. When Angular sees an HTML element with the name matching a selector, it knows which component implements it. The lesson is over.

Below is a code sample of a SearchComponent, and we can include it in an HTML document as <search-product> because its declaration includes the selector property with the same name.

@Component({
  selector: 'search-product',
  template:
     `<div>
          <input #prod>
          <button (click)="findProduct(prod.value)">Find Product</button>
          Product name: {{product.name}}
        </div>
    `
})
class SearchComponent {
 
   product: Product; // code of the Product class is omitted

   findProduct(prodName: string){
    // Implementation of the click handler goes here
   }
   // Other code can go here
}

A Java developer can read and understand most of this code right away. OK,ok. I’ll give you more explanations. The annotated class SearchComponent declares a variable product, which may represent an object with multiple properties, one of which (name) is bound to the view ({{product.name}}). The #prod is a local template variable that stores a reference to the input field so you don’t need to query DOM to get the entered value.The (click) notation represents a click event, and the event handler function gets the argument value from the input field.

Note that the HTML template is surrounded with the back tick symbols, which allow you to write the markup in multiple lines in a readable form. If you prefer to store HTML in a separate file instead of template use the templateURL property:

templateUrl: './search.html' 

Dependency Injection. Angular architecture will be very familiar to those who use Spring framework or Java EE. Angular comes with the Dependency Injection (DI) module, which instantiates an object using a registered class or a factory and injects it to the application component via constructor’s arguments. The following code will instruct Angular to instantiate the class ProductService and inject it into the ProductComponent:

@Component({
   providers: [ProductService]
})
class ProductComponent {
product: Product;
 
  constructor(private productService: ProductService) {
 
     this.product = this.productService.getProduct();
  }
}

Specifying the provider and declaring the constructor with the type is all you need for injecting the object. Application components form a hierarchy, and each component may have its own injector. Injectors are not singletons.

App structure. The following image shows what the main page of a sample application is made up of. The parent component includes child components, which are surrounded with green borders.

ch2_auction_home_page_components

Router. Angular shines in development of single-page applications (SPA), where the entire Web page is never reloaded. Angular router allows you to easily configure the page fragments (the views) that should be loaded based on the user’s actions. The code snippet below includes the annotation @RouteConfig that configures two routes Home and ProductDetail, which are mapped to the corresponding components (HomeComponent and ProductDetailComponent). The user navigates the application by clicking on the links with the corresponding routerLink attribute, which will display the requested component in the area marked as <router-outlet>.

@Component({
    selector: 'basic-routing',
    template: `<a [routerLink]="['/Home']">Home</a>
              <a [routerLink]="['/ProductDetail']">Product Details</a>
              <router-outlet></router-outlet>`,
    directives: [ ROUTER_DIRECTIVES]
})

@RouteConfig([
    {path: '/',        component: HomeComponent, as: 'Home'},
    {path: '/product', component: ProductDetailComponent, as: 'ProductDetail'}
])
class RootComponent{
}

Inter-component communication. Each component in Angular is well encapsulated, and you can create it in a losely-coupled manner. To pass the data from the outside world to the component just annotate a class variable(s) with @Input() and bind some value to it from the parent component.

class OrderComponent {

    @Input() stockSymbol: string; 
    @Input() quantity: number; 
}

To pass the data from the component to the outside world, use the @Output annotation and dispatch events through this variable. Dispatch to whom? Ain’t none of the component’s business. Let’s whoever is interested listen to this event, which can be either a standard or a custom event carrying a payload.

class PriceQuoterComponent {
    @Output() lastPrice: EventEmitter<IPriceQuote>  = new EventEmitter(); 
 ...
    this.lastPrice.emit(priceQuote)
 }   

See something familiar? You got it. That thingy in the angle brackets after EventEmitter denotes a generic type, and IPriceQuote can be an interface. TypeScript supports generic and interfaces.

Casting. TypeScript supports types, classes, and interfaces (class A extends B implements D, E, F). It support type casting as well. As in Java, upcasting doesn’t require special notation. To denote downcasting surround the target type with angle brackets and place it before more general type as shown in the screenshot below.

casting

I took this screenshot after placing the cursor before value in line 17. I use WebStorm 12 IDE (a little brother of IntelliJ IDEA), which supports TypeScript quite nicely (including refactoring), and this supports improves with every minor release of WebStorm. If I wouldn’t declare the variable with the type in line 15 and wouldn’t use casting, the code would still work, but the IDE would show value in red and the code completion wouldn’t work in line 17.

Streams and lambdas. These are big in Java 8. Angular 2 incorporates RxJS, the library with react extensions, where streams is a religion. Everything is a stream in RxJS, and Angular 2 promotes using observable streams and subscribers.
Even events are streams, can you believe this? The user types in an HTML input field or is dragging the mouse, which generates a stream that you can subscribe to (think observer/observable or pub/sub).

Make an HTTP request or open a WebSocket and subscribe to the observable stream, which is a Promise on steroids. Handling results is still an asynchronous operation, but as opposed to a Promise it can be cancelled.

In Java 8 you can run a stream through a number of changed intermediate operations (e.g. map()) followed by a terminal one. In Angular 2 you can do the same:

class AppComponent {

  products: Array = [];

  constructor(private http: Http) { 

    this.http.get('/products') 
        .map(res => res.json()) 
        .subscribe(
            data => {
              if (Array.isArray(data)){
                this.products=data; 
              } else{
                this.products.push(data);
              }
            },
            err =>
              console.log("Can't get products. Error code: %s, URL: %s ",  err.status, err.url), 
            () => console.log('Product(s) are retrieved') 
        );
  }
}

If the above code requires explanations, then your Java is a little rusty. Seriously.

Module loading. One of the important features that ES6 brings to Web development is standardization of modules. The application code consists of modules (typically one module is one script file). Using the export keyword (e.g. export class Product {...}) you specify which members of the module should be exposed to other scripts. Accordingly, a script can include one or more import statements to have access to other modules.

ES6 includes the syntax for importing/exporting modules, but the standardization of the module loader System is postponed, and we use the polyfill SystemJS that can load modules of all existing formats (including ES6). When the System object will become standard in all browsers that support ES6, you won’t need to change your code (removing the polyfill is all that’s needed).

The main HTML file of he Angular/TypeScript application simply includes the configuration of the loader and transpiler (the running code must be compiled to JavaScript) and import statement of the main application component:

<body>
  <app>Loading...</app>

  <script>
    System.config({
      transpiler: 'typescript',
      typescriptOptions: {emitDecoratorMetadata: true},
      packages: {app: {defaultExtension: 'ts'}}
    });
    System.import('app');
  </script>
</body>

In the above code snippet the System object imports the module from the file app.ts, which is a root component of the application and may have child components represented by custom HTML tags. The System loader reads all import statements in each application component and loads all dependencies accordingly. Lazy loading of the modules is supported as well.

Deployment. Java developers use build tools like Maven or Gradle for deployment. Guess what, Angular developers use them as well. The TypeScript code needs to be transpiled into JavaScript, minimized and obfuscated before deployment to QA or prod servers. Some people use Grunt, some Gulp, but we use Webpack for bundling the code and npm scripts for deployment. The jury is still out on the best build automation tools, and we keep our eyes open.

I hope that after reading this blog thousands (ok, hundreds) of Java developers will want to take a closer look at Angular 2. Start with Angular architecture.

In this blog I showed you just a tip of the iceberg. You’d need to invest some time in learning Angular 2 and TypeScript, but the learning process isn’t too steep for the Java folks. If you want to make this process as pleasant as it can be, get the book that I’m co-authoring or enroll in one of our training classes.

IMHO Angular 2 will make as big of an impact in the JavaScript community as Spring Framework has in the Java world.

One more thing… View rendering is implemented in a separate tier, which means that it doesn’t have to be HTML only. You will be able to implement mobile applications that will use native iOS or Android UI components. The folks from Telerik are working with the Angular team to integrate this framework with NativeScript (read this).

Java HashSet becomes a little faster

I was experimenting with Java HashSet, which is a pretty expensive collection to create, but it has a benefit of the O(1) performance while finding the elements from this collection. Based on my experiments performance of HashSet is improved over the last year.

I’ve written a small benchmark comparing the performance of the one year old JRE 1.8.0_05 with the latest 1.8.0_60. In my tests I’m creating a HashSet containing 100000 objects. The object looks like this:

import java.math.BigDecimal;

public class MyObject {

	public String s1 = "aaaaaaaaaaaaa";
	public Double d1 = 222222222222.22;
	public BigDecimal b1 = new BigDecimal(1.54);
	public int i1;
	
	public String s2 = "aaaaaaaaaaaaa&amp";
	public Double d2 = 222222222222.22;
	public BigDecimal b2 = new BigDecimal(1.54);
	public int i2;
	
	public String s3 = "aaaaaaaaaaaaa";
	public Double d3 = 222222222222.22;
	public BigDecimal b3 = new BigDecimal(1.54);
	public int i3;	
}

My test program runs two test loops. First, I preallocate the memory for the HashSet capable of storing 133000 object with the load factor 0.75. In the second loop I create the HashSet with the default initial size 16 and the same load factor. The load factor 0.75 causes the HashSet to grow if the number of elements becomes greater than 75% of the initial capacity. I was expecting the first loop to perform a little better because there is no need to do additional memory allocations. Here’s the test program:

import java.time.Duration;
import java.time.LocalTime;
import java.util.HashSet;

public class Main {

	static int iterations = 100000;
	static float loadFactor=0.75f;
	static int initialSize = (int)Math.round(iterations/loadFactor);
	
	public static void main(String[] args) {
       
	   int nTests = 10;
	   long totalTime = 0; 
	   
	   // HashSet with large initial size
	   for (int i=0; i&amp;lt;nTests; i++){
		totalTime += populateHashSet(initialSize, loadFactor);					
	   }
	   
	   System.out.println("With JRE &amp;quot; + System.getProperty(&amp;quot;java.version") + " the average time (in milis) to populate the HashSet of initial size " + initialSize + " is "+ totalTime/nTests);
	  
	   
	   // HashSet with default initial size
	   initialSize = 16;  // default for HandSet
	   totalTime = 0; 
	   
	   for (int i=0; i < nTests; i++){
		totalTime += populateHashSet(initialSize, loadFactor);					
	   }
	   
	   System.out.println("With JRE &amp;quot; + System.getProperty("java.version") + " the average time (in milis) to populate the HashSet of initial size " + initialSize + " is "+ totalTime/nTests);
	}
	

	static long populateHashSet(int size, float loadFactor){
     
		System.gc();
		
		HashSet&amp<MyObject> hashSet = new HashSet<>(initialSize, loadFactor);
		
			LocalTime before = LocalTime.now(); 
			
	
			for (int i =0; i < iterations; i++){
				MyObject obj = new MyObject();
				obj.i1 = i*2; 
				hashSet.add(obj);
			}
		
		LocalTime after = LocalTime.now();
		
       return Duration.between(before, after).toMillis();		
				
	}
}

Running this program in two different JREs shows the following results:

With JRE 1.8.0_05 the average time (in milis) to populate the HashSet of initial size 133333 is 167
With JRE 1.8.0_05 the average time (in milis) to populate the HashSet of initial size 16 is 152

With JRE 1.8.0_60 the average time (in milis) to populate the HashSet of initial size 133333 is 153
With JRE 1.8.0_60 the average time (in milis) to populate the HashSet of initial size 16 is 141

My test shows that the HashSet in JRE 1.8.0_60 gets populated about 10% faster than with JRE 1.8.0_05. If your application works with large HashSets you should upgrade your JRE.

What I can’t explain is why the numbers with default initial size are better than with the HashSet with pre-allocated memory.

New Java books and videos

The second edition of my Java tutorial went on sale.
While this is not my first book, it’s special, because it’s a second edition. When you see a second edition of any book, it means that the first one was successful (i.e. was profitable for the publisher). I don’t remember the exact figures, but I made around $40K in the form of royalties for the first edition.

java24cover
In the second edition I’ve re-written a half of the book from scratch. The release of Java 8 was THE major release of this 20 year-old super popular programming language, and I had to cover the new syntax and APIs of the language.

I’ve replaced the chapters covering Swing with showing a modern way of developing GUI with JavaFX 8. The chapters about Spring, Hibernate, and JSF are out. The chapters about WebSockets and Logging and Gradle are in.

This book comes with more than 7 hours of professional-grade video screencasts produced by Chad Darby. You can watch several of these videos here.

My special thanks to the technical editors Martijn Verberg and Rajesuwer Singaravelu for providing valuable input about the book content.

Finally, I’d like to thank Wiley editors for their professionalism, and O’Reilly Media that provided a great publishing platform Atlas, which spared me from using MS Word.

Cover
In parallel, I was writing a book “Java For Kids”, and the drafts of this book are available at this Web site. At this point I have no official publisher for this book, and the content is available for free (subject to change). I also plan to create a training manual based on this book and start running workshops teaching kids Java programming. These manuals will be available for free for anyone who wants to teach Java.

I hope you’ll enjoy the reading as much as I enjoyed writing these books!

Partying with IntelliJ IDEA Dart, Java, WebSocket and Glassfish

Recently I wrote a blog showing how to use the WebSocket protocol to push the data from a Java server to a JavaScript client. This time I’ll keep the same code on the server, but the client will be written in Dart. For this example I was using GlassFish 4.1 server, and IntelliJ IDEA 14.1 with installed Dart plugin. I also have Dart 1.9.1 SDK. My goal was to create one Web application deployable module that would contain both Java and Dart code.

I’ll be brief assuming the the reader has some familiarity with IntelliJ IDEA IDE and the structure of Dart projects. Repeating the same exercise in Eclipse IDE should be a trivial task too.

By the time I was creating this app, I already had an IntelliJ IDEA project with multiple Dart modules. So I wanted to add a new Java module with Dart support to the same project. If you prefer creating a new IDEA project from scratch, instead of creating a new module create a new project. Here’s how I did it:

1. Create a new GlassFish configuration (IDEA menu Run | Edit Configurations) pointing at the existing GlassFish installation.

2. Create a new module of type Java Enterprise selecting GlassFish as an application server Web Application and WebSocket as additional libraries. IDEA will create a project with directories src and web (the latter will contain the WEB-INF dir). I called my module GlassfishWebsocketDart. IDEA will also generate index.jsp, which you can delete.

GlassFish_Idea

3. Go to the Project Structure (Cmd ; ) and add GlassFish, GlassFIsh WebSocket, and Dart SDK as dependencies to the module GlassfishWebsocketDart.

4. Create (or copy from an existing Dart module) the files pubspec.yaml and pubspeck.lock into the root dir of your module.

5. Create index.html and main.dart in the web dir. The file index.html can look like this:

 
<!DOCTYPE html>
<html><head>
    <meta charset="utf-8">
    <meta http-equiv="X-UA-Compatible" content="IE=edge">
    <meta name="viewport" content="width=device-width, initial-scale=1.0">
    <meta name="scaffolded-by" content="https://github.com/google/stagehand">
    <title>hello</title>

</head>

<body>

  <div id="output">dart uber</div>

  <script type="application/dart" src="main.dart"></script>
  <script data-pub-inline src="packages/browser/dart.js"></script>
</body></html>

My file main.dart looks as follows:

import 'dart:html';

main() {

  var output = querySelector('#output');

  WebSocket ws = new WebSocket('ws://localhost:8080/GlassfishWebsocketDart_war_exploded/clock');

  ws.onOpen.listen((event){
    output.text = &amp;amp;quot;Connected&amp;amp;quot;;
  });

  ws.onMessage.listen((event){
    output.text = event.data;
  });
}

6. Open main.dart in the editor and IDEA will show the option Enable Dart support – click on it.

7. Right-click on the pubspec.yaml and run pub build (select the debug mode). It’ll create the folder build with files and dart packages required for deployment.

build

8. Copy all the files from the build/web dir into the web dir located in the root of your module.

9. In the src directory create the following file WebSocketClock.java

import javax.websocket.OnOpen;
import javax.websocket.Session;
import javax.websocket.server.ServerEndpoint;
import java.io.IOException;
import java.time.LocalTime;
import java.time.format.DateTimeFormatter;
import java.util.Set;
import java.util.concurrent.Executors;
import java.util.concurrent.ScheduledExecutorService;
import java.util.concurrent.TimeUnit;

@ServerEndpoint("/clock")
public class WebSocketClock {

    static ScheduledExecutorService timer =
            Executors.newSingleThreadScheduledExecutor();

    private static Set<Session> allSessions;

    DateTimeFormatter timeFormatter =
            DateTimeFormatter.ofPattern("HH:mm:ss");
    @OnOpen
    public void showTime(Session session){
        allSessions = session.getOpenSessions();

        // start the scheduler on the very first connection
        // to call sendTimeToAll every second
        if (allSessions.size()==1){
            timer.scheduleAtFixedRate(
                    () -> sendTimeToAll(session),0,1,TimeUnit.SECONDS);
        }
    }

    private void sendTimeToAll(Session session){
        allSessions = session.getOpenSessions();
        for (Session sess: allSessions){
            try{
                sess.getBasicRemote().sendText("Local time: " +
                        LocalTime.now().format(timeFormatter));
            } catch (IOException ioe) {
                System.out.println(ioe.getMessage());
            }
        }
    }
}

10. IDEA can deploy Java web apps in the exploded mode (default) or as an WAR archive. Open the GlassFish configuration (menu Run | Edit), and it should look like this:

gf_exploded

11. Run your GlassFish and you should see the server pushing the local time every second. The Chromium browser runs the client’s code in its Dart VM, which properly runs WebSocket client communicating with the Java server.

chromium

You may ask, “Will this app work in other browsers that don’t have (and will never have) Dart VM?”. Good question. Theoretically the last two lines in our index.html file should check the presence of Dart VM and replace the references to main.dart with a reference to the JavaScript main.dart.js that was generated by the pub build process.

  <script type="application/dart" src="main.dart"></script>
  <script data-pub-inline src="packages/browser/dart.js"></script>

In practice this may not happen, and you’d get a 404 on “missing” dart.js. Now you have two choices:

a) Manually replace the above two lines with this one:

 <script src="main.dart.js"></script>

b) Add a dependency to your project to use the transformer dart_to_js_script_rewriter to do this replacement automatically. Your modified pubspec.yaml should look like this:

name: 'glassfish_websocket_dart'
version: 0.0.1
description: >
  A web app that illustrates dart, websocket, and glassfish.
environment:
  sdk: '>=1.0.0 <2.0.0'
dependencies:
  browser: any
  dart_to_js_script_rewriter: any
transformers:
  - dart_to_js_script_rewriter

Now run the pub get and pub build and only the JavaScript version will be used. This should be done only if you decide to deploy my useful application in production.

The other improvement that can be done are to create a deployment artifact that builds a WAR file that will include the content from the Dart build folder as well as compiled Java classes. And those who already cut the IDE umbilical cord should automate build and deployment with gradle and gulp.

In April, I’ll be making the presentation “Dart for Java developers” twice. On April 14 I’ll do it online at the New York Dart Users Group, and on April 23 I’ll do a live presentation for the New York Java SIG.

Update for MAC OS users: After upgrading to 10.10.3 GlassFish doesn’t start unless you change the startup line to
/Users/yfain11/glassfish4/glassfish/bin/asadmin start-domain –verbose

How to create a signup screen to minimize the number of users who will sign up

I’m wondering if these developers do this on purpose or they are just random people in our profession? I was trying to sign up at this Web site. Had to enter my email and pick a password, which I did. Nobody warned me that the password had to be 8 characters until I pressed the submit button. Then the new window popped up:

login

Just take a look and try to recreate the line of thinking of the developer of this piece of art:

“I need to let the user enter the password that’s at least 8 characters long. So I’ll hide in the bushes and will quietly wait till the user will make a mistake and enter a shorter password. Then I’ll chuckle: one more fell into my trap. Then I’ll add a cool Whoops message. The instructor in our vocational evening classes told us that the error messages should be shown in red. Makes sense. Let me google how to display the text in red. Got it. There is a Font tag with an attribute color. It was easy. Done.  It would be nice to add a counter to know how many people will enter a short password.  I hope it’ll be covered in the Advanced Programming class that I’m planning to take next year”.

Why some developers hate users so much? The prompt in the password field reads “Enter a password”. Why not add the helpful text prompting to enter at least 8 characters?

Maybe this developer was a rookie? And the QA engineer didn’t notice? And the manager never tried to sign up? And the site owner didn’t care?

It’s all about caring. If you care about your users, you’ll find a way to do it right.

And the biggest irony is that the name of this Web site is Skills Matter. Indeed. That’s why I’m not going to sign up for their services.

Update. Two days after writing this blog I decided to registered at the Vimeo video site. They were also hiding in the bushes with the same password length error. Is is something wrong with me? Am I being too picky?

vimeo