
Another update. Oops, they did it again. In RC.5 routing configuration has been changed. Will update this blog by the end of August of 2016.
This blog was updated on July 24, 2016.
Angular 2 framework (currently in RC.4) offers a simple way to implement client-side navigation for Single-Page Applications (SPA). The new component router (currently v.3.0.0-beta.2) allows you to configure routes, map them to the corresponding components, and arrange user’s navigation in a declarative way. While working on a routing chapter for our book “Angular 2 Development with TypeScript” I created a number of small applications illustrating various routing scenarios:
– Configuring routes in the root component
– Configuring routes in both root and child components
– Passing parameters to routes
– Using routing with both Hash- and History API-based strategies
– Using auxiliary (independent) routes
You can find these sample apps on Github where we host and update all code samples for the book (see the chapter3 folder). But in this blog I’ll do a high-level overview of Angular 2 routing and will show you a basic working example where the routing is configured in the root component of the application.
When you visit any Web page the location bar of your browser shows a URL (see, you already learned something new!). The URL consists of a protocol, domain name, port, and in case of GET requests may have parameters after the question mark:
http://mysite.com:8080/auction?someParam=123
If you change any character in the above URL and press Enter, this will result in sending a request to the server and page refresh, which is not what we want in SPA. In SPA, we want to be able to change a URL fragment that won’t result in the server request, but would update a portion of the Web page based on the JavaScript code that is already loaded to the browser.
Many years ago browsers started supporting a hash-sign (#) in the URLs, for example:
http://mysite.com:8080#/products/page/3
Any modifications to the right of the hash tag don’t trigger requests to the server, hence we can map these fragments to the client-side component to be rendered in the designated area of the Web page (in Angular 2 it’s identified by the tags <router-outlet></router-outlet>).
Then browsers started implementing HTML5 APIs, which includes History API that allows programmatically support the Back and Forward buttons as well as modify a URL fragment using the pushState() method. The history of all user’s navigations would be
stored on the client.
Angular 2 supports both location strategies using its classes HashLocationStrategy or PathLocationStrategy sparing you from adding the hash sign to the URL or calling pushState(). You just need to choose which strategy to use. I prefer hash-based navigation because a) it’s supported by all the browsers and b) History API-based navigation is unstable at this point.
Now let’s get familiar with the main players of Angular 2 navigation:
* Router – an object that represents the router during the runtime. You can use its methods navigate() or navigateByUrl() to navigate to a route either by the configured route path or by the URL segment respectively.
* RouterOutlet – a directive that serves as a placeholder within your Web page where the router should render the component
* provideRouter – maps URLs to components to be rendered inside the tag <router-outlet>
* RouterLink – a directive to declare a link to a route if the navigation is done using the HTML anchor tags. The RouterLink may contain parameters to be passed to the route’s component
* ActivatedRoute – an object that represents the route(s) that’s currently active
You configure routes for your app in a separate object of type RouterConfig and pass this object to the bootstrap() function. Router configuration is not done on the component level.
In a typical scenario, you’ll be implementing navigation in your application by performing the following steps:
1. Configure your app routes to map the URL segments to the corresponding components and pass the configuration object to bootstrap() as an argument. If some of the components expect to receive input values, you can use route parameters.
2. Add the property directives: [ROUTE_DIRECTIVES] to the @Component annotation. This will allow you to use the custom tag <router-outlet>, a property routerLink et al.
3. Define the viewport where the router will render components using the <router-outlet> tag.
4. Add the HTML anchor tags with bounded [routerLink] properties (square brackets denote property binding), so when the user clicks on the link the router will render the corresponding component. Think of a routerLink as a client-side replacement for the href attribute of the HTML anchor tag.
NOTE: Invoking the router’s methods navigate() or navigateByUrl() is an alternative to using [routerLink] for navigating to a route.
Here’s an illustration of the above steps:
The function provideRoute() takes the routes configuration that represents two URL segments that may be appended to the base URL:
* The empty string in the path means that there’s no additional URL segment after the base URL (e.g. http://localhost:8080), and the application should display the HomeComponent in the outlet area.
* The product path represents the URL segment product (e.g. http://localhost:8080/product), and the application should display the ProductDetailComponent in the outlet.
Let’s illustrate these steps in a sample application. Say we want to create a RootComponent that has two links Home and Product Details at the top of the page. The application should render either HomeComponent or ProductDetailComponent depending on which link the user clicks. The HomeComponent will render the text “Home Component” on the red background, and the ProductDetailComponent will render “Product Detail Component” on cyan.
Initially the Web page should display the HomeComponent as shown below.

After the user clicks on the Product Details link the router should display the ProductDetailComponent as shown on the next screenshot. Note the hash portion in the URL:

The main goal of this exercise is to get familiar with the router, so our components will be very simple. Below is the code of HomeComponent:
import {Component} from 'angular2/core';

@Component({
    selector: 'home',
    template: '
<h1 class="home">Home Component</h1>
',
    styles: ['.home {background: red}'],
})
export class HomeComponent {}
The code of the ProductDetailComponent will look similar, but instead of red the property styles will define the cyan background:
import {Component} from 'angular2/core';

@Component({
    selector: 'product',
    template: '
<h1 class="product">Product Detail Component</h1>
',
    styles: ['.product {background: cyan}']
})
export class ProductDetailComponent {}
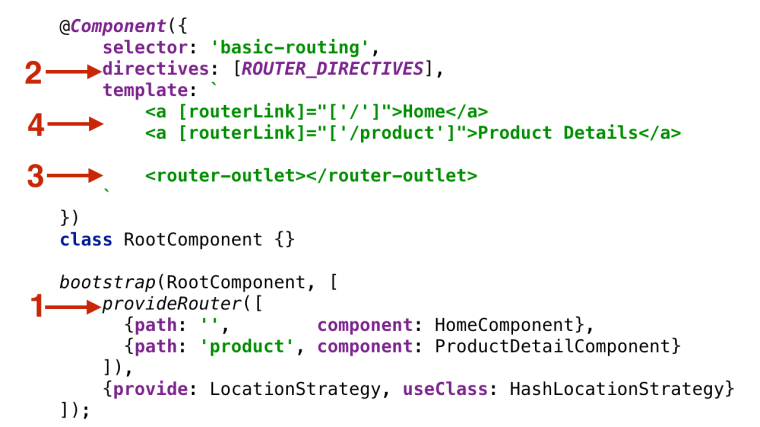
The [RootComponent] will define the routing of this application, and its code is shown next.
import {bootstrap} from '@angular/platform-browser-dynamic';
import {Component} from '@angular/core';
import {LocationStrategy, HashLocationStrategy} from '@angular/common';
import {provideRouter, ROUTER_DIRECTIVES, RouterConfig} from '@angular/router'; // 1

import {HomeComponent} from './components/home';
import {ProductDetailComponent} from './components/product';

@Component({
    selector: 'basic-routing',
    directives: [ROUTER_DIRECTIVES], // 2
    template: `
        <a [routerLink]="['/']">Home</a> // 3
        <a [routerLink]="['/product']">Product Details</a>
        <router-outlet></router-outlet> // 4
    `
})
class RootComponent {}

RouterConfig

bootstrap(RootComponent, [
    provideRouter([ // 5
      {path: '',        component: HomeComponent},
      {path: 'product', component: ProductDetailComponent}
    ]),
    {provide: LocationStrategy, useClass: HashLocationStrategy} // 6
]);
1. First we import all navigation-related directives and classes from @angular/router and @angular/common.
2. Since this component uses router directives we include ROUTER_DIRECTIVES in the annotation @Component.
3. Binding routerLink to routes (see callnote 5) using their paths / and /product.
4. The tag <router-outlet> specifies the area on the page where the router will render one of our components.
5. We’ve configured routes here. The empty URL segment represents the base URL.
6. During the application bootstrap we specify dependencies of the RootComponent in the square brackets.
In the above example we use HashLocationStrategy, which means if we configure the router with the URL segment product, Angular will add /#/product. The browser will treat the segment after the hash sign as an identifier of a specific segment of the Web page.
Note the use of brackets in the <a< tags. The square brackets around routerLink denote property binding, while brackets on the right represent an array with one element (e.g. [‘/’]). We’ll show you examples of array with two or more elements later in this chapter. The second anchor tag has the property routerLink bound to the route named ProductDetail.
In the above example HomeComponent is mapped to the path containing an empty string, which implicitly makes it a default route.
Here we’ve configured routes in the object and passed it as an argument to the provideRouter() function. The value in the routerLink will be matched with the configured path. In our case the <router-outlet> represents the area below the anchors.
The structure of the object that you can pass to provideRouter() is defined in the interface RouteConfig, which is an array of objects implementing the interface Route shown below (the question marks mean that the respective property is optional):
export interface Route {
    path?: string;
    pathMatch?: 'full' | 'prefix';
    component?: Type | string;
    redirectTo?: string;
    outlet?: string;
    canActivate?: any[];
    canDeactivate?: any[];
    data?: Data;
    resolve?: ResolveData;
    children?: Route[];
}
NOTE: Make sure that the file package.json includes “@angular/router”: “3.0.0-beta.2” in its dependencies section.
Handling 404 errors
If the user will enter a non-existing URL in your application, the router won’t be able to find the matching route and will print the error message on the browser’s console leaving wondering why not any navigation is happening. Consider creating an application component that will be displayed whenever the application can’t find the matching component.
For example, you can create a component named _404Component and configure it with the wild card path **:
provideRouter([
{path: '', component: HomeComponent},
{path: 'product', component: ProductDetailComponent},
{path: '**', component: _404Component}
])
Now, whenever the router can’t match the URL to any component, it’ll render the content of your _404Component instead. The wild card route configuration has to be the last element in the array given to provideRouter(). The router always treats the wild card route as a match and any routes listed after the wild card’s one won’t even be considered.
That’s all for now. Stay tuned for more Angular 2 blogs. My other Angular-related blogs are here. Our next public online Angular 2 workshop starts on September 11, 2016.

You forgot to use and in your code sample template.
And you talk about instead of in point 3.
Thanks for your posts, hope next ‘ng2 with typescript’ chapters will arrive soon 🙂
Thank you for noticing. I didn’t forget – if you open the source code in plunker – they are there. WordPress removed these tags from the text somehow. Will fix it.
Manning will post two more chapters in November and then another two in December.
Yakov, maybe you should create a TypeScript User Group (but they did have some TS presentation in Microsoft ones). There is a total absence of these. We do need to have a better version of JavaScript, OO and with more features… I think, even after ES6 it will be true.
>NOTE: In versions prior to Alpha 46 you could manually crete an instance of the route in the @RouteConfig >section, e.g. new Route({path: ‘/’, component: HomeComponent, as: ‘Home’}). This syntax will generate an >error starting from Aplha 46.
that is my problem now. How can I fix it? I removed the “as: ‘Home'” from the routes but now I get the error: Component “MyDemoApp” has no route named “Home”.
Had similar problem with beta-0 today using -> component: HomeComponent, name: ‘Home’ <-
In my case I tried to put your newer plunker files inside of an existing Angular 2 environment, which already had a "bootstrap" on my "main.ts" home page.
I'm trying to embed components that load their own router parameters…
Any help on this would be most grateful 🙂
Updated the plunk to run with beta.0
Updated the code and the plunk to run in Alpha 52 (routerLink instead of router-link and imports for Component and bootstrap).
Thanks for the post Yakov. Very helpful! One area that is a problem for me is how to handle redirect uris which PingFederate as OAuth 2.0 provider will use to redirect the browser to a route in my app. The problem is that Ping uses fragment components to store the access token, etc. For that reason they don’t allow me to configure a redirect uri for a particular client with a fragment already present. So I am using the default PathLocationStrategy, but I notice the # fragment is removed when my route is rendered. Any ideas?
Is your issue related to this bug? https://github.com/angular/angular/issues/6595
Try using HashLocationStrategy.
“Many years ago browsers started supporting a hash-sign (#) in the URLs, …”
Actually fragments go way back. Originally, the idea was that, after displaying the page, the browser would scan for an <a tag with a name= attribute that matches the frag (without #). I think that still works, but of course things have changed so much. Here's an RFC from 1995 that describes them.
https://tools.ietf.org/html/rfc1808
"hash tag" – I think a hash tag is a Twitter thing. These are called Hashes or Fragments.