
In Angular 2 a parent component can pass the data to its child via binding to the child’s input parameter marked with the annotation @Input(). I’ll blog about it later, but you can see how it can be done in my blog on implementing the Mediator design pattern.
In this blog I’ll show you another scenario when the parent component simply needs to use the API exposed by the child. You’ll see how a parent component can use the child’s API from both the template and the TypeScript code.
Let’s create a simple application where a child component has the method greet() that will be invoked by the parent. Our Child component will look like this:
@Component({
    selector: 'child',
    template: `<h3>Child</h3>`

})
class Child {
    greet(name) {
        console.log(`Hello from ${name}.`);
    }
}
To illustrate different techniques of calling the child’s API, the parent will use two instances of the same child component.
<child #child1></child>
<child #child2></child>
Here use local template variables that are used to for getting a reference to DOM object that represents an HTML component in the browser’s window. The names of local template variables must start with the hash sign.
To access the first child component from the TypeScript code, the parent component App will declare a variable of type Child annotated with `@ViewChild`. This annotation is provided by Angular for getting a reference to child components. This code will also invoke the method greet() declared in the Child component:
@ViewChild('child1')
firstChild: Child;
  // invoke the child's API
this.firstChild.greet('Child 1');
The second child will be accessed not from the code, but from the parent’s template as simple as this:
<button (click)="child2.greet('Child 2')">Invoke greet() on child 2</button>
The entire code of the application that uses both techniques is shown below.
import {bootstrap} from 'angular2/platform/browser';
import {Component, ViewChild, AfterViewInit} from 'angular2/core';

@Component({
    selector: 'child',
    template: `<h3>Child</h3>`

})
class Child {
    greet(name) {
        console.log(`Hello from ${name}.`);
    }
}

@Component({
    selector: 'app',
    directives: [Child],
    template: `
    <h1>Parent</h1>
    <child #child1></child>
    <child #child2></child>

    <button (click)="child2.greet('Child 2')">Invoke greet() on child 2</button>
  `
})
class App implements AfterViewInit {
    @ViewChild('child1')
    firstChild: Child;

    ngAfterViewInit() {
        this.firstChild.greet('Child 1');
    }
}

bootstrap(App);
If you’ll run this application in the browser with Developer Panel open, it’ll immediately invoke the method greet() on the first child and will print the greeting on the console. This is an illustration of using of the child’s API from the TypeScript code. If you click on the button, the method greet() will be invoked on the second child, which is an illustration of the using child’s API from the template. The browser’s window will look as follows:
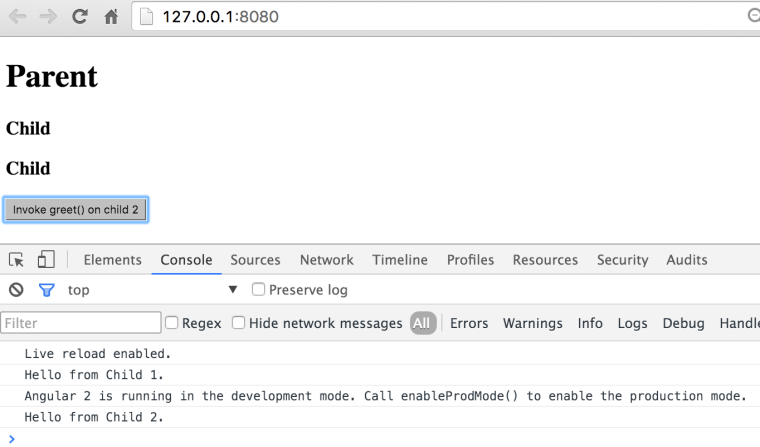
Note that in the above example I used the parent’s component lifecycle hook ngAfterViewInit() for invoking the API on the first child. The child’s greet() method doesn’t change its UI and simply prints the message on the console. But if you’d try to change the UI from greet() Angular would throw an exception that the UI is changed after ngAfterViewInit() was fired. The reason being that this hook is called in the same event loop for both parent and child components, and Angular by default runs in the development mode which does an additional change detection run to check the bindings, and it wouldn’t like the fact that UI has changed again on the same event.
There are two ways to deal with this issue:
1. either run the application in the production mode – invoke enableProdMode() before the bootstrap() – so Angular won’t do the additional bindings check
2. Use setTimeout() for the code updating UI to run it in the next event loop.
If you’re interesting in learning Angular 2, consider enrolling into one of our training classes. The current schedule is published here.

Yakov, how can Angular2 program use 3rd party (component) library, lets say DataGrid from SlickGrid or D3 chart? Do these JS libraries have to be rewritten for TypeScript or use Typings, so we need to wait until it is done (for complex Ang2 apps) ?
The short answer is yes.
See if there is a d.ts file for the library you need by using Typings. If yes simply instal it and use the library’s API from typescript. For example, here’s the d3.d.ts: https://github.com/DefinitelyTyped/DefinitelyTyped/blob/master/d3/d3.d.ts
and this is the file for slickgrid: https://github.com/DefinitelyTyped/DefinitelyTyped/blob/master/slickgrid/SlickGrid.d.ts
If you can’t fine type definition file, see if you can create a d.ts file on your own.
You can also follow the path described here: https://www.thepolyglotdeveloper.com/2016/01/include-external-javascript-libraries-in-an-angular-2-typescript-project/
Hey, thanks!
Was reading about the @ViewChild decorator in the Angular tutorial and didn’t find how to reference more than one child template within the parent controller. (see https://angular.io/docs/ts/latest/cookbook/component-communication.html#!#parent-to-view-child).
Your post saved me with this @ViewChild(‘child1’) @ViewChild(‘child2’). Saved me a lot of time. Thanks!
Thank you for such simple and straight to the point tutorial!