How to use Facebook

During the last year or so, Facebook is censoring its users. For example, before the US presidential elections, they blocked a respected newspaper New York Post for publishing the info about the Hunter Biden investigation. Now that the elections are over, his father is a president, you can write about Hunter again

Another example: Facebook was blocking posts suggesting that COVID-19 might have been leaked from the Wuhan lab. Now, when Dr Fauci is being fried for trying to conceal certain information about the gain of function experiments, Facebook allows you to write posts about the possible lab leak. By the way, have you seen any apologies from Mr. Zuckerberg for blocking lots of users for this? Me neither.

Earlier this year, Mark Zuckerberg announced that Facebook’s mission is “Bringing the world together“.  In the same video, he states that Facebook wants to change the “social fabric of the world”. How? I guess, according to the vision of Mr. Zuckerberg. 


He also stated that in a number of countries Facebook is already in the top 10% of all brands.  In some – in the top three. Facebook becomes a superpower.

Add to this Facebook’s push to group people around the world based on what Mr. Zuckerberg believes is right. They call such groups communities. If initially, Facebook was simply allowing to bring together family members and friends, now Facebook will help you to join “supportive communities that share value and help you grow…which is important in helping to rebuild the social fabric in our country and around the world” .

Keep watching the video and you’ll learn that we often discuss what a government can or can not do, but the real power should belong to healthy communities. What’s healthy? Mr. Zuckerberg will let you know. Just you wait. 

If everything goes as planned, the majority of the users will obediently click on Facebook’s recommendations and join the “healthy communities” with the “right values”. The “unhealthy communities” won’t pop up in recommendations, so the majority of Facebook users (read the majority of the world population) won’t even know they exist.

Does it mean that I suggest to stop using Facebook?  Not at all!  This is a well-designed platform where you communicate with people you like, play games, and buy things. What’s important is that you should absolutely ignore all Facebook recommendations regarding joining communities. I’m not against communities but join a community if it’s recommended by a real friend (not a Facebook one) or you just feel a need to be a part of a certain group of people.  

Also, don’t trust any social or political recommendations by Facebook (regardless of your political views), whose goals are never the same as yours. As Mr. Zuckerberg cynically put it, “That may be good for the world, but it’s not good for us”.

Always commit your yarn.lock file into the source code repo

I use the Yarn package manager for all my Angular projects. Besides being faster than npm, yarn creates a file yarn.lock that stores the exact versions of installed dependencies. Last year, I wrote about a specific use case that caused a breaking change during one of my Angular workshops.

Yesterday, I had to create a new project using Angular CLI. The project was successfully generated and started with ng serve. Then, I wanted to create a production build with ng build –prod, but the build failed with the error Cannot find module ‘uglifyjs-webpack-plugin’. I know that Webpack uses UglifyJS for optimizing sizes of the bundles, which is great, but my production build fails, which is not great at all.

The generated package.json file located in the root of my project has no direct dependency on uglifyjs-webpack-plugin, but there is one deep inside node_modules in one of the thousand (literally) dependencies used in Angular CLI projects.

To make the long story short, the WebPack team pushed to npmjs.org the new version 1.1.7 this plugin, which was empty. The Angular team got in touch with them, and an hour later, the fixed version 1.1.8 of the Webpack UglifyJS plugin was pushed to the npm central repo.

My project already had the yarn.lock file with an erroneous version of this plugin. I deleted it and ran yarn install again. This time it picked up the fixed 1.1.8 version and the ng build –prod command started working again. Thank you, the Webpack team for the quick turnaround! Happy end!

This was a specific issue with the newly generated project created at the “wrong time”. But imagine a team working on a project for some time, and their github repo didn’t include the yarn.lock file that stored the reference to the working version 1.1.6 of that plugin, and Mary (the QA engineer) decided to make a production build. A minute later, the entire team got an email titled “Who broke the build?”

The bottom line: Push the yarn.lock of the project that works and builds correctly into your version control system to ensure that the entire team has a reproducible and working build. This way, your project won’t depend on someone from across the globe submitting erroneous packages to the npmjs.org.

P.S. While npm 5 also creates the file package-lock.json with the registry of all installed dependencies, it doesn’t guarantee that each npm install will install exact versions of the packages listed there.

Wrapping a RxJS observable stream into an Angular service

Angular’s dependency injection mechanism allows us to cleanly separate business logic (services) from UI (components). What if our app generates a stream of values and we want to implement it as an injectable service? In this blog, I’ll create an injectable service that emits a stream of values and a UI component subscribes to this stream displaying its values in real time.

In one of my RxJS blogs  I showed you how to use the method Observable.create() providing an observer as an argument. Let’s create a service with a method that will take an observer as an argument and will emit the current time every second.

import {Observable} from 'rxjs/Observable';

export class ObservableService{

  createObservableService(): Observable<Date>{  // 1

      return new Observable(  // 2
          observer => {   // 3
              setInterval(() =>
                  observer.next(new Date())  // 4
              , 1000);
          }
      );
  }
}

1. Return an observable stream of dates
2. Create an observable
2. Provide an observer
4. Emit the new date every second

In this service, we create an instance of the RxJS Observable object, assuming that the subscriber will provide an Observer that knows what to do with the emitted data. Whenever the observable invokes the method next(new Date()) on the observer, the subscriber will receive the current date and time. Our data stream never throws an error and never completes.

We’ll inject the ObservableService into the AppComponent, which invokes the method createObservableService() and subscribes to its stream of values, creating an observer that knows what to do with the data. The observer just assigns the received time to the variable currentTime which renders the time on UI.

import 'rxjs/add/operator/map';
import {Component} from "@angular/core";
import {ObservableService} from "./observable.service";

@Component({
  selector: 'app-root',
  providers: [ ObservableService ],
  template: `<h1>Custom observable service</h1>
       Current time: {{currentTime | date: 'mediumTime'}}  // 1
  `})
export class AppComponent {

  currentTime: Date;

  constructor(private observableService: ObservableService) { // 2

    this.observableService.createObservableService()  // 3
      .subscribe( data => this.currentTime = data );  // 4
  }
}

1. Display the time using the date pipe
2. Inject the service that wraps the observable
3. Create the observable and start emitting dates
4. Subscribe to the stream of dates

This app doesn’t use any servers, and you can see it in action in the great Stackblitz online IDE  here.

In the browser’s window, the current time will be updated every second. You use DatePipe here with the format ‘mediumTime’, which displays only hours, minutes, and seconds (all date formats are described in the DatePipe documentation).

This simple example demonstrates a basic technique for wrapping any application logic in an observable stream and subscribing to it. In this case, we use setInterval(), but you could replace it with any application-specific code that generates one or more values and sends them as a stream.

Don’t forget about error handling and completing the stream if need be. The following code snippet shows a sample observable that sends one element to the observer, may throw an error and tells the observer that the streaming is complete:

return new Observable(
    observer => {
      try {
        observer.next('Hello from observable');

        //throw ("Got an error");

      } catch(err) {
         observer.error(err);
      } finally{
         observer.complete();
      }
    }
);

If you uncomment the line with a throw, observer.error() is invoked, which results in the invocation of the error handler on the subscriber if there is one.

The data producer for our observable stream was generating date/time but it could be any app code that generates some useful values, e.g. a WebSocket server generating stock quotes, auction bids, actions of online game players, etc. During my workshops, I show a sample online auction app that has a Node server emulating users’ bids on products. That server uses a WebSocket connection to push new bids for products to all users that are interested in receiving them.

RxJS offers WebSocketSubject – a ready-to-use wrapper around the browser’s WebSocket. It accepts either a string with the WebSocket endpoint or a WebSocketSubjectConfig
On subscribe, it uses either an existing connection or creates a new one; on unsubscribe, it closes the connection if there are no other subscribers. In the second edition of our Angular book, we use WebSocketSubject in the sample app ngAuction.

My books

Books that I authored or co-authored

0. TypeScript Quickly, Manning Publications, 2019
1. Angular Development with TypeScript, Second Edition, Manning Publications, 2018
2. Angular 2 Development with TypeScript, Manning Publications, 2016
3. Java Programming, 24-Hour Training, 2nd edition, Wiley, 2015
4. Java Programming for Kids, Self-Published e-book, 2015, Free Download
5. Enterprise Web Development: From Desktop to Mobile“, O’Reilly, 2014.
6. Java Programming. 24-Hour Training, 1st edition, Wiley, 2011
7. Enterprise Development with Flex, O’Reilly, 2010
8. Enterprise Development Without the BS, Self-Published, 2008, Free Download”
9. Rich Internet Applications with Flex and Java, Sys-Con Books, 2007
10. Java 2. Enterprise Edition 1.4 Bible, Wiley, 2003
11. Java Tutorial for the Real World Self-Published, 2002

Back to blog

RxJS Essentials. Part 2: map, filter, reduce

In the previous article, I introduced the main players or RxJS, and now let’s start getting familiar with RxJS operators. In this article well use the operators map(), filter(), and reduce().

As the data elements flow from the observable to the observer, you can apply one or more operators, transforming each element prior to supplying it to the observer. Each operator takes an observable as an input, performs its action, and returns a new observable as an output:

Since each operator takes an observable in and creates an observable as its output, operators can be chained so each observable element can go through several transformations prior to being handed to the observer.

RxJS offers about a hundred of various operators, and their documentation may not always be easy to understand. On the positive side, the documentation often illustrates operators with so called marble diagrams. You can get familiar with the syntax of marble diagrams here.

The map() operator

The map() operator transforms one value to another. It takes a given value from the observable stream and applies the provided transforming function to it.

The marble diagram below is taken from the RxJS manual, and it illustrates the map() operator. This diagram shows the map() operator that takes a value of each incoming element and multiplies it by 10. The fat arrow function x => x*10 is the transforming function in this example.

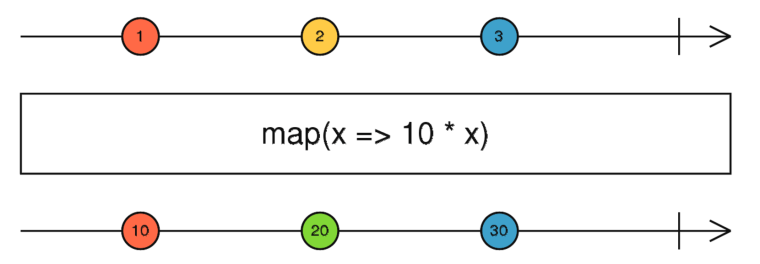
On top, a marble diagram shows the horizontal line with several shapes representing a stream of incoming observable elements. Then goes the illustration of what a particular operator does. At the bottom, you see another horizontal line depicting the outgoing observable stream after the operator has been applied. The vertical bar represents the end of the stream. When you look at the diagram, think of a time that’s moving from left to right. First, 1 was emitted, the time went by… and 2 was emitted, the time went by… and 3 was emitted, and then the stream ended.

The filter() operator

Now let’s get familiar with the marble diagram of the filter() operator shown next.

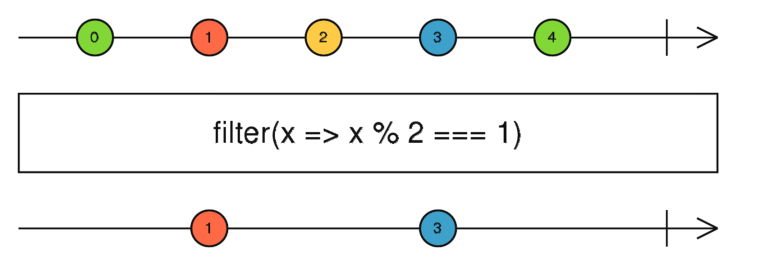
The filter() operator takes a function predicate as an argument, which returns true if the emitted value meets the criteria, or false otherwise. Only the values that meet the criteria will make it to the observer. This particular diagram uses the fat arrow function that checks if the current element is an odd number. The even numbers won’t make it further down the chain to the observer.

The following code sample declares an array of beers and turns it into Observable using the Observable.from() function. Then it applies the filter() operator to pass only the beers that cost less than eight dollars, and the chained map() operator converts the beer object into a string.

let beers = [
    {name: "Stella", country: "Belgium", price: 9.50},
    {name: "Sam Adams", country: "USA", price: 8.50},
    {name: "Bud Light", country: "USA", price: 6.50},
    {name: "Brooklyn Lager", country: "USA", price: 8.00},
    {name: "Sapporo", country: "Japan", price: 7.50}
];

Rx.Observable.from(beers)   // <1>
  .filter(beer => beer.price < 8)   // <2>
  .map(beer => beer.name + ": $" + beer.price) // <3>
  .subscribe(    // <4>
      beer => console.log(beer),
      err => console.error(err),
      () => console.log("Streaming is over")
);

console.log("This is the last line of the script");

1. Turn the beers array into an Observable

2. Filter out the beers that are more expensive than eight dollars

3. Turn the object into a string showing the beer name the price

4. Subscribe to the Observable providing the Observer as three fat arrow functions

This program will print the following on the console:

Bud Light: $6.5
Sapporo: $7.5
Streaming is over
This is the last line of the script

To see it in action in CodePen, follow this link.

By default, the operator from() returns a synchronous observable, but if you want an asynchronous one, use a second argument specifying an async scheduler:

Rx.Observable.from(beers, Rx.Scheduler.async)

Making this change in the above code sample will print “This is the last line of the script” first and then will emit beers info.

Don’t include the entire RxJS library in your app

When you’ll be reviewing the code in CodePen, not that the HTML document imports the entire RxJS library as follows:

<script 
 src="https://unpkg.com/@reactivex/rxjs/dist/global/Rx.js">
</script>

This loads the entire RxJS library even though we only use the Observable, from(), filter(), and map(). Loading the entire library for demo purposes is OK, but in the real-world apps, we want to minimize the app size and load only the code we actually use. For example, in JavaScript or TypeScript apps we’d install RxJS locally and write something like this:

import 'rxjs/add/operator/map';
import {Observable} from "rxjs/Observable";

Including the entire RxJS add about 90KB (33KB gzipped) to your app that uses RxJS. The size of the future version RxJS 6 will be substantially smaller, but we recommend including only the classes and functions that you use for now.

NOTE. Starting from RxJS 5.5 you can (and should) use so-called pipeable operators, which are tree-shaking-friendly and simplify import statements, e.g.

import { debounceTime, map} from 'rxjs/operators';

Using this syntax also simplifies the tree-shaking process performed during app bundling with the tools like Webpack or Rollup.

The reduce() operator

Now we’d like to introduce the operator reduce() that allows you aggregate values emitted by an observable. The marble diagram of the reduce() operator is shown next. This diagram shows an observable that emitted 1, 3, and 5, and the reduce() operator added them up producing the accumulated value of 9.

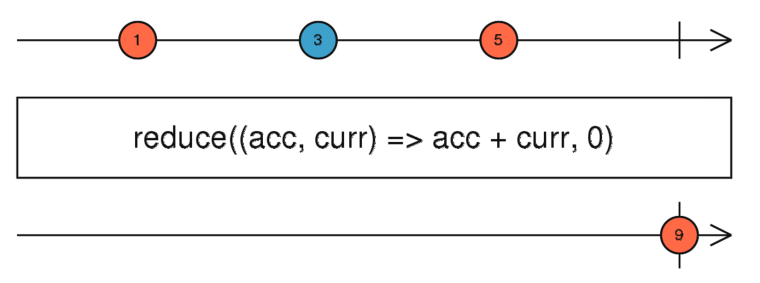
The operator reduce() has two arguments: an accumulator function where you specify how to aggregate the values, and the initial (seed) value to be used by the accumulator function. The above diagram uses zero was as an initial value, but if we’d change it to 10, the accumulated value would be 19.

As you see from the above diagram, the accumulator function also has two arguments:

* acc stores the currently accumulated value, which is available for each emitted element

* curr stores the currently emitted value.

The following code sample creates an observable for the beers array and applies two operators to each emitted element: map() and reduce(). The map() operator takes a beer object and extracts its price, and the reduce() operator adds the prices.

let beers = [
    {name: "Stella", country: "Belgium", price: 9.50},
    {name: "Sam Adams", country: "USA", price: 8.50},
    {name: "Bud Light", country: "USA", price: 6.50},
    {name: "Brooklyn Lager", country: "USA", price: 8.00},
    {name: "Sapporo", country: "Japan", price: 7.50}
];

Rx.Observable.from(beers) 
    .map(beer =>  beer.price)  // <1>
    .reduce( (total,price) => total + price, 0)  // <2>
    .subscribe(
        totalPrice => console.log(`Total price: ${totalPrice}`)  // <3>
);

1. Transform the beer object into its price
2. Sum up the prices
3. Print the total price of all beers

Running this script will produce the following output:

Total price: 40

In this script, we were adding all prices, but you could apply any other calculation to create a different aggregate value, e.g. to calculate an average or maximum price.

The reduce() operator emits the aggregated result when the observable completes. In the above example, it happened naturally, because we created an observable from an array with a finite number of elements. In other scenarios, you’d need to invoke the method complete() on the observer explicitly, and you’ll see how to do it in the next article of this series.

To see this example running in CodePen follow this link.

Code samples from this article were turning the array into an observable and were magically pushing the array’s elements to the observer. In the next article, I’ll show you how to push elements by invoking the next() function on the observer.

If you have an account at O’Reilly’s safaribooksonline.com, you can watch my video course “RxJS Essentials” there.

Migrating your apps from AngularJS to Angular

So you have an Angular JS in prod and you want to migrate it to the latest version of Angular. The first question to answer is why? While talking to our clients, I’ve heard the following answers:

– We have a large app and it has issues with performance.
– Our company is moving to Angular/TypeScript and we want all apps to use these technologies.
– We need to improve performance of our AngularJS app
– Since all new apps will be written in Angular, it’s going to become hard to support apps written in two different languages and frameworks. The pool of developers who can/want write in AngularJS will be shrinking.

Any of the above answers sounds reasonable. But think about it for a moment. You have a working app with a certain functionality. After spending X amount of dollars your end users will get an app with the same functionality. Does it worth the trouble? Let’s say it does and the budget for the migration is approved.

Two approaches for migration

There are a couple of approaches to the AngularJS-Angular migration process.

1. Rewrite the app from scratch.

IMO, this is the best approach if your circumstances permit. A complete re-write can be the most cost-effective strategy. If you’re a manager, put your team through Angular training (live, online, videos, books). Allocate time and budget for getting your developers up to speed with Angular as the learning curve is steep and prior experience with AngularJS is not overly helpful. Then your developers will write the new version of the app as per best practices recommended for Angular/TypeScript projects. Ideally, your team should include a developer who has at least one year of practical development in Angular. If you don’t already have such a developer, hire one. He should be both a developer and a mentor.

But a complete rewrite may not be an option. Your existing (small-to-midsize) AngularJS app is in prod, works well, and the end users keep asking for new features that have to be released in prod on a regular basis. This means that you can’t just stop developing in AngularJS, and spending several months doing greenfield development is not an option.

You can’t do a complete rewrite if an existing app is large (think hundreds of views). In this case, a rewrite could take a couple of years.

2. Gradual migration

If you decide to go this route, start with reading the document titled “Upgrading from AngularJS“. It’s a well-written document, but you need to understand that it’s about migration from AngularJS to a completely different framework. Don’t be tricked by the statements like “Angular is a reimagined version of the best parts of AngularJS”. Angular is a different framework with different architecture and principles of building apps.

TypeScript, being a superset of JavaScript, requires some investment in learning too. But TypeScript is your friend. The learning curve for any JavaScript/Java/Python/C# developer is not steep, the tooling is great, optional static types make the transition from JavaScript easy plus you’ll get a great help from IDEs (autocomplete and compilation errors). In no time, you’ll see how your productivity is increased compared to writing in JavaScript.

Some die-hard JavaScript experts may continue bad-mouthing TypeScript, but be pragmatic. TypeScript allows making developers of any skill level (not just the superstars) more productive. Don’t trust me? A recent StackOverFlow survey nominated TypeScript as a third most loved language.

Plan your migration

You need to come up with a plan for your migration project. The plan will depend on how your current AngularJS app was written. While the Angular’s migration guide mentioned above recommends preparing your AngularJS app to have one component per file (see Rule 1 in the migration guide) and use module loaders, the chances are slim that your existing AngularJS app followed this rule. Refactoring your AngularJS app just to follow this rule is a project on its own; it may be costly and your refactored app would require additional testing and bug fixing.

The Angular migration guide explains how the AngularJS app should use component directives to simplify migration to Angular. Once again, changing your existing app to follow these guidelines is yet another project.

Depending on the production release schedule of the existing AngularJS app, you can pick one of two approaches for the migration:

– Feature by feature
– Route by route

When you migrate feature by feature, identify a group of component and services implementing this feature in the new Angular code.

Migrating route by route would also require a similar activity, but you’d need to pick a route and identify which components and services would need to be there. The route by route strategy works well if the views of your app are relatively simple and don’t use complex custom components.

If your AngularJS app has complex UI components, you may need to convert them first.

Running Angular and AngularJS side by side

The next step is to learn how the ngUpgrade and UpgradeModule work. The UpgradeModule serves as a bridge between the Angular and AngularJS parts of your app.

No matter how you’ll approach the migration, for some period of time your app will include two frameworks: AngularJS and Angular. When our company is involved with migration projects, we start with creating an Angular app that just bootstraps the existing AngularJS app as is with the help of the UpgradeModule.

With the UpgradeModule, you’ll run a hybrid app that’ll have two parts – one part will include Angular framework, and another – AngularJS. The components and services from the Angular part will communicate with their counterparts from the part written in AngularJS. Read the Angular migration guide about the differences in Dependency Injection (DI), change detection, and working with DOM.

While Angular DI is more flexible and allows either having services as singletons for the entire app or a specific component branch, in AngularJS services are always app-level singletons. This is not a big deal as in a typical Angular app we use app-level singletons anyway. In particular, you can use a singleton and DI for storing the state of the hybrid app. During the migration, you need to identify which services will be injected from Angular to AngularJS and those that will be injected in the opposite direction.

Components of both frameworks need to communicate with each other. If you’re not familiar with how to arrange a loosely-coupled component communication in Angular using injectable services, watch my video on the subject.

While running a mixed Angular/AngularJS app, the Angular framework will be responsible for triggering change detection of the entire app. Angular includes a library zone.js that serves as an execution context for all asynchronous processes of the app. On any change that may need to update a UI, it makes a single pass through the entire component tree and triggers the UI updates. There is no need to invoke $scope.$apply() as it’s done in AngularJS. In a hybrid app, on any async change that would start Angular change detection, the UpgradeModule will invoke $rootScope.$apply() in your AngularJS code.

Finally, roll-up your sleeves, start reading the AngularJS code and gradually implement it in Angular.

Automating deployment

Don’t forget about re-thinking your deployment process. Most likely you have an automated deployment implemented using Gulp or Grunt. In Angular apps most of the features that we had to manually configure in AngularJS are provided by the tool called Angular CLI. We wrap Angular CLI commands into npm scripts and add Gulp tasks if need be. It takes only several lines of code in npm scripts to build the bundles for deployment in Angular. In this video I show how to write a script that will build the Angular bundles and deploy them under a Java Spring server. If I wanted to gzip the files before deployment, I could have added one more line like `“postbuild:prod”: “gulp –gulpfile compress.js”` that invokes my script that uses the Gulp plugin for compression.

Good luck with your migration projects!

My presentations and workshops


This is a list of presentations and workshops that Yakov Fain offers. If you’d like to invite Yakov to deliver these talks/workshops at your organization, please send an email at training@faratasystems.com. To get familiar with Yakov’s teaching style, watch his Youtube Java tutorial.

Presentations

Modern JavaScript – 70 min

In this presentation, you’ll learn how to write code using the latest syntax of JavaScript. While most of the apps use the ES5 version of the language, majority of the modern web browsers fully support the ES6 specification. Some of them started supporting the ES7 and ES8 syntax. In this presentation you’ll learn how to use classes, fat arrow functions, destructuring, spread and rest operators, promises, async-await, and modules.

Mastering TypeScript – 90 min

In this presentation, you’ll learn how to write code in TypeScript, one of the most loved languages today.TypeScript is a superset of JavaScript, which allows you to be more productive in writing JavaScript applications. Per StackOverflow developers survey TypeScript is the 3rd place in the most loved languages and 5th in most wanted. The syntax of this language is pretty easy to pick up for anyone who’s familiar with such object-oriented languages as Java or C#. During this presentation, you’ll learn the syntax of TypeScript and will understand the benefits it brings to the table.

Angular Tooling – 90 min

Learning Angular is easier than AngularJS, and developing in TypeScript is more productive than in JavaScript. But you need to know your tools to create, bundle, and deploy your app.This presentation is not about the Angular syntax. We’ll discuss the development process with Angular starting from setting up the project to deploying an optimized application. Most part of this presentation is about using Angular CLI. We’ll start with generating a new project, and then discuss such subjects as configuring proxies, working with environment variables, automating builds with npm scripts, and more.

Communication with the server via HTTP and WebSocket protocols in Angular – 90 min

In this session, you’ll see how to create an Angular 4 app that can communicate with the servers via a pull (HTTP) and push (WebSocket) modes. We’ll program a simple Node server and then will go through a number of code samples that communicate with it using HTTP and WebSocket protocols. We’ll start with creating a simple NodeJS server, and then will enable it to handle HTTP requests from an Angular app. Then you’ll see how to wrap a service into an observable stream. Finally, we’ll teach our server to perform a data push to an Angular client using the WebSocket protocol.

Angular for Java developers – 90 min

Angular is a complete re-write of the super popular Web framework AngularJS. Angular is a component-based framework that will have an effect in JavaScript community similar to what Spring framework did for Java. This presentation is a high-level overview of Angular, which in combination with TypeScript, finally made Web development understandable for Java developers. At the end of the presentation, you’ll see how to deploy Angular app can communicate with the Spring Boot backend.

Make a facelift to your Angular app with UI libraries – 90 min

In this presentation, you’ll see how to create a nice looking UI with Angular Material 2 and PrimeNG components.Commercial applications need to be good looking, which means that you should pick up a rich library of UI components for your app. While Angular Material 2 library offers two dozen of great looking components, this may not be enough for your application needs. The good news is that there are other libraries that you can use. In this presentation, we’ll start with an overview of Angular Material 2 components. Then we’ll proceed with another open-source library called PrimeNG, which offers more than 70 UI components.

Implementing inter-component communication in Angular – 90 min

Angular is a component-based framework with a well-defined API for passing data to and getting data from a component. Any application is a tree of components that often need to communicate with each other. You’ll see how to create reusable application components that can exchange data with each other in a loosely-coupled manner. You’ll see how components can communicate via a common parent or via an injectable service. You’ll see how to pass data using the router, input and output parameters, events and callbacks. You’ll also learn how to use projection to pass HTML fragments to a component’s template. You’ll see how to pass parameters to routes. We’ll also touch upon the incorporation of the third-party JavaScript libraries into an Angular 4 app.

Working with the Angular router – 90 min

The Angular framework includes a powerful component router. In this session, you’ll see how to use the router that comes with Angular 4. We’ll start with configuring the navigation in a simple app. Then you’ll see how to pass data to routes, work child routes, and create apps with multiple router outlets (auxiliary routes). We’ll also review a unit-test configuration for testing the app router. Finally, you’ll see how to lazy load modules using the router.

Using Observable Streams in Angular – 90 min

Angular includes RxJS, which is a library of reactive extensions built on the premise that everything is an observable stream. Angular includes RxJS, which is a library of reactive extensions built on the premise that everything is an observable stream. Observables introduce the push model to your application. First, we’ll get familiar with the RxJS library, and then will continue reviewing observables in Angular.You’ll see how observables are used to handle events, forms, the router, and HTTP requests. We’ll talk about using subjects, implementing the mediator design pattern, and more.

RxJS essentials – 90 min

Libraries of reactive extensions exist in many programming languages. RxJS 5 is a popular library of reactive extensions for JavaScript. This library is used for transforming and composing streams of data. RxJS promotes the push model where the data flow through the algorithms of your application. RxJS is not a framework and can be used in any JavaScript app. Using RxJS allows writing certain portions of your app by composing functions where you see fit. You’ll learn how to create observable data streams, what are the roles of observers and subscribers, how to apply and compose operators to process the data emitted by observables, how to compose multiple data streams and more.

Reactive thinking with RxJava2 – 70 min

This presentation is about asynchronous programming in Java, where the streams of data are handled in a non-blocking fashion. We’ll talk about Reactive Streams and specifically about the RxJava2 library that may change the way you design Java applications. You’ll see how to consume streams of events, deal with backpressure, and apply a variety of operators offered by this library, which requires a different way of thinking about writing code.

JHipster: Bringing together Angular and Spring Boot – 70 min

JHipster is a popular open-source code generator that automates creation and configuration of a Web project that uses the Angular framework on the front and Java Spring Boot on the back. We’ll start with a simple example where an Angular app consumes the REST service from Spring Boot. Then we’ll proceed with an intro to JHipster followed by the generation of a new Angular/Spring Boot app from scratch. This will be a CRUD app of the following architecture: a gateway (the front end), a microservice (the back end), and a service discovery server.

Hands-on workshops

Developing Web apps with Angular and TypeScript – 3 days

Participants of this workshop will gain practical skills while exploring the best practices and principles of developing Angular applications and get familiar with multiple sample applications illustrating solutions for real-world challenges. During this course, we’ll cover all the latest APIs (routing, dependency injection, forms). At the end of each day, the participants will spend an hour working on the front end of a sample application “Online Auction”.

Angular Material 2 Applied – 1 day

This hands-on workshop is for developers who are already familiar with Angular. Under the instructor’s guidance, participants will work on the front end of the online store application, which uses Angular and the library of UI components Angular Material 2. By the end of the day, each participant will develop an online store with a shopping cart the will look and work like this one. This workshop assumes participants are already familiar with Angular. This workshop is NOT an Angular intro.


BIO

Yakov Fain works as a Solutions Architect at Farata Systems that offers consulting and training services in developing of the Web Apps with Angular and Java. A Java Champion, he has taught multiple classes and workshops on the web and Java-related technologies, presented at international conferences, and published more than a thousand blog posts (see https://yakovfain.com). Yakov authored and co-authored a number of technical books on programming including the Amazon bestseller “Angular 2 Development with TypeScript”. He leads Princeton Java Users Group.

Yarn package manager: yarn.lock

Yesterday, I was running yet another Angular workshop. After explaining how to install dependencies using npm, I show how to use Yarn (see this blog), a faster alternative to npm, and suggest that the students should consider using Yarn.

Before the workshop, I give handouts with several projects to the group and then ask the group to open a particular project, install the dependencies and run the app. Usually, everything goes smoothly, but this time many people started to complain about a runtime error. In this app, I was using themes from Angular Material 2, but the app couldn’t find the file “node_modules/@angular/material/core/theming/prebuilt/indigo-pink.css”.

I was strange. I tested all the projects two days before the class. After checking the content of the node_modules directory on Paul’s computer, I couldn’t find even the directory node_modules/@angular/material/core let alone that CSS file.

Then I asked if everyone gets this error? Everyone except Jim got this error. Jim was using Yarn for installing dependencies while everyone else was using npm. After learning this, I guessed what was the problem.

I’ using Yarn too, and all my projects included the file yarn.lock, which is created after the initial install storing all packages and their versions there were installed for the project. When you do the yarn install next time, it checks if the file yarn.lock is present, it installs exactly packages of those versions that were listed in yarn.lock. This file can be checked into the version control repo used by your team to ensure that everyone would have exactly the same dependencies.

Now let me explain what happened in the classroom. The package.json in that project included the dependency

"@angular/material": "^2.0.0-beta.2"

The file yarn.lock in that project had the following:

"@angular/material@^2.0.0-beta.2":
  version "2.0.0-beta.2"
  resolved "https://registry.yarnpkg.com/@angular/material/-/material-2.0.0-beta.2.tgz#65ee8733990347b7518b7f42113e02e069dc109b"

Hence, when Jim ran his Yarn install, he got Angular Material 2 2.0.0-beta.2, which had the file “node_modules/@angular/material/core/theming/prebuilt/indigo-pink.css”

But last week, a new version (Beta.3) of Angular Material 2 has been released with a breaking change – they rearranged the file structure:

So the students who didn’t use Yarn, got the latest version while my project used “the old” location of that CSS file.

Fixing this issue in the app was an easy task, but I wanted you to appreciate that Yarn gives you predictability in the projects that have multiple dependencies. Some library author introduces a breaking change, and your app gives a runtime error.

After fixing the CSS location in the app, I deleted my yarn.lock file and re-ran the install. The newly created yarn.lock has this fragment:

"@angular/material@^2.0.0-beta.2":
  version "2.0.0-beta.3"
  resolved "https://registry.yarnpkg.com/@angular/material/-/material-2.0.0-beta.3.tgz#ec31dee61d7300ece28fee476852db236ded1e13"

The first line indicates the dependency as it was listed in my package.json, and the second line shows the actual version that has been installed. Now my project is working again… until the next breaking change.

Update. Here’s another situation I ran into that would prove the usefulness of yarn.lock.

Angular 4: Changes in the router

Angular 4 comes with some useful changes in the router. Let’s take a look at the changes in receiving parameters by a route and in the CanDeactivate guard (see here).

A route can receive the parameters either using a snapshot property of the ActivatedRoute or by subscribing to its property param. Now there is a property paramMap that allows you to either get a particular parameter by using the method get() or get all parameters by invoking getAll().

Here’s how to receive a parameter id that’s not changing in the parent:

export class ProductDetailComponentParam {
  productID: string;

  constructor(route: ActivatedRoute) {
    this.productID = route.snapshot.paramMap.get('id');
  }
}

If the parameter id is changing in the parent (as described here), you can subscribe to the stream of id’s as follows:

export class ProductDetailComponentParam {
  productID: string;

  constructor(route: ActivatedRoute) {

    route.paramMap.subscribe(
     params => this.productID = params.get('id')
     );
  }
}

The CanDeactivate guard now allows you to be more specific and conditionally prohibit navigating from a route depending on where the user is planning to navigate. The interface CanDeactivate now has an optional parameter nextState, which you can check to decide if you want to prohibit the navigation or not. The next code snippet shows the guard that would display a warning popup only if the user is trying to navigate to the home route represented by the path ‘/’. The navigation to any other routes remains unguarded.

@Injectable()
export class UnsavedChangesGuard implements CanDeactivate<ProductDetailComponent>{

    constructor(private _router:Router){}

    canDeactivate(component: ProductDetailComponent, 
                  currentRoute: ActivatedRouteSnapshot,
                  currentState: RouterStateSnapshot, 
                  nextState?: RouterStateSnapshot){

        let canLeave: boolean = true;

        // If the user wants to go to home component
        if (nextState.url === '/') {
          canLeave = window.confirm("You have unsaved changes. Still want to go home?");
        }
        return canLeave;

    }
}

Angular 4 was just released and there might be some other goodies in the router, but I just wanted to share with you these convenient additions.

Upgrading to the latest Angular CLI

As of the Angular CLI beta 30, the command to install Angular CLI looks as follows:

npm install -g @angular/cli

To get rid of the old version of Angular CLI and install the new one, run the following commands:

npm uninstall -g angular-cli
npm cache clean
npm install -g @angular/cli

To update the existing CLI projects, modify the CLI dev dependency in package.json to this:

"@angular/cli": "1.0.0-beta.32"

Then update the CLI version on top of the angular-cli.json, remove your node_modules dir and run npm install.