How I migrated a dozen of projects to Angular 6 and then 7

In this article, I’ll share with you my experience of upgrading more than a dozen of Anguar 5 projects to Angular 6. These projects were small to medium in size, but they used lots of various Angular features because these are the projects from the second edition of our Angular book. Many of these projects had multiple apps configured in the file .angular-cli.json, and they were automatically migrated into the new project structure as defined in the new configuration file angular.json.

First of all, there’s the site https://update.angular.io that gives you an idea of how to do the upgrade from version X to version Y, and you certainly need to read the instructions there first. But the devil is in the detail, right?

Theoretically, the upgrade should be a 1-2-3 process that consists of the following three steps:

1. npm install @angular/cli@latest –save-dev
Run this command in your project’s dir, to upgrade (and install) the latest Angular CLI version in the devDependencies section of package.json. This command shouldn’t need @latest, but it does.

2. ng update @angular/cli
Run this command to convert the project configuration file .angular-cli.json into angular.json introduced by Angular 6.It also will update testing and tslint config files.

3. ng update @angular/core
Run this command to upgrade all Angular dependencies in the package.json file (except Angular Material and Angular Flex Layout, if used).

What else is needed

On my computer, I had Angular CLI 6 install globally, and my typical project had the line “typescript”: “~2.4.2” in devDependency section of package.json.

Before running and upgrade steps, bump up the TypeScript compiler version in your project or you’ll get an error “@angular/compiler-cli” has an incompatible peer dependency to “typescript” during the step 3. Start any project upgrade with manually changing this dependency to “typescript”: “~2.7.2”. If you still see that error, delete the node_module directory and re-run step 3.

If you use the Angular Material library, run ng update @angular/material to update its dependencies in package.json.

If you use the Flex Layout library, modify its version to 6.0.0-beta15 or later prior to running ng update @angular/core.

Your project’s .angular-cli.json might include the file favicon.ico in the asset’s property that’s not used in your app. Angular 5 would still launch your app even if this file was missing. In Angular 6, you need to explicitly remove all occurrences of favicon.ico in the newly generated angular.json.

After migration, I noticed some strange behavior in the UI rendering, which seems like a bug. In some of my apps, I had the following HTML in the component templates:

<a [routerLink]="['/']">Home</a> 
<a [routerLink]="['/product']">Product</a> 

In Angular 5, it rendered just fine, but after migration to Angular 6, the browser rendered both links without the space between them: HomeProduct. Adding &nbsp; after the first anchor tag helped. I thought it might be related to the Angular compiler’s option preserveWhitespaces, but it didn’t.

Starting from TypeScript 2.7, you may need to take care of the error TS2564: Property ‘SoAndSo’ has no initializer and is not definitely assigned in the constructor. For example, the following class variable declaration won’t compile:

product: Product[];

Either set the TypeScript compiler’s option strictPropertyInitialization to false or explicitly initialize class variables, e.g.

product: Product[] = [];

Upgrading your app to RxJS 6

During the upgrade, I spent the most time updating the code related to breaking changes in RxJS 6.

Your updated package.json will include the dependency “rxjs-compat”: “^6.0.0-rc.0” after step 3. At the time of this writing, the current version of rxjs-compat is 6.1.0, so if you decide to keep rxjs-compat, update its version in package.json and reinstall dependencies. Theoretically, having the rxjs-compat package should allow you to run your app without making any changes in the app code that uses RxJS API. In practice, this may not be the case and the app may fail either during the build- or runtime.

So I decided to remove the rxjs-compat dependency and modify my code to conform to RxJS 6 structure. Remove rxjs-compat from your package.json file to avoid unnecessary increase of your app bundle size. Then run ng serve and fix the RxJS errors (if any) one by one. Then load your app in the browser and keep the browser console wide open so you won’t miss the RxJS-related runtime errors, if any.

The internal structure of RxJS 6 has changed, and you need to change the import statements to get the classes and operators from the proper places. You may start with reading this upgrade guide. Disclaimer: I didn’t follow my own advice and started learning by doing.

In the past, the golden rule was “Don’t import Observable from rxjs, import it from rxjs/observable otherwise the entire RxJS library will be included in your app bundle”. No more. The new golden rule is import { Observable } from “rxjs”; The same applies to Subject, Subscription, interval(), of(), and many other RxJS thingies.

You need to stop using the dot-chainable operators (they simply won’t work without rxjs-compat package). Now you have to use the RxJS pipeable operators, and your imports should look like this:
import { debounceTime, map } from ‘rxjs/operators’;

The ng update command added the rxjs-compat package to your project, and if you’re lucky, your app might run as before without changing the code. But some of my apps gave me build errors, while others crashed at runtime.

For example, in one of my apps, I had this:

import { Observable } from "rxjs";
...
const myObservable$ = Observable.fromEvent(...)

Got the TypeScript error “error TS2339: Property ‘fromEvent’ does not exist on type ‘typeof Observable’.” Here’s the fix:

import { fromEvent } from "rxjs";
...
const myObservable$ = fromEvent(...)

In another app, I had this:

import {Observable} from 'rxjs';
...
return Observable.empty();

It also gave me the error TS2339. This time the fix included replacing the deprecated function empty() with the constant EMPTY:

import {EMPTY} from 'rxjs';
...
return EMPTY;

Another app had this:

numbers$ = Observable.interval(1000)...

This code sneaked through the build phase, but crashed my app during runtime. Here’s the fix:

import {interval} from "rxjs";
numbers$ = interval(1000)...

Don’t bet too heavily on rxjs-compat. This package may help you to quickly get your app running in Angular 6, but until you remove rxjs-compat from your project, don’t report to your boss that migration is done. Find the time and fix the code in your Angular 5 app to conform to RxJS 6. After this is done, migrate your app to Angular 6.

The next one is for those two people who also use RxJS WebSocketSubject. The API has changed in RxJS 6. In the past, you’d do this:

import { WebSocketSubject } from 'rxjs/observable/dom/WebSocketSubject';
...
let myWebSocket = WebSocketSubject.create(wsUrl);
...
myWebSocket.next(JSON.stringify(objectToSend));

To make it work in RxJS 6, I’ve changed it to the following:

import { WebSocketSubject } from 'rxjs/websocket';
...
let myWebSocket = new WebSocketSubject(wsUrl);
...
myWebSocket.next(objectToSend);

And one more thing. If you use Angular Material library, you may run into some breaking changes in the UI components. But overall, conversion of a project to Angular 6 is not a time-consuming process.

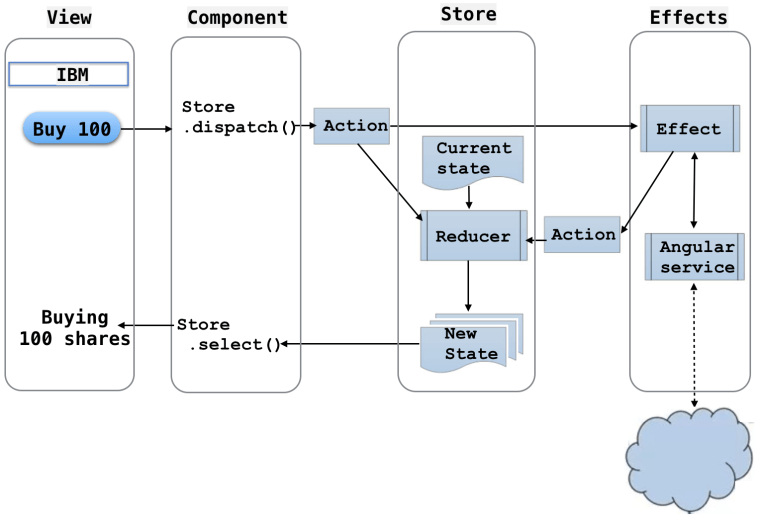
P.S. If you use NGRX, don’t forget to upgrade all ngrx packages to version 6 (at the time of this writing, it’s 6.0.0-beta.3).

Update. Yesterday, I’ve upgraded all these projects to Angular 7. In each project I ran just one command that updated dependencies in package.json:

ng update –all

This was easy.

Angular: When using ngrx is an overkill

State management is one of the most important aspects of any app that has UI. redux is a popular library for maintaining state in the React community. ngrx is a redux-inspired library for maintaining state in Angular apps. But if redux is a rather simple library, ngrx is not so much, and its workflow is illustrated in the diagram below.

In this blog, I’m not going to explain how ngrx works in detail. You can learn it by going through one of the online tutorials, attending our online workshop, or reading the last chapter of our Angular book. I’ll just show you a video comparing two small apps that have the same functionality, but one of them implements state management by using RxJS BehaviorSubject in an Angular service, while the other uses ngrx.

The app that doesn’t use ngrx has about 80 lines of code and its production build size is 268KB. The ngrx version of this app has about 160 lines of code and its production build weighs 315KB.

In short, I do not recommend using ngrx for state management of small and mid-size apps.

Typically, you use a library to write less code, but the current version of ngrx requires you to write more code.

What’s coming in Angular 6+

The release of Angular 6 is around the corner, and in this blog, I’d like to highlight some of its new features announced by the Angular Team.

I started working with Angular when it was in its early alpha versions. Every new Alpha, Beta, and Release Candidate was full of breaking changes, and the announcement of each new release was giving me goosebumps.

After the official release of Angular 2 in September of 2016, the Angular Team started to care about us the developers from the trenches; new major releases come twice a year and switching from one release to another is an easy task. Angular is gaining popularity in the enterprise world leaps and bounds, and the Angular team continues improving this framework. To the best of my knowledge, these are the new and upcoming features:

Angular Elements. While Angular is a great choice for developing Single-Page Applications, creating a widget that can be added to any existing web page was not a simple task. The package called Angular Elements will allow you to create an Angular component and publish it as a Web Component, which can be used in any HTML page. Say there is an existing non-SPA app built using JavaScript and jQuery. The developers of this app will be able to use Web Components built in Angular in the pages of such an app. In our opinion, this killer feature will open many enterprise doors to the Angular framework.

Ivy renderer. This is a code name of a new renderer that will make the size of the app smaller and the compilation faster. The size of the Hello World app is only 3KB gzipped. The Angular Team promises that switching to Ivy rendered will be smooth, and I’ll take my hat off if they’ll be able to make it a non-breaking change.

Bazel and Closure Compiler. Bazel is a build system used for nearly all software built at Google, including their 300+ apps written in Angular. Closure Compiler is the bundling optimizer used to create JavaScript artifacts for nearly all Google web applications. The Closure Compiler consistently generates smaller bundles and does a better job in dead code elimination compared to Webpack and Rollup bundlers. In the upcoming releases of the Angular framework, you’ll be able to use this toolchain for building your apps as well.

Component Dev Kit (CDK). This package is already used by the Angular Material library, which offers 30+ UI components. What if you don’t want to use Angular Material but want to build your own library of UI components and control page layouts? CDK allows you to do this. It also supports Responsive Web Design layouts eliminating the need for using libraries like Flex Layout or learning CSS Grid. CDK was released in December of 2017, but the Angular Team keeps improving it.

Schematics and ng update. Angular CLI generates Angular artifacts using the technology called Schematics. If you decide to create your own templates and have Angular CLI use it, Schematics will help you with this. Staring from Angular CLI 1.7, you can use the ng update that automatically updates your project dependencies and makes automated version fixes. With Schematics, you’ll be able to create your own code transformations like ng update.

I’ looking forward to these features that will make Angular even better, but what else could be improved, that’s not on the roadmap yet? Angular CLI is a great tool, but it has lots and lots of dependencies on the third-party software. Over the last year, several times I’ve experienced broken builds in the latest releases of Angular CLI that were caused by some erroneous release of a third-party package.

The Angular CLI folks are pretty good at releasing patches when errors are reported, but the process of regression testing should be improved, so these errors wouldn’t even sneak in. I stopped using the ^ sign for the version of @angular/clip in package.json. I use the exact version that works for me unless I have a compelling reason for upgrade.

Go Angular!

From a convenience store to Redux architecture

Imagine that you’re a proud owner of a convenience store that sells various products. Remember how did you start? You rented an empty place (i.e. the store was in its initial state). Then you purchased shelves and ordered products. After that, multiple vendors started delivering products. You hired employees that arranged these products on the shelves in a certain order changing the state of the store. Then you put out the Grand Opening sign and lots of colorful balloons.

Customers started visiting your store and buy products. When the store is open, some products lay on the shelves, and some products are in the shopping carts of customers. Some customers are waiting in lines at the cash registers, and there are store employees there. In other words, we can say that at any given moment, your store has the current state.

If a customer takes an action, e.g. buys (or returns) five bottles of water, the cashier scans the barcode, and this reduces (or increases) the number of bottles in the inventory, i.e. updates the state. If a vendor delivers new products, your clerk updates the inventory (i.e. state) accordingly.

Your web app can also maintain a store that holds the state of your app. Similarly to a real store, at any given time your app’s store has a current state. Some data collections have specific data retrieved from the server and, possibly modified by the user. Some radio buttons are checked, the user selected some products and navigated to some routes represented by a specific URL.

If the user interacts with the UI, or the server sends new data, these actions should ask the store object to update the state. But to keep track of the state changes, the current state object is never updated, but a new instance of the state object is created.

What’s Redux?

Redux an open-source JavaScript library that takes care of managing application state. Initially, the React.js developers made Redux popular, but since it’s just a library for maintaining an app state, it can be used in any JavaScript app. Redux is based on the following three principles:

  • Single source of truth. There is a single store where your app contains the state that can be represented by an object tree.
  • State is read-only. When an action is emitted, the reducer function won’t update, but clone the current state and update it based on the action.
  • State changes are made with pure functions. You write the reducer function(s) that takes an action and the current state object, and returns a new state.

In Redux, the data flow is unidirectional:

1. The app component dispatches the action on the store
2. The reducer (a pure function) takes the current state object and then clones, updates, and returns it.
3. The app component subscribes to the store, receives the new state object and updates the UI accordingly.

This is how the Redux unidirectional data flow can be presented if used in a web app.

An action is a JavaScript object that has a property `type` describing what happened in your app, e.g. the user wants to buy the IBM stock. Besides the property type, and action object can optionally have another property with the payload of data that should somehow change the app state, for example:

{
  type: 'BUY_STOCK',
  stock: { symbol: 'IBM', quantity: 100} 
}

This object only describes the action and provides the payload, but it doesn’t know how the state should be changed. Who does? The reducer.

A reducer is a pure function that specifies how the state should be changed. The reducer never changes the current state but creates a new (and updated) version of it. In other words, the state object is immutable. The reducer creates a copy of the state object and returns a new reference to it. If you use the Angular framework, it’s a binding change event, and all interested parties will immediately know that the state has changed without requiring expensive value checking in the entire state tree.

A reducer function has the following signature:

function (previousState, action): State {...} 

Should the reducer function implement the app functionality like placing an order, which requires work with external services? Of course not, because reducers are meant for updating and returning the app state, e.g. the stock to buy is “IBM”. Besides, implementing the app logic would require interaction with the environment external to the reducer, i.e. it would cause side effects, and pure functions can’t have side effects.

The reducer can implement minimal app logic related to the state change. For example, the user decides to cancel the order, which requires a reset of certain fields on the state object. The main app logic remains in your application code (e.g. in services) unless a concrete implementation of the Redux-inspired library offers a special place meant for the code with side effects.

Why storing an app state in a single place is important

Recently, I was working on a project for a car manufacturer. This was a web app that allowed a prospective buyer to configure a car by selecting from tons of packages and options (e.g. model, interior and exterior colors, length of the chassis et al.) This app was developed for many years, the software modules were written using JavaScript, jQuery, Angular, React, Handlebars as well as the HTML templating engine Thymeleaf on the server. Nothing unusual, right?

From the user’s perspective, this was one workflow that consisted of several steps resulting in configuring and pricing the car based on selected options. But internally, this process was switching from one module to another, and each module would need to know what was selected in the previous step to show the available options.

In other words, each module would need to know the current state of the app. Depending on the software used in any particular module, the current user’s selections were stored using one of the following places:

* URL parameters
* HTML data attributes
* Browser’s local and session storages
* Angular services
* React store

New requirements were coming in, new JIRA tickets were created and assigned, and we’d start implementing them. Time and time again, implementing a seemingly simple new requirement would turn into a very time consuming and expensive task. Good luck in explaining to your manager why showing the price in page B would take a half day if this price was already known in page A. The thing is that the state object used in page B didn’t expect to have the price property, and if in page A the price was a part of the URL, page B was expecting to get the current state from the local storage.

Re-writing an app from scratch was not an option, but it would be so much easier if the app state was implemented in a uniform way and stored in a single place!

While the Redux is widely used in the web apps developed with the React framework, for Angular apps you can use the ngrx library that also implements the unidirectional data flow and can be used for implementing the app state management.
While the Redux API is simple, the ngrx is not. The reason is that ngrx is a combination of Redux and RxJS libraries that offers more than just keeping track of the round-trips between the UI and the app state. With ngrx, you can inject the code that communicates with external services into the data flow. Also, you can monitor the state of the router.

I’m planning to write a series of blogs to present ngrx, so it wouldn’t require a Ph.D. to master it. If you can’t wait, consider enrolling in our online workshop on using ngrx for state management in Angular apps. You’ll need to invest 7 hours of your time, but this may save you a lot more time in the long run.

Always commit your yarn.lock file into the source code repo

I use the Yarn package manager for all my Angular projects. Besides being faster than npm, yarn creates a file yarn.lock that stores the exact versions of installed dependencies. Last year, I wrote about a specific use case that caused a breaking change during one of my Angular workshops.

Yesterday, I had to create a new project using Angular CLI. The project was successfully generated and started with ng serve. Then, I wanted to create a production build with ng build –prod, but the build failed with the error Cannot find module ‘uglifyjs-webpack-plugin’. I know that Webpack uses UglifyJS for optimizing sizes of the bundles, which is great, but my production build fails, which is not great at all.

The generated package.json file located in the root of my project has no direct dependency on uglifyjs-webpack-plugin, but there is one deep inside node_modules in one of the thousand (literally) dependencies used in Angular CLI projects.

To make the long story short, the WebPack team pushed to npmjs.org the new version 1.1.7 this plugin, which was empty. The Angular team got in touch with them, and an hour later, the fixed version 1.1.8 of the Webpack UglifyJS plugin was pushed to the npm central repo.

My project already had the yarn.lock file with an erroneous version of this plugin. I deleted it and ran yarn install again. This time it picked up the fixed 1.1.8 version and the ng build –prod command started working again. Thank you, the Webpack team for the quick turnaround! Happy end!

This was a specific issue with the newly generated project created at the “wrong time”. But imagine a team working on a project for some time, and their github repo didn’t include the yarn.lock file that stored the reference to the working version 1.1.6 of that plugin, and Mary (the QA engineer) decided to make a production build. A minute later, the entire team got an email titled “Who broke the build?”

The bottom line: Push the yarn.lock of the project that works and builds correctly into your version control system to ensure that the entire team has a reproducible and working build. This way, your project won’t depend on someone from across the globe submitting erroneous packages to the npmjs.org.

P.S. While npm 5 also creates the file package-lock.json with the registry of all installed dependencies, it doesn’t guarantee that each npm install will install exact versions of the packages listed there.

Creating an Angular app that weighs only 55KB

With Angular CLI, generating a new app and installing dependencies takes 30 seconds. Creating a production build takes another 15 seconds. And the best part is that the size of the deployed app can be as small as 55KB gzipped. Let’s do it.

1. Generate a minimalistic app with the inline template and styles with the following Angular CLI command:

ng new hello-world --minimal

2. If you’re not creating custom decorators and perform the AoT build, you don’t need to import the reflect polyfill, so comment out the following line in the generated file polyfills.ts:

import 'core-js/es7/reflect';

3. In the generated file app.component.ts remove most of the HTML markup from the component template so it looks as follows:

template: `Welcome to {{title}}!`

4. Make a production build (it performs the AoT compilation by default):

ng build -prod

5. The npm package serve is a small web server that can gzip static files on the fly. Install it globally:

npm install serve -g

6. Change to the dist directory where the application bundles were generated and serve the app (it’ll run on port 5000 by default):

serve .

7. Enjoy the small size!

To see it in action, watch this 5-minute video.

Update. Hello World in the upcoming rendering engine Ivy is only 3.3KB!
See https://ng-ivy-demo.firebaseapp.com/

Wrapping a RxJS observable stream into an Angular service

Angular’s dependency injection mechanism allows us to cleanly separate business logic (services) from UI (components). What if our app generates a stream of values and we want to implement it as an injectable service? In this blog, I’ll create an injectable service that emits a stream of values and a UI component subscribes to this stream displaying its values in real time.

In one of my RxJS blogs  I showed you how to use the method Observable.create() providing an observer as an argument. Let’s create a service with a method that will take an observer as an argument and will emit the current time every second.

import {Observable} from 'rxjs/Observable';

export class ObservableService{

  createObservableService(): Observable<Date>{  // 1

      return new Observable(  // 2
          observer => {   // 3
              setInterval(() =>
                  observer.next(new Date())  // 4
              , 1000);
          }
      );
  }
}

1. Return an observable stream of dates
2. Create an observable
2. Provide an observer
4. Emit the new date every second

In this service, we create an instance of the RxJS Observable object, assuming that the subscriber will provide an Observer that knows what to do with the emitted data. Whenever the observable invokes the method next(new Date()) on the observer, the subscriber will receive the current date and time. Our data stream never throws an error and never completes.

We’ll inject the ObservableService into the AppComponent, which invokes the method createObservableService() and subscribes to its stream of values, creating an observer that knows what to do with the data. The observer just assigns the received time to the variable currentTime which renders the time on UI.

import 'rxjs/add/operator/map';
import {Component} from "@angular/core";
import {ObservableService} from "./observable.service";

@Component({
  selector: 'app-root',
  providers: [ ObservableService ],
  template: `<h1>Custom observable service</h1>
       Current time: {{currentTime | date: 'mediumTime'}}  // 1
  `})
export class AppComponent {

  currentTime: Date;

  constructor(private observableService: ObservableService) { // 2

    this.observableService.createObservableService()  // 3
      .subscribe( data => this.currentTime = data );  // 4
  }
}

1. Display the time using the date pipe
2. Inject the service that wraps the observable
3. Create the observable and start emitting dates
4. Subscribe to the stream of dates

This app doesn’t use any servers, and you can see it in action in the great Stackblitz online IDE  here.

In the browser’s window, the current time will be updated every second. You use DatePipe here with the format ‘mediumTime’, which displays only hours, minutes, and seconds (all date formats are described in the DatePipe documentation).

This simple example demonstrates a basic technique for wrapping any application logic in an observable stream and subscribing to it. In this case, we use setInterval(), but you could replace it with any application-specific code that generates one or more values and sends them as a stream.

Don’t forget about error handling and completing the stream if need be. The following code snippet shows a sample observable that sends one element to the observer, may throw an error and tells the observer that the streaming is complete:

return new Observable(
    observer => {
      try {
        observer.next('Hello from observable');

        //throw ("Got an error");

      } catch(err) {
         observer.error(err);
      } finally{
         observer.complete();
      }
    }
);

If you uncomment the line with a throw, observer.error() is invoked, which results in the invocation of the error handler on the subscriber if there is one.

The data producer for our observable stream was generating date/time but it could be any app code that generates some useful values, e.g. a WebSocket server generating stock quotes, auction bids, actions of online game players, etc. During my workshops, I show a sample online auction app that has a Node server emulating users’ bids on products. That server uses a WebSocket connection to push new bids for products to all users that are interested in receiving them.

RxJS offers WebSocketSubject – a ready-to-use wrapper around the browser’s WebSocket. It accepts either a string with the WebSocket endpoint or a WebSocketSubjectConfig
On subscribe, it uses either an existing connection or creates a new one; on unsubscribe, it closes the connection if there are no other subscribers. In the second edition of our Angular book, we use WebSocketSubject in the sample app ngAuction.

Offline generation of Angular CLI projects with Yarn

There are situations when an ability to generate new Angular CLI projects from the locally installed packages is quite useful, for example:

  • You’re running a live workshop at a conference in a hotel and the students have to install project dependencies multiple times. When 20-30 people are installing Angular dependencies at the same time on a hotel’s connection, it can take three minutes or more.
  • You’re on a long flight and want to try something new with Angular.

In this post, I’ll show you how to generate Angular CLI projects in a disconnected mode.

First of all, I don’t use npm. I use Yarn for two main reasons:

  1. Yarn is faster than npm (including npm 5).
  2.  Yarn creates a file yarn.lock that keeps track of the exact version of packages installed.

For example, if package.json has a dependency “@angular/core”: “^5.0.0”, running yarn install today would include the version of 5.1.0 of this package. If you want to make sure that all devs in your team use this version even after 5.2.0 is available, push yarn.lock in the source control repo, and everyone who pulls the code will get 5.1.0. Reproducible builds are guaranteed. While npm 5 also creates a file package-lock.json, it doesn’t guarantee the same versions for all developers.

To configure Yarn as a default package manager for Angular CLI, run the following command:

ng set --global packageManager=yarn

Now let’s see how to create a local directory (a.k.a yarn offline mirror) with cached packages so Yarn can use it without the need to connect to the Internet.

Perform the following steps before boarding the plane while the Internet connection is still available.

1. Configure a directory for locally cached packages by running this command:

yarn config set yarn-offline-mirror ~/npm-packages-offline-cache

This will create a file .yarnrc in the user’s directory on your computer. In my case (I use MAC OS), this command creates the file .yarnrc with the following content

# THIS IS AN AUTOGENERATED FILE. DO NOT EDIT THIS FILE DIRECTLY.
# yarn lockfile v1


lastUpdateCheck 1512857190418
yarn-offline-mirror "/Users/yfain11/npm-packages-offline-cache"

2. Generate a new project with Angular CLI without installing dependencies:

ng new hello-cli --skip-install

3. Copy the file .yarnrc into the newly generated directory hello-cli

4. Change directory to hello-cli:

cd hello-cli

5. Install the project dependencies using Yarn:

yarn install

Important: Make sure that there is no file yarn.lock in hello-cli when you run this command for the first time.

This command not only will install dependencies in the node_modules directory but will also create a directory npm-packages-offline-cache in your user’s directory. This directory will contain about a thousand of compressed package files required for the offline installation. These are gzipped files with extension .tgz. This is your Yarn offline mirror with npm packages.

6. Just in case, clear the existing yarn cache to make sure we’ll be using only the files from the mirror:

yarn cache clean

Now let’s board the plane. Turn off the wi-fi or unplug the network wire. Our aircraft is airborne.

In the hello-cli directory, run the following command:

yarn install --offline

Yarn will install all the dependencies from the offline mirror. Now you can create as many Angular CLI projects as you need without being connected:

1. Generate a new project:

ng new hello-cli2 --skip-install 

2. Copy the file .yarnrc into the hello-cli2 directory

3. Change to the project directory

cd hello-cli2

4. Run the offline installation of the project dependencies

yarn install --offline

Have a safe flight!

P.S. If you’re running a workshop, have a flash drive with the yarn offline miror directory and ask the participants to copy it into their user’s directories. Then they’d just need to run a command to create the .yarnrc file as explained in step 1.

Angular CLI: dev and prod builds with JiT and AoT

I’m happy to announce that my colleague Anton and I started working on the second edition of our Angular book published by Manning. The new TOC is here. The major changes in the second edition are:

– Get rid of any mention of SystemJS – use Angular CLI only
– Replace the chapter on Webpack with the chapter on ngrx
– Add more code samples illustrating various features and techniques

I just finished re-writing the first chapter and would like to offer you a fragment that illustrates the use of Angular CLI for creating dev and prod builds. Your feedback is appreciated.

To make this article more practical, generate a new project Hello CLI using Angular CLi:

ng new hello-cli

Then build the bundles, start the dev server and open the browser on port 4200 by running a single command:

ng serve -o

Now goes the chapter fragment.

Production Builds

The ng serve command bundled the app files but didn’t optimize our Hello CLI application. Open the Network tab in the dev tools of your browser and you’ll see that the browser had to load 2.4MB to render this simple app. In dev mode, the size of the app is not a concern because you run the server locally and it takes the browser only 802 milliseconds to load this 2.4MB of code as shown below.

Now visualize a user with a mobile device browsing the Internet over a regular 3G connection. It’ll take 10 seconds to load the same Hello CLI app. Many people can’t tolerate waiting for 10 seconds for any app except Facebook (30% of the Earth population just lives on Facebook). We need to reduce the size of the bundles before going live.

Applying the -prod option while building the bundles will produce much smaller bundles by optimizing your code, i.e. it’ll rename your variables into single-letter ones, will remove comments and empty lines, and will remove the majority of the unused code. There is another piece of code that can be removed from the app bundles – the Angular compiler. Yes, the ng serve command included such compiler into the vendor.bundle.js. In the next section will talk about production builds and how to remove the Angular compiler from your deployed app.

JiT and AoT Compilations

Take a look at the code of the generated app.component.html.

<div style="text-align:center">
  <h1>
    Welcome to {{title}}!
  </h1>
  <img width="300" src="data:image/svg+xml;base64,PD94bWwgdmVyc2lvbj0iMS4wIiBlbmNvZGluZz0idXRmLTgiPz4NCjwhLS0gR2VuZXJhdG9yOiBBZG9iZSBJbGx1c3RyYXRvciAxOS4xLjAsIFNWRyBFeHBvcnQgUGx1Zy1JbiAuIFNWRyBWZXJzaW9uOiA2LjAw...">
</div>
<h2>Here are some links to help you start: </h2>
<ul>
  <li>
    <h2><a target="_blank" href="https://angular.io/tutorial">Tour of Heroes</a></h2>
  </li>
  <li>
    <h2><a target="_blank" href="https://github.com/angular/angular-cli/wiki">CLI Documentation</a></h2>
  </li>
  <li>
    <h2><a target="_blank" href="http://angularjs.blogspot.com/">Angular blog</a></h2>
  </li>
</ul>

For the most part, it consists of standard HTML tags, but there is one line that browsers won’t understand:

Welcome to {{title}}!

These double curly braces represent binding a value into a string in Angular, but this line has to be compiled by the Angular compiler (it’s called ngc) to replace the binding with something that browser would understand. A component template can include another Angular-specific syntax (e.g. structural directive *ngIf and *ngFor) that need to be compiled before asking the browser to render the template.

When you run the ng serve command, the template compilation is performed inside the browser. After the browser loads your app bundles, the Angular compiler (packaged inside vendor.bundle.js)performs the compilation of the templates from main.bundle.js. This is called Just-in-Time (JiT) compilation. This term means that the compilation happens in time of the arrival of the bundles to the browser.

The drawbacks of the JIT compilation are:

1. There is a time gap between the loading bundles and rendering the UI. This time is spent on JiT compilation. On a small app like Hello CLI this time is minimal, but in real world apps, the JiT compilation can take a couple of seconds, so the user needs to wait longer for just seeing your app.

2. The Angular compiler has to be included in the vendor.bundle.js, which adds to the size of your app.

Using the JiT compilation in the prod is discouraged, and we want the templates to be pre-compiled into JavaScript before the bundles are created. This is what Ahead-of-Time (AoT) compilation is about.

The advantages of the AoT compilation are:

1. The browser can render the UI as soon as you app is loaded. There is no need to wait for code compilation.

2. The ngc compiler is not included in the vendor.bundle.js and the resulting size of your app might be smaller.

Why use the word “might” and not “will”? The removing of ngc compiler from the bundles should always result in smaller app size? Not always. The reason being that the compiled templates are larger than those that use a concise Angular syntax. The size of the Hello CLI will definitely be smaller as there is only one line to compile. But in larger apps with lots of views, the compiled templates may increase the size your app so it’s even larger than the JIT-compiled app with ngc included in the bundle. But you should use the AoT mode anyway because the user will see initial landing page of your app sooner.

Creating bundles with the -prod option

When you build the bundles with the -prod option, Angular CLI performs code optimization and AoT compilation. Let’s see it in action by running the following command in our Hello CLI project:

ng serve -prod

Open the app in your browser and check the Network tab as shown in the next image. Now the size of the same app is only 120KB (compare to 2.4MB) and the load time is 573 milliseconds (compare to 802 milliseconds).

What a great result! Google home page weighs more than 200KB. As a matter of fact, the size of the app could be reduced even more after applying the gzip compression to the bundles. Note that the file names of the bundles now include a hash code of each bundle. Angular CLI calculates a new hash code on each prod build to prevent browsers from using the cached version if a new app version is deployed in prod.

Recently released Angular CLI 1.3.0 offers a new option –build-optimizer, which does a better job in eliminating unused code. Even in our simple app it reduced the size of this app to 111Kb. On larger apps the effect of this option can be even bigger. In one of our apps that uses Angular Material it reduced the app size from 290KB to 200KB (lots of dead code there?). The option –build-optimizer works with both ng serve and ng build commands.

ng serve -prod --build-optimizer

Shouldn’t we always use AoT? Ideally, you should unless you use some third-party JavaScript libraries which produce errors during the AoT compilation. If you run into this problem, turn the AoT compilation off by building the bundles with the following command:

ng serve -prod -aot=false

The next screen shot shows that both the size and the load time increased compared to the AoT compiled app.

We were using the ng serve -prod command, which was building the bundles in memory. If you’re ready to generate prod files, use the ng build -prod command instead. We’ll go over the process of building production bundles and deploying the app on the server in chapter 8.

The goal of this section was to get you started with Angular CLI, and we’ll continue its coverage in chapter 2.