React.js: fetching the weather data in the useEffect hook

This blog continues my React/TypeScript miniseries and the previous blogs are:

1. Let’s start coding with TypeScript and React.js
2. React.js: A functional component and its state
3. Using the React.js state hook in the weather app

In this blog, I’ll add the useEffect() hook to fetch the weather info in the app that we started in the previous blog, where you learned how to store the city in the state of the App component. But our ultimate goal is finding the weather in the given city by fetching the data from an external server. Using the terminology from functional programming, we need to write a function with side effects. As opposed to pure functions, the functions with side effects use the external data and every invocation may produce different results even if the function arguments remain the same.

In React’s functional components, we’ll be using the useEffect() hook for implementing the functionality with side effects. By default, React automatically invokes the callback function passed to useEffect() after every DOM rendering. Let’s add the following function to the App component from the previous blog:

useEffect(() => console.log("useEffect() was invoked"));

If you run the app with the browser console open, you’ll see the message “useEffect() was invoked” each time when you enter a character in the input field and the UI is refreshed. Every React component goes through a set of lifecycle events, and if you need you code to be executed after the component was added to the DOM or each time it was was re-rendered, the useEffect() is the right place for such a code. But if you want the code in useEffect() to be executed only once after initial rendering, specify an empty array as the second argument:

useEffect(() => console.log("useEffect() was invoked"), []);

The code in this hook will be executed only once, which makes it a good place for performing the initial data fetch right after the component has been rendered.

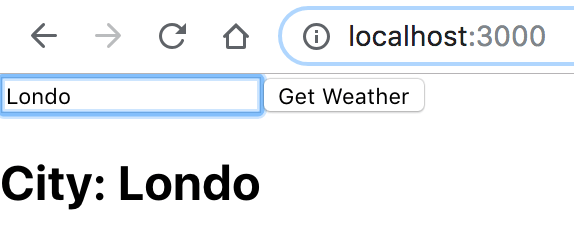
Let’s assume you live in London and would like to see the weather in London as soon as this app is launched. Start by initializing the city state with “London”:

const [city, setCity] = useState('London');

Now you’d need to write a function that would fetch the data for the specified city. The URL will include the following static parts (replace 12345 with your APPID).

const baseUrl = 'http://api.openweathermap.org/data/2.5/weather?q=';
const suffix = "&units=imperial&appid=12345";

In between, you need to place the name of the city, so complete URL may look like this:

baseUrl + 'London' + suffix

For making Ajax requests, we’ll use the browser’s Fetch API (see https://developer.mozilla.org/en-US/docs/Web/API/Fetch_API). The function fetch() returns a Promise, and we’ll use the async/await keywords in our method getWeather() that can look like this:

const getWeather = async (city: string) => {
  const response = await fetch(baseUrl + city + suffix); 
  const jsonWeather = await response.json(); 
  console.log(jsonWeather); 
}

NOTE: I prefer using the async/await keywords for asynchronous code, but using promises with chained .then() invocations would also work here.

When you use a standard browser’s fetch() method, getting the data is a two-step process: You get the response first, and then you need to call the json() function on the response object to get to the actual data.

TIP: JavaScript developers often use third-party libraries for handling HTTP requests. One of the most popular ones is a promise-based library called Axios (see https://www.npmjs.com/package/axios).

Now you can use this function for the initial data fetch in the useEffect():

useEffect( () => getWeather(city), []);

If you want the code in useEffect() to be executed selectively only if a specific state variable changed, you can attach the hook to such a state variable. For example, you can specify that the useEffect() has to run only if the city gets updated as follows:

useEffect(() => console.log("useEffect() was invoked"),
                 ['city']);

The current version of the App component is shown below.

import React, { useState, useEffect, ChangeEvent } from 'react';

const baseUrl = 'http://api.openweathermap.org/data/2.5/weather?q=';
const suffix = "&units=imperial&appid=12345";

const App: React.FC = () => {

 const [city, setCity] = useState('London');

 const getWeather = async (city: string) => { 
      const response = await fetch(baseUrl + city + suffix);
      const jsonWeather = await response.json();
      console.log(jsonWeather);
  }

  useEffect( { () => getWeather(city) }, []);  // this line has an issue

 const handleChange = (event: ChangeEvent<HTMLInputElement>) => {
    setCity( event.target.value ); 
}

  return (
    <div>
      <form>
        <input type="text" placeholder="Enter city"
               onInput = {handleChange} />
        <button type="submit">Get Weather</button>
        <h2>City: {city}</h2>
      </form>
    </div>
  );
}

export default App;


The second argument of the useEffect() is an empty array, so getWeather() will be invoked only once when the App component is initially rendered.

Note: If you run this app, the browser’s console will show the following warning: React Hook useEffect has a missing dependency: ‘city’. Either include it or remove the dependency array react-hooks/exhaustive-deps. The reason is that inside this hook we use the state variable city, which is a dependency and should be listed in the array. This is not an error and for simplicity I’ll keep this code as is, but you should keep this in mind while designing your hooks.

Tip: For the in-depth coverage of the useEffect() hook, read the article by Dan Abramov “A complete guide to useEffect“.

Run this app with the browser console open, and it’ll print the retrieved JSON with the London weather:

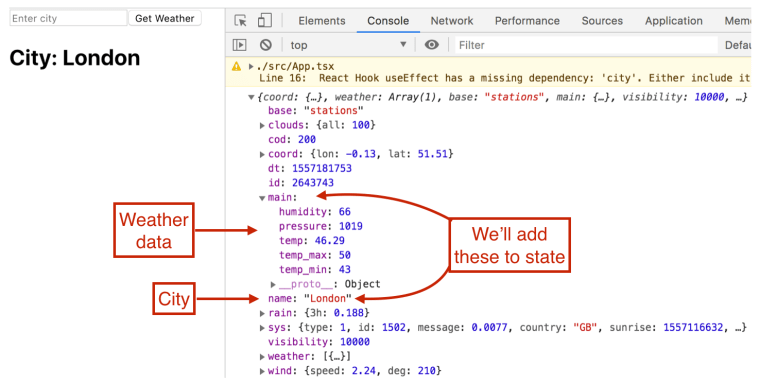
The initial data fetch is complete for the default city, and it looks like a good idea to store the retrieved weather data in the component’s state. Let’s define a new type Weather as shown in listing below for storing the content of the properties name and main marked in the above screenshot.

export interface Weather {
  city: string; 
  humidity: number; 
  pressure: number; 
  temp: number;     
  temp_max: number; 
  temp_min: number; 
}

In the App component, we’ll add a new state variable weather and the function to update it as follows:

const [weather, setWeather] = useState(null);

Note that the hook useState() allows you to use a generic parameter for better type safety. Now we need update the function getWeather() so it saves the retrieved weather and city name in the component’s state as shown below:

async function getWeather(location: string) {
  const response = await fetch(baseUrl + location + suffix);
  if (response.status === 200){
    const jsonWeather = await response.json();
    const cityTemp: Weather = jsonWeather.main; 
    cityTemp.city=jsonWeather.name;  
    setWeather(cityTemp);  
  } else {
      setWeather(null);  
  }
}

This code takes the object jsonWeather.main and the city name from jsonWeather.name, and saves them in the state variable weather.

So far, our function getWeather() was invoked for the initial retrieval of the London weather by the hook useEffect(). The next step is to add the code to invoke getWeather() when the user enters any other city and clicks on the button Get Weather. This button is a part of the form (its type is submit), so we’ll add the event handler to the tag. The function handleSubmit() and the first version of the JSX:

const handleSubmit = (event: FormEvent) => { 
   event.preventDefault();  
   getWeather(city);  
 }

return (
   <div>
     <form onSubmit = {handleSubmit}>  
       <input type="text" placeholder="Enter city"
              onInput = {handleChange} />
       <button type="submit">Get Weather</button>
       <h2>City: {city}</h2>
       {weather &&  <h2>Temperature: {weather.temp}F</h2>}  
     </form>
   </div>
 );

In React, event handlers get instances of SyntheticEvent, which is an enhanced version of browser’s native events (see https://reactjs.org/docs/events.html for details). SyntheticEvent has the same interface as the browser native events (e.g. preventDefault()) but events work identically across all browsers.

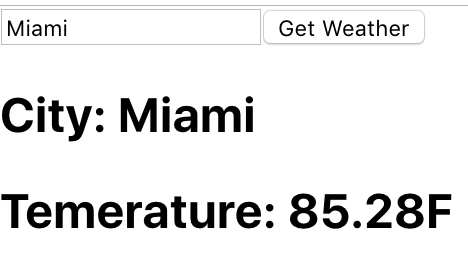
To pass the argument to getWeather(city), we didn’t have to find the reference to the field on the UI. The component’s state city was updated as the user typed the name of the city, so the variable city already has the value displayed in the field. The next screenshot was taken after the user entered Miami and clicked on the button Get Weather.

What if the user enters the city that doesn’t exist or not supported by openweathermap.org? The server returns 404 and we should add the appropriate error handling. So far we have the following line to prevent displaying the temperature if the weather state is falsy:

{ weather &&  <h2>Temperature: {weather.temp}F</h2> }

In the next version of this app, we’ll create a type guard to check if the weather for the provided city was received or not. For now, let’s take a breather and recap what we did in this and the previous blogs in the weather app:

1. Applied for the APPID at openweathermap.org
2. Generated a new app and replaced the JSX with a simple
3. Declared the state city using the hook useState()
4. Added the function handleChange() that updated city on each change in the input field
5. Added the hook useEffect() that would be invoked only once on the app startup
6. Ensured that useEffect() invokes the function getWeather() that uses the fetch() API to retrieve the weather in London
7. Declared the state weather to store the retrieved temperature and humidity
8. Added the event handler handleSubmit() to invoke getWeather() after the user entered the city name and clicked on the button Get Weather
9. Modified the function getWeather() to save the retrieved weather in the state weather
10. Displayed the retrieved temperature on the web page under the form

This is all good, but you shouldn’t to program all the app logic in one App component, and in the next blog, we’ll create a separate component to be responsible for displaying the weather data.

The source code of the completed app is here. If you want to learn TypeScript quickly, get our book TypeScript Quickly.

Using the React.js state hook in the weather app

This blog continues my React/TypeScript miniseries and the previous blogs are:

1. Let’s start coding with TypeScript and React.js
2. React.js: A functional component and its state

In this blog, I’ll start developing an app that will let the user enter the name of the city and get the current weather there. I’ll develop this app gradually, and its first version won’t be fetching data from the weather server just yet. First, I’ll add a little HTML form to the App component, where the user will be entering the name of the city.

Second, I’ll add the code to fetch the real weather data from the weather server and the App component will display the weather.

Finally, I’ll create another component WeatherInfo, which will be used as a child of the App component. The App component will retrieve the weather data and will pass it to WeatherInfo, which will display the weather.

We’ll be getting real weather data from the weather service at http://openweathermap.org, which provides an API for making weather requests for many cities around the world. This service returns the weather information as a JSON-formatted string. For example, to get the current temperature in London in Fahrenheit (units=imperial), the URL could look like this: http://api.openweathermap.org/data/2.5/find?q=London&units=imperial&appid=12345

Creators of this service require you to receive the application ID, which is a simple process. If you want to run our weather app, do the same and replace 12345 in the above URL with your APPID.

The sample code for this weather app was initially generated by the following command:

create-react-app weather --typescript

Then, I replaced the JSX code in the app.tsx with a simple HTML form where the user could enter the name of the city and press the button Get Weather. Also, the entered city represents the state of this component, and the App will be updating its state as the user is entering the city name.

Adding a state hook to the App component

In the previous blog, you’ve got familiar with the useState() hook, and the first version of our App component defines its state with this hook as follows:

const [city, setCity] = useState('');

Now the value in the variable city has to be updated using the function setCity(). Our hook useState() initializes the variable city with an empty string, so TypeScript will infer the type of city as a string. The following listing shows the App component with the declared state, and the form defined in the JSX section. This code also has an event handler handleChange(), which is invoked each time the user enters or updates any character in the input field.

import React, { useState, ChangeEvent } from 'react';

const App: React.FC = () => {

const [city, setCity] = useState(''); // 1

const handleChange = (event: ChangeEvent<HTMLInputElement>) => { // 2
setCity(event.target.value); // 3
}

 return (
  <div>
    <form>
      <input type="text" placeholder="Enter city"
             onChange = {handleChange} /> // 4
      <button type="submit">Get weather</button>
    <h2>City: {city}</h2> // 5
    </form>
  </div>
 );
}

export default App;

1. Declaring the state city
2. Declaring the function to handle the input field events
3. Updating the state by invoking setCity()
4. Assigning the handler to the onChange attribute
5. Displaying the current state value

The input field defines the event handler onChange = {handleChange}. Note that we didn’t invoke handleClick() here; we just provided the name of this function. React’s onChange behaves as onInput and is fired as soon as the content of the input field changes. As soon as the user enters (or changes) a character in the input field, the function handleChange() is invoked; it updates the state, which causes the UI update.

There is no documentation on which types of the React events to use with specific JSX elements, and to avoid using an event: any as the argument in event handler functions, open the file index.d.ts in the directory node_modules/@types/react and search for “Event Handler Types”. This should help you to figure out that the proper type for the onChange event is a generic ChangeEvent that takes the type of a specific element as a parameter, i.e. ChangeEvent.

To illustrate the state updates, I’ve added the <h2> element that displays the current value of the state: <h2>Entered city: {city}</h2>. Note that for re-rendering the current value of the city, I didn’t need to write a jQuery-like code finding the reference to this <h2> element and changing its value directly. The invocation of setCity (event.target.value) forces React to update the corresponding node in the DOM.

In general, if you need to update the functional component’s state, do it only using the appropriate setXXX() function that’s returned by the hook useState():

By invoking setXXX() you let React know that the UI update may be required. If you update the state directly (e.g. city=”London”), React won’t update the UI. React may batch the UI updates before reconciliating the Virtual DOM with the browser’s one. The following screenshot was taken after the user entered Londo in the input field.

To see that React updates only the <h2> node in the DOM, run this app (npm start) with the Chrome Dev Tools open in the tab Elements. Expand the DOM tree so the content of the the <h2> element is visible, and start typing in the input field. You’ll see that the browser changes only the content of the <h2> element, while all other elements remain unchanged.

Working with component’s state is an internal function of the component. But at some point, the component may need to start working with external data, and this is where the useEffect() hook comes in, which we’ll discuss in the next blog.

If you want to learn TypeScript quickly, get our book TypeScript Quickly.

React.js: A functional component and its state

In the previous blog, I generated a new React/TypeScript app using the create-react-app tool. In this blog, you’ll get familiar with two types of React components, and what a component’s state is for.

Two types of React components

A React component can be declared either as a function or as a class. A functional component is implemented as a function and is structured as shown below (types are omitted).

const MyComponent = (props) => {  // 1

  // other functions may go here
  
  return ( 
    <div>...</div>   // 2
  )
}

export default MyComponent;

1. props is used to pass data to the components
2. Return the component’s JSX

Developers who prefer working with classes can create a class-based component, which is implemented as a subclass of React.Component and is structured as follows:

class MyComponent extends Component {   // 1

  render() {   // 2
    return (   // 3
      <div>...</div>
    );
  }

  // other methods may go here
}

export default MyComponent;

1. The class must be inherited from React.Component
2. The render() method is invoked by React
3. Return JSX for rendering

If a functional component would simply return JSX, the class-based one has to include the method render() that returns JSX. I prefer using functional components, which have several benefits over the class-based ones:

* A function is easier to read than a class and requires less code to write; there is no need to inherit the component’s code from any class either
* A functional component generates less code during Babel transpiling
* No instances are created for wrapping the function
* No need for the this reference
* Functions are easier to test than classes; assertions simply map props to the returned JSX

You should use class-based components only if you have to use the React version older than 16.8. In old versions, only the class-based components would support the component’s state and lifecycle methods.

If you use the current version of create-react-app with the –typescript option, the generated file App.tsx file will already have the boilerplate code of a functional component (i.e. a function of type React.FC) shown below.

import React from 'react';    // 1
import logo from './logo.svg';
import './App.css';

const App: React.FC = () => {  // 2
  return (    // 3
    <div className="App">  // 4
      <header className="App-header">
        <img src={logo} className="App-logo" alt="logo" />
        <p>
          Edit <code>src/App.tsx</code> and save to reload.
        </p>
        <a
          className="App-link"
          href="https://reactjs.org"
          target="_blank"
          rel="noopener noreferrer"
        >
          Learn React
        </a>
      </header>
    </div>
  );
}

export default App;   // 5

1. Import React library
2. This is a functional component
3. Return the component’s template as a JSX expression ( it’s not a string)
4. In JSX, use className instead of the CSS selector class to avoid conflicts with the JavaScript keyword class
5. Export the component declaration so it can be used in other modules

I used version 3.0 of create-react-app. The older versions of this tool would generate a class-based component App. The generated App function returns the markup (or template), which React uses for rendering this component’s UI. During the build process, Babel will convert it into a pure JavaScript object JSX.element with the div container that will update the Virtual DOM (I’ll introduce it in a separate blog) and the browser’s DOM. This App component didn’t have a separate place for storing its data (a.k.a. state), and we’ll add it in the next section.

Managing the component’s state

A component’s state is the datastore that contains the data that should be rendered by the component. The data in the component’s state is preserved even if React re-renders the component. Whenever the code updates the component’s state, React updates the component’s UI to reflect changes caused by the user’s actions (e.g. button clicks or typing in the input fields) or other events. If you have a Search component, its state can store the last search criteria and the last search result.

Do not confuse the component’s state with the application’s state. The former is the storage of an individual component’s state while the latter stores the app’s data that may represent the data from multiple components, functions, or classes.

And how would you define and update the component’s state? This depends on how the component was created in the first place. We’re going to move back to class-based components for a minute so that you can understand the difference in dealing with state in class-based and functional approaches. Then we’ll return to functional components, which I recommend using.

Adding state to a class-based component

If you have to work with a class-based component, you could define a type representing the state, create and initialize an object of this type, and then update it as needed by invoking this.setState(…).

Let’s consider a simple class-based component that has a state object with two properties: the user name and the image to be displayed. For serving images we’ll use the web site called Lorem Picsum, which returns random images of the specified size. For example, if you enter the URL https://picsum.photos/600/150, the browser will show a random image having the width 600px and height 150px. The next listing shows such a class-based component with a two-property state object.

interface State { <1>
  userName: string;
  imageUrl: string;
}

export default class App extends Component {

  state: State = { userName: 'John', <2>
           imageUrl: 'https://picsum.photos/600/150' }; 

  render() {
    return (
      <div>
        <h1>{this.state.userName}</h1> <3>
        <img src={this.state.imageUrl} alt=""/> <4>
      </div>
    );
  }
}

1 Defining the type for the component’s state
2 Initializing the State object
3 Rendering the userName here
4 Rendering the imageUrl here

By looking at the code of the render() method, you can guess that this component would render John and the image. Note that we embedded the values of the state properties into JSX by placing them inside the curly braces, e.g. {this.state.userName}.

Any class-based component is inherited from the class Component, which has a property state and the method setState(). If you need to change the value of any state property, you must do it using this method, for example:

this.setState({userName: "Mary"});

By invoking setState() you let React know that the UI update may be required. If you update the state directly (e.g. this.state.userName=’Mary’), React won’t call the method render() to update the UI. As you might have guessed, the state property is declared on the base class Component.

Earlier, I listed the benefits of functional components over the class-based ones, and we won’t use class-based components any longer. In functional components, we manage state by using hooks introduced in React 16.8.

Using hooks for managing state in functional components

In general, hooks allow to “attach” behavior to a functional component without the need to write classes, create wrappers or use inheritance. It’s as if you say to a functional component, “I want you to have additional functionality while remaining a flat function”.

Hooks have their names started with the word use. For example, useState() is the name of the hook for managing the component’s state, while useEffect() is used for adding a side-effect behavior (e.g. fetching data from a server). In this section, we’ll focus on the useState() hook using the same example as in the previous section: a component whose state is represented by the user name and the image URL, but this time it’ll be a functional component.

The useState() hook allows you to store the state in one or more primitive variables as well as in an object. The following line shows you how to define a state for the user name.

const [userName, setUserName] = useState('John'); 

The function useState() returns a pair: the current state value and a function that lets you update it. Do you remember the syntax of array destructuring introduced in ECMAScript 6? The above line means that the hook useState() takes the string ‘John’ as an initial value and returns an array, and I use destructuring to get the two elements of this array into two variables: userName and setUserName. The syntax of array destructuring allows you to give any names to these variables. If you need to update the value of userName from John to Mary and make React to update the UI (if needed), do it as follows:

setUserName('Mary');

In your IDE, do CMD-Click or Ctrl-Click on the useState(), and it’ll open the type definition of this function, which will declare that this function returns a stateful value and a function to update it. The function useState() is not a pure function because it stores states somewhere inside React. It’s a function with side effects.

The next listing shows a functional component that stores the state in two primitives: userName and imageUrl and displays their values using JSX.

import React, {useState} from 'react'; <1>

const App: React.FC = () => {

  const [userName, setUserName] = useState('John');  <2>
  const [imageUrl, setImageUrl] = useState('https://picsum.photos/600/150'); <3>
  
  return (
    <div>
      <h1>{userName}</h1> <4>
      <img src={imageUrl} alt=""/>  <5>
    </div>
  );
}

export default App;

1 Importing the useState hook
2 Defining the userName state
3 Defining the imageUrl state
4 Rendering the value of the state variable userName
5 Rendering the value of the state variable imageUrl

Now let’s re-write the component from the previous listing so instead of two primitives, it’ll declare its state as an object with two properties: userName and imageUrl. The next listing declares an interface State and uses the useState() hook to work with the object of type State.

import React, {useState} from 'react';

interface State {   // 1
  userName: string;
  imageUrl: string;
}

const App: React.FC = () => {

  const [state, setState] = useState<State>({  // 2
    userName: 'John',
    imageUrl: 'https://picsum.photos/600/150'
  });  

  return (
    <div>
      <h1>{state.userName}</h1>  // 3
      <img src={state.imageUrl} alt=""/>  // 4 
    </div>
  );
}

export default App;

1. Defining the type for the component state
2. Defining and initializing the state object
3. Rendering the value of the state property userName
4. Rendering the value of the state property imageUrl

Note that the useState() is a generic function and during its invocation, I provided the concrete type State.

The source code of this sample app is located in the directory hello-world. Run the command npm start and the browser will render the window that look similar to the screenshot below (the image may be different though).

The user name and image are too close to the left border of the window, which is easy to fix with CSS. The generated app shown earlier had a separate file App.css with CSS selectors applied in the component with the className attribute; you can’t use the class attribute to avoid a conflict with the reserved JavaScript keyword class. This time, we’ll add the margin by declaring a JavaScript object with styles and using it in JSX. In the next listing, I added the variable myStyles and used it in the component’s JSX.

const App: React.FC = () => {

  const [state, setState] = useState<State>({
    userName: 'John',
    imageUrl: 'https://picsum.photos/600/150'
  });  

  const myStyles = {margin: 40};   // 1

  return (
    <div style ={myStyles}>       // 2
      <h1>{state.userName}</h1> 
      <img src={state.imageUrl} alt=""/> 
    </div>
  );
}

1. Declaring the styles
2. Applying the styles

With this margin, the browser will render the div with additional 40px of space around it as shown in the next screenshot.

Our first React app works and looks nice! It has one functional component that stores hard-coded data in the state object and renders them using JSX. It’s a good start, and in the next blog, we’ll start writing a new app that will have more functionality.

If you want to learn TypeScript quickly, get our book TypeScript Quickly.

Let’s start coding with TypeScript and React.js

I like the programming language TypeScript, and recently, I’ve been blogging about this language. Earlier, I’ve been blogging about programming in Angular with TypeScript. The time has come, and I’ll start a short series on programming in React.js with TypeScript.

The React.js library (a.k.a. React) was created by a Facebook engineer Jordan Walke in 2013, and today it has 1300 contributors and 130K stars on GitHub! According to Stack Overflow Developer Survey of 2019, it’s the second most popular JavaScript library (jQuery remains the most broadly used library), and in this blog series, I’ll show how to start developing web apps in React using TypeScript. React is not a framework but a library responsible for rendering views in the browser (think of the letter V in the MVC design pattern).

The main player of React is a component, and the UI of a web app consists of components having parent-child relations. But if Angular takes control of the entire root element of the Web page, React allows you to control a smaller page element (e.g. a div) even if the rest of the page was implemented with any other framework or in pure JavaScript.

You can develop React apps either in JavaScript or in TypeScript and deploy them using tools like Babel and Webpack, and without further ado let’s start by writing the simplest version of the Hello World app using React and JavaScript; we’ll switch to TypeScript a bit later.

Developing the simplest web page with React

I’ll show you two versions of a very simple web page written with React and JavaScript. Each of these pages renders Hello World, but if the first version uses React with no additional tooling, the second version will engage Babel.

In the real-world apps, a React app is a project with configured dependencies, tools and the build process, but to keep things simple, our first web page will have just a single file index.html, which loads the React library from CDN.

<!DOCTYPE html>
   <head>
     <meta charset="utf-8">
     <script crossorigin src="https://unpkg.com/react@16/umd/react.development.js"> <1>
     </script> 
     <script crossorigin src="https://unpkg.com/react-dom@16/umd/react-dom.development.js"> <2>
     </script> 
   </head>
   <body>
     <div id="root"></div>  <3>

     <script >
         const element = React.createElement('h1', <4>
                                             null, <5> 
                                             'Hello World'); <6>
         ReactDOM.render(element, 
                         document.getElementById('root')); <7>
      </script>

   </body>
</html>

1. Loading the React package from CDN
2. Loading the ReactDOM package from CDN
3. Adding the div with the id “root”
4. Creating the h1 element using createElement() function
5. We don’t send any data (props) to the h1 element
6. The text of the h1 element
7. Rendering the h1 inside the div

The processes of declaring the page content (React.createElement()) and rendering it to the browser’s DOM (ReactDOM.render()) are decoupled, and the former is supported by the API offered by the React object, while the latter is done by ReactDOM. Accordingly, we loaded these two packages in the heasd section of the page.

In React, all component’s UI elements have to be wrapped in one container, and this web page has a div element with the ID root that serves as such container for the content rendered by React. In the script, we prepare the element to render using React.createElement(), and then invoke ReactDOM.render() that finds the element with the root ID and renders it there.

In Chrome, right-click on Hello World and select the menu Inspect. It’ll open the Dev Tools showing the div with the h1 element inside.

The method createElement() has three arguments: the element, its props (data to be passed to the element) and content. In this case, we didn’t need to provide any props (think attributes) and used null here; I’ll explain what props are for in another blog. The content of h1 is “Hello World”, but it can contain child elements (e.g. ul with nested li elements), which could be created with the nested createElement() calls.

Open the file index.html in your browser, and it’ll render the text Hello World as shown next.

Invoking createElement() on the page that has only one element is fine, but for the page that had dozens of elements, this would become tedious and annoying. React allows you to embed the UI markup into the JavaScript code, which looks like HTML, but is JSX. Let’s see how our Hello World page could look like if we used JSX (note const myElement ) instead of invoking createElement().

<!DOCTYPE html>
    <head>
        <meta charset="utf-8">
        <script crossorigin 
           src="https://unpkg.com/react@16/umd/react.development.js"></script>
        <script crossorigin 
           src="https://unpkg.com/react-dom@16/umd/react-dom.development.js"></script>

        <script src="https://unpkg.com/babel-standalone/babel.min.js"></script> <!-- 1 -->
    </head>
    <body>
        <div id="root"></div>
         <script type="text/babel"> // <2>
           const myElement = <h1>Hello World</h1>; // <3>
           
           ReactDOM.render( // <4>
                 myElement, 
                 document.getElementById('root')
           );

           console.log(myElement); // <5>
        </script> 

    </body>
</html>

1. Adding Babel from CDN
2. The type of the script is text/babel
3. Assigning a JSX value to a variable
4. Initiating the rendering of myElement to the div
5. Monitoring the JavaScript object that was rendered

This app renders the same page as seen in the screenshot above, but it’s written differently. The JavaScript code has embedded string <h1>Hello World!<h1> that looks like HTML to you, but it’s actually JSX. Browsers can’t parse this, so we need a tool to turn JSX into a valid JavaScript. Babel to the rescue!

The <head> section has an additional <script> tag that loads Babel from the CDN. Also, I changed the type of our script to text/babel, which tells Babel to transform the content of this <script> tag into JavaScript.

We wouldn’t use CDN for adding Babel to a Node-based project as we did in the code above, but for demo purposes, it suffices. In the Node-based apps, Babel would be installed locally in the project and it would be a part of the build process.

The next screenshot shows the browser’s console open. Babel converted the JSX value to a JavaScript object that was rendered inside the div, and we printed this object in the console.

Now that you have a fair understanding of how the very basic pages that use React, let’s switch to Node-based projects and component-based apps and see some tooling that React developers use in the real world.

Generating and running a new React-TypeScript app with create-react-app

If you want to create a React app that includes a transpiler and a bundler, you’d need to add configuration files to your app, and this process is automated by the command-line interface (CLI) called create-react-app (see https://www.npmjs.com/package/create-react-app). This tool generates all required configuration files for Babel and Webpack, so you can concentrate on writing your app instead of wasting time configuring tooling. To install the package create-react-app globally on your computer, run the following command in the Terminal window:

npm install create-react-app -g

Now you can generate either a JavaScript or a TypeScript version of the app. To generate the TypeScript app, run the command create-react-app followed by the app name and the –typescript option:

create-react-app hello-world --typescript

In a minute or so, all required files will be generated in the directory hello-world and the project dependencies will be installed. In particular, it installs the following React packages:

* react – a JavaScript library for creating user interfaces
* react-dom – React package for working with the DOM
* react-scripts – scripts and configurations used by create-react-app

Besides the above packages, the CLI installs Webpack, Babel, TypeScript, their type definition files, and other dependencies. To launch the generated web app, switch to the directory hello-world and run npm start, which in turn runs react-scripts start. Webpack will bundle the app and webpack-dev-server will serve the app on localhost:3000 as shown in the next screenshot.

For bundling, Webpack uses the file webpack.config.js located in the directory node_modules/react-scripts/config.

The good part is that if you generated the project with create-react-app, it’ll recompile the code, rebuild the bundles, and re-render the UI. This functionality is provided by the Webpack Dev Server. The UI of this app tells us to edit the file src/App.tsx (tsx is for TypeScript + JSX), which is the main TypeScript file of the generated app. Open the directory in VS Code, and you’ll see the project files as shown in the next screenshot.

The source code of your app is located ins the src directory, and the public directory is for the assets of your app that shouldn’t be included in the app bundles. For example, your app has thousands of images and needs to dynamically reference their paths, and the directory public is for files that don’t require any processing before deployment.

The file index.html contains an element <div id=”root”>, which serves as a container of the generated React app. You won’t find any <script> tags for loading the React library code there; they’ll be added during the build process when the app’s bundles are ready.

You can run the app and open the Chrome Dev Panel under the Elements tab to see the runtime content of index.html.

The file serviceWorker.ts is generated just in case you want to develop a Progressive Web App (PWA) that can be started offline using cached assets. We are not going to use it in our sample apps.

As you see, some of the files have an unusual extension .tsx. If we’d be writing the code in JavaScript, the CLI would generate the app file with the extension .jsx (not .tsx).

JSX and TSX

The draft of the JSX specification offers the following definition: “JSX is an XML-like syntax extension to ECMAScript without any defined semantics. It’s NOT intended to be implemented by engines or browsers”.

JSX stands for JavaScript XML. It defines a set of XML tags that can be embedded inside the JavaScript code. These tags can be parsed and turned into regular HTML tags for rendering by the browser, and React includes such a parser. The next screenshot shows the Babel’s REPL with a sample JSX.

On the left, we selected the preset react and pasted a sample code from the JSX spec. This preset means that we want to turn each JSX tag into React.createElement() invocation. The sample code should render a dropdown with a menu containing three menu items. On the right, you see how the JSX was parsed into JavaScript.

Every React app has at least one component, which is called a root component, and our generated app has only the root component App. The file with the code of the function App has the name extension .tsx, which tells the TypeScript compiler that it contains JSX. But just having the extension .tsx is not enough for tsc to handle it: you need to enable JSX by adding the jsx compiler option. Open the file tsconfig.json, and you’ll find there the following line:

"jsx": "preserve"

The jsx option only affects the emit stage – type checking is unaffected. The value preserve tells tsc to copy the JSX portion into the output file changing its extension to .jsx, because there will be another process (e.g. Babel) that will be parsing it. If the value would be react, tsc would turn the JSX tags into React.createElement() invocations as seen in the above screenshot on the right.

In the next blog, I’ll introduce two types of React components and what the component’s state is about. If you want to learn TypeScript quickly, get our book TypeScript Quickly.

TypeScript mapped types. Part 2

This blog is a part of my TypeScript series, and the previous ones are:

1. Why program in TypeScript
2. Structural vs nominal typing
3. Getting started with TypeScript classes
4. Access modifiers public, private, and protected
5. Abstract classes
6. enums
7. An intro to TypeScript generics
8. TypeScript mapped types. Part 1

In the previous blog, I showed you how the transformation function for the built-in mapped type Readonly was declared in the file typescript/lib/lib.es5.d.ts:

type Readonly<T> = {
  readonly [P in keyof T]: T[P];
};

You can define your own transformation functions using similar syntax. Let’s try to define the type Modifiable – an opposite to Readonly.

We took a type Person made all of its properties read-only by applying Readonly mapped type: Readonly. Let’s consider another scenario. Say, the properties of the type Person were originally declared with the readonly modifier as follows:

interface Person {
  readonly name: string;
  readonly age: number;
}

How can you remove the readonly qualifiers from the Person declaration if need be? There is no built-in mapped type for it, so let’s declare one:

type Modifiable = {
  -readonly[P in keyof T]: T[P];
};

The minus sign in front of the readonly qualifier removes it from all properties of the given type. Now you can remove the readonly restriction from all properties by applying the mapped type Modifiable:

interface Person {
  readonly name: string;
  readonly age: number;
}

const worker1: Person = { name: "John", age: 25};

worker1.age = 27;  // compile error

const worker2: Modifiable = { name: "John", age: 25};

worker2.age = 27;  // No errors here 

You can see this code in the Playground at https://bit.ly/2GMAf3c.

Other built-in mapped types

You know that if a property name in the type declaration ends with the modifier ?, this property is optional. Say we have the following declaraion of the type Person:

interface Person {
  name: string;
  age: number;
}

Since none of the Person’s properties names ends with a question mark, providing values for name and age is mandatory. What if you have a need in type that has the same properties as in Person, but all of its properties should be optional? This is what the mapped type Partial is for. Its mapping function is declared in lib.es5.d.ts as follows:

type Partial<T> = {
    [P in keyof T]?: T[P];
};

Have you spotted the question mark there? Basically, we create a new type by appending the question mark to each property name of the given type. The mapped type Partial makes all properties in the given type optional. The following screenshot was taken while I was hovering the mouse over the declaration of the worker1 variable.

It shows an error message because the variable worker1 has the type Person, where each property is required, but the value for age was not provided. There are no errors in initializing worker2 with the same object because the type of this variable is Partial, so all its properties are optional.

There is a way to make all properties of a type optional, but can you do the opposite? Can you take a type that was declared with some optional properties and make all of them required? You bet! This can be done with the mapped type Required that’s declared as follows:

type Required<T> = {
    [P in keyof T]-?: T[P];  // The -? means remove the modifier ?.
};

The next screenshot was taken while I was hovering the mouse over the declaration of the worker2 variable. The properties age and name were optional in the base type Person but are required in the mapped type Required hence the error about missing age.

Tip: The type Required was introduced in TypeScript 2.8. If your IDE doesn’t recognize this type, make sure it uses the proper version of the TypeScript language service. In Visual Studio Code you can see its version in the bottom right corner. Click on it to change to a newer version if you have it installed.

You can apply more than one mapped type to a given type. In the next listing, I apply Readonly and Partial to the type Person. The former will make each property read-only and the latter will make each property optional. There I initialize the property name but not the optional age. The property name is read-only and can be initialized only once.

interface Person {
   name: string;
   age: number;
}

const worker1: Readonly<Partial<Person>>   
                       = { name: "John" }; 

worker1.name = "Mary"; // compiler's error 

TypeScript offers yet another useful mapped type called Pick. It allows you to declare a new type by picking a subset of properties of the given type. Its transformation function looks like this:

type Pick<T, K extends keyof T> = {
    [P in K]: T[P];
};

The first argument expects an arbitrary type T, and the second – a subset K of the properties of this T. You can read it as “From T, pick a set of properties whose keys are in the union K”. The next listing shows the type Person that has three properties. With the help of Pick, we declare a mapped type PersonNameAddress that has two string properties: name and address as seen in the following listing.

interface Person {   
  name: string;
  age: number;
  address: string;
}

type PersonNameAddress<T, K> = Pick<Person, 'name' | 'address' >; 

The moral of the mapped types story? Mapped types allow you to create apps that have a limited number of basic types and many derived types based on the basic ones.

TypeScript mapped types. Part 1.

This blog is a part of my TypeScript series, and the previous ones are:

1. Why program in TypeScript
2. Structural vs nominal typing
3. Getting started with TypeScript classes
4. Access modifiers public, private, and protected
5. Abstract classes
6. enums
7. An intro to TypeScript generics

NOTE: Understanding of the generics syntax is a pre-requisite for understanding this blog.

Mapped types allow you to create new types from the existing ones. This is done by applying a transformation function to an existing type. In this blog, you’ll see how they work by looking at the type Readonly that comes with TypeScript. In the next blog, I’ll show you how to create your own mapped types.

The mapped type Readonly

Imagine that you need to pass the objects of type Person (shown next) to the function doStuff() for processing.

interface Person {
  name: string;
  age: number;
}

This class is used in multiple places, but you realized that you don’t want to allow the function doStuff() to accidentally modify some of the Person’s properties like age.

const worker: Person = { name: "John", age: 22};

function doStuff(person: Person) {

    person.age = 25; // We don’t want to allow this
}

None of the properties of the type Person was declared with the readonly modifier. Should we declare another type just to be used with doStuff() as follows?

interface ReadonlyPerson {
  readonly name: string;
  readonly age: number;
}

Does it mean that you need to declare (and maintain) a new type each time when you need to have a read-only version of the existing one? There is a better solution. We can use a built-in mapped type Readonly to turn all the properties of a previously declared type to be readonly. We’ll just need to change the signature of the function doStuff() to take the argument of type Readonly instead of Person, just like this:

const worker: Person = { name: "John", age: 22};

function doStuff(person: Readonly) { 

    person.age = 25;   // This line generates a compiler error
}

To understand why an attempt to change the value of the property age generates a compiler error, you need to see how the type Readonly is declared, which in turn requires an understanding of the type keyof.

The type keyof

Reading the declarations of the built-in mapped types in the file typescript/lib/lib.es5.d.ts (it comes with TypeScript installation) helps in understanding their inner-workings and requires familiarity with the TypeScript’s index type query keyof.

You can find the following declaration of the Readonly mapping function in lib.es5.d.ts:

type Readonly = {
readonly [P in keyof T]: T[P];
};

We assume that you’ve read about generics in chapter 4, and you know what in angle rackets means. Usually, the letter T in generics represents type, K – key, V – value, P – property et al.

keyof is called index type query and it represents a union of allowed property names (the keys) of the given type. If the type Person would be our T, then keyof T would represent the union of name and age. The next screenshot was taken while hovering the mouse over the custom type propNames. As you see, the type of propName is a union of name and age.


In the previous listing, the fragment [P in keyof T] means “give me the union of all the properties of the given type”. This seems as if we’re accessing the elements of some object, but actually, this is done for declaring types. The keyof type query can be used only in type declarations.

Now we know how to get access to the property names of a given type, but to create a mapped type from the existing one, we also need to know the property types. In case of the type Person, we need to be able to find out programmatically that the property types are string and number.

This is what lookup types are for. The piece T[P] is a lookup type, and it means “Give me the type of a property P”. The next screenshot was taken while hovering the mouse over the type propTypes. The types of properties are string and number.

Now let’s read the code in the previous listing  one more time. The declaration of the type Readonly means “Find the names and types of the properties of the provided concrete type and apply the readonly qualifier to each property”.

In our example, Readonly will create a mapped type that will look like this:

interface Person {
readonly name: string;
readonly age: number;
}

Now you see why an attempt to modify the person’s age results in the compiler’s error “Cannot assign to age because it’s a read-only property”. Basically, we took an existing type Person and mapped it to a similar type but with the read-only properties. You can try this code in the Playground.

You may say, “OK, I understand how to apply the mapped type Readonly, but what’s the practical use of it?” Those of you who purchased our book “TypeScript Quickly”  will see plenty of examples of using Readonly while going through the code of a sample blockchain app that comes with the book. For example, in chapter 10 in listing 10.15 you can see two methods that use the Readonly type with their message argument:

replyTo(client: WebSocket, message: Readonly): void

This method can send messages to blockchain nodes over the WebSocket protocol. The messaging server doesn’t know what types of messages are going to be sent, and the message type is generic. To prevent accidental modification of the message inside replyTo(), we use the mapped type Readonly there.

In the next blog, I’ll show you how to create your own mapped types.

An intro to TypeScript generics

This blog is a part of my TypeScript series, and the previous ones are:

1. Why program in TypeScript
2. Structural vs nominal typing
3. Getting started with TypeScript classes
4. Access modifiers public, private, and protected
5. Abstract classes
6. enums

We know that TypeScript has built-in types and you can create the custom ones as well. But there’s more to it. Strange as it may sound, types can be parameterized, i.e. you can provide a type (not the value) as a parameter.

It’s easy to declare a function that takes parameters of specific concrete types e.g. a number and a string:

function calctTax(income: number, state: string){...}

But TypeScript generics allow you to write a function that can work with a variety of types. In other words, you can declare a function that works with a generic type(s), and the concrete type(s) can be specified later by the caller of this function.

In TypeScript, you can write generic functions, classes, or interfaces. A generic type can be represented by an arbitrary letter(s), e.g. T in Array<T>, and when you declare a specific array, you provide a concrete type in angle brackets, e.g. number:

let lotteryNumbers: Array<number>;

In this blog, you’ll learn how to use generic code written by someone else as well as how to create your own classes, interfaces, and functions that can work with generic types.

Understanding Generics

A generic is a piece of code that can handle values of multiple types that are specified at the moment of using this piece of code (e.g. function invocation or class instantiation). Let’s consider TypeScript arrays, which can be declared as follows:

  1. Specify the type of the array element followed by []:

    const someValues: number[];

  2. Use a generic Array followed by the type parameter in angle brackets:

    const someValues: Array<number>;

With the second syntax, the angle brackets represent a type parameter. You can instantiate this the Array like any other while restricting the type of allowed values, which is number in our example.

The next code snippet creates an array that will initially have 10 objects of type Person, and the inferred type of the variable people is Person[].

class Person{ }

const people = new Array<Person>(10);

TypeScript arrays can hold objects of any type, but if you decide to use the generic type Array, you must specify which particular value types are allowed in the array, e.g. Array<Person>. By doing this, you place a constraint on this instance of the array. If you were to try to add an object of a different type to this array, the TypeScript compiler would generate an error. In another piece of code, you can use an array with a different type parameter, e.g. Array<Customer>.

The code in the next listing declares a class Person, its descendant Employee, and a class Animal. Then it instantiates each class and tries to store all these objects in the workers array using the generic array notation with the type parameter Array<Person>.

class Person {  
    name: string;
}

class Employee extends Person {  
    department: number;
}

class Animal {  
    breed: string;
}

const workers: Array<Person> = []; 

workers[0] = new Person();  
workers[1] = new Employee(); 
workers[2] = new Animal(); // compile-time error

The last line won’t compile because the array workers was declared with a type parameter Person, and our Animal is not a Person. But the class Employee extends Person and is considered a subtype of a Person; you can use the subtype Employee anywhere where the supertype Person is allowed

So, by using a generic array workers with the parameter <Person>, we announce our plans to store only instances of the class Person or its subtypes there. An attempt to store an instance of the class Animal (as it was defined in the previous listing ) in the same array will result in the following compile-time error “Type Animal is not assignable to type Person. Property name is missing in type Animal.” In other words, using TypeScript generics helps you to avoid errors related to using the wrong types.

Note

The term generic variance is about the rules for using subtypes and supertypes in any particular place of your program. For example, in Java, arrays are covariant, which means that you can use Employee[] (the subtype) where the array Person[] (the supertype) is allowed.
Since TypeScript supports structural typing, you can use either an Employee or any other object literal that’s compatible with the type Person where the Person type is allowed. In other words, generic variance applies to objects that are structurally the same. Given the importance of anonymous types in JavaScript, an understanding of this is important for the optimal use of generics in Typescript.
To see if type A can be used where type B is expected, read about structural subtyping.

Tip

We used const (and not let) to declare the identifier workers because its value never changes in the above listing. Adding new objects to the array workers doesn’t change the address of the array in memory hence the value of the identifier workers remains the same.

If you’re familiar with generics in Java or C#, you may get a feeling that you understand TypeScript generics as well. There is a caveat, though. While Java and C# use the nominal type system, TypeScript uses the structural one as explained in this blog.

In the nominal system, types are checked against their names, but in a structural system, by their structure. In languages with the nominal type system, the following line would always result in an error:

let person: Person = new Animal();

With a structural type system, as long as the structures of the type are similar, you may get away with assigning an object of one type to a variable of another. Let’s add the property name to the class Animal, as seen below.

class Person {
    name: string;
}

class Employee extends Person {
    department: number;
}

class Animal {
    name: string; 
    breed: string;
}

const workers: Array<Person> = [];

workers[0] = new Person();
workers[1] = new Employee();
workers[2] = new Animal();  // no errors

Now the TypeScript compiler doesn’t complain about assigning an Animal object to the variable of type Person. The variable of type Person expects an object that has a property name, and the Animal object has it! This is not to say that Person and Animal represent the same types, but these types are compatible.

Moreover, you don’t even have to create a new instance of PersonEmployee, or Animal classes but use the syntax of object literals instead. Adding the following line to the above listing is perfectly fine because the structure of the object literal is compatible with the structure of type Person:

workers[3] = { name: "Mary" };

On the other hand, trying to assign the Person object to a variable of type Animal will result in the compilation error:

const worker: Animal = new Person(); // compilation error

The error message would read “Property breed is missing in type Person”, and it makes sense because if you declare a variable worker of type Animal but create an instance of the object Person that has no property breed, you wouldn’t be able to write worker.breed hence the compile-time error.

Note

The previous sentence may irritate savvy JavaScript developers who’re accustomed to adding object properties like worker.breed without thinking twice. If the property breed doesn’t exist on the object worker, the JavaScript engine would simply create it, right? This works in the dynamically typed code, but if you decided to use the benefits of the static typing, you have to play by the rules. When in Rome, do as the Romans do.

Generics can be used in a variety of scenarios. For example, you can create a function that takes values of various types, but during its invocation, you must explicitly specify a concrete type. To be able to use generic types with a class, interface, or a function, the creator of this class, interface, or function has to write them in a special way to support generic types.

 Open TypeScript’s type definition file (lib.d.ts) from the TypeScript GitHub repository at line 1008 and you’ll see the declaration of the interface Array, as shown below.

The <T> in line 1008 is a placeholder for a concrete type that must be provided by the application developer during the declaration of the array like we did earlier. TypeScript requires you to declare a type parameter with Array, and whenever you’ll be adding new elements to this array, the compiler will check that their type matches the type used in the declaration.

In our code samples, we used the concrete type <Person> as a replacement of the generic parameter represented by the letter <T>:

const workers: Array<Person>;

But because generics aren’t supported in JavaScript, you won’t see them in the code generated by the transpiler – generics (as any other types) are erased. Using type parameters is just an additional safety net for developers at compile time.

You can see more generic types T in lines 1022 and 1026 in the above figure. When generic types are specified with the function arguments, no angle brackets are needed, and you’ll see this syntax in the next listing. There’s no T type in TypeScript. The There means the push() and pop() methods let you push or pop objects of the type provided during the array declaration. For example, in the following code snippet, we declared an array using the type Person as a replacement of T and that’s why we can use the instance of Person as the argument of the method push():

const workers: Array<Person>;
workers.push(new Person());
Note

The letter T stands for type, which is intuitive, but any letter or word can be used for declaring a generic type. In a map, developers often use the letter K for key and V for value.

Seeing the type T in the API of the interface Array tells us that its creator enabled support of generics. In one of the future blogs, I’ll show you how to create your own generic types.  Even if you’re not planning to create your own generic types, it’s really important that you understand the syntax of generics while reading someone else’s code of TypeScript documentation. You can also read our book TypeScript Quickly, where it’s explained.

TypeScript enums

This blog is a part of my TypeScript series, and the previous ones are:

1. Why program in TypeScript
2. Structural vs nominal typing
3. Getting started with TypeScript classes
4. Access modifiers public, private, and protected
5. Abstract classes

Enumerations (a.k.a. enums) allow you to create limited sets of named constants that have something in common. For example, a week has seven days, and you can assign numbers from 1 to 7 to represent them. But what’s the first day of the week?

According to the standard ISO 8601, Monday is the first day of the week, which doesn’t stop such countries as USA, Canada, and Australia consider Sunday as the first day of the week. Hence using just numbers from 1 to 7 for representing days may not be a good idea. Also, what if someone will assign the number 8 to the variable that store the day? We don’t want this to happen and using day names instead of the numbers makes our code more readable.

On the other hand, using numbers for storing days is more efficient than their names. So we want to have readability, the ability to restrict values to a limited set, and efficiency in storing data. This is where enums can help.

TypeScript has the enum keyword that can define a limited set of constants, and we can declare the new type for weekdays as follows:

enum Weekdays {
  Monday = 1,
  Tuesday = 2,
  Wednesday = 3,
  Thursday = 4,
  Friday = 5,
  Saturday = 6,
  Sunday = 7
}

Here, we define a new type Weekdays that has a limited number of values. We initialized each enum member with a numeric value, and a day of the week can be referred using the dot notation:

let dayOff = Weekdays.Tuesday;

The value of the variable dayOff is 2, but if you’d be typing the above line in your IDE or in TypeScript Playground, you’d be prompted with the possible values as shown on the next screenshot.

Using the members of the enum Weekdays stops you from making a mistake and assigning a wrong value (e.g. 8) to the variable dayOff. Well, strictly speaking, nothing stops you from ignoring this enum and write dayOff = 8 but this would be a misdemeanor.

We could initialize only Monday with 1, and the rest of the days values will be assigned using auto-increment, e.g. Tuesday will be initialized with 2, Wednesday with 3 and so on.

enum Weekdays {
  Monday = 1,
  Tuesday,
  Wednesday,
  Thursday,
  Friday,
  Saturday,
  Sunday
}

By default, enums are zero-based, and if we wouldn’t initialize the Monday member with one, its value would be zero.

Reversing numeric enums

If you know the value of the numeric enum, you can find the name of the corresponding enum member. For example, you may have a function that returns the weekday number and you’d like to print its name. By using this value as an index, you can retrieve the name of the day.

enum Weekdays {  // Declaring a numeric enum
  Monday = 1,
  Tuesday,
  Wednesday,
  Thursday,
  Friday,
  Saturday,
  Sunday
}

const getDay = () => 3;  // A function that returns 3
const today = getDay();  // today is equal 3

console.log(Weekdays[today]);  // Getting the name on the member that’s equal to 3 

In the last line, we retrieve the name of the day, and it’ll print Wednesday on the console.

In some cases, you don’t even care which numeric values are assigned to the enum members, and the following function convertTemperature() illustrates this. It converts the temperature from Fahrenheit to Celsius or visa versa. In this version of convertTemperature(), we won’t use enums, but then will re-write it with them. This function takes two parameters: temperature and conversion direction

function convertTemperature(temp: number, fromTo: string): number { 

  return ('FtoC' === fromTo) ?
      (temp - 32) * 5.0/9.0:  // Convert from Fahrenheit to Celsius
      temp * 9.0 / 5.0 + 32;  //Convert from Celsius to Fahrenheit
}

console.log(`70F is ${convertTemperature(70, 'FtoC')}C`);  
console.log(`21C is ${convertTemperature(21, 'CtoF')}F`);  
console.log(`35C is ${convertTemperature(35, 'ABCD')}F`);  

This function converts the value from Celsius to Fahrenheit if you pass any value as a fromTo parameter except FtoC. In the last line, we purposely provided the erroneous value ABCD as a fromTo parameter, and this function still converts the temperature from Celsius to Fahrenheit. The attempts to invoke a function with the erroneous values should be caught by the compiler and this is what TypeScript enums are for. You can see it in action here.

In the next listing, we declare the enum Direction that restricts the allowed constants to either FtoC or CtoF and nothing else. We also changed the type of the fromTo parameter from a string to Direction.

enum Direction {  // Declaring the enum Direction 
  FtoC,
  CtoF
}

function convertTemperature(temp: number, fromTo: Direction): number {  

      return (Direction.FtoC === fromTo) ?
             (temp - 32) * 5.0/9.0:
             temp * 9.0 / 5.0 + 32;
}

console.log(`70F is ${convertTemperature(70, Direction.FtoC)}C`); 
console.log(`21C is ${convertTemperature(21, Direction.CtoF)}F`); 

Since the type of the second parameter of the function is Direction, we have to invoke this function providing one of this enum’s member, e.g. Direction.CtoF. We’re not interested in what is the numeric value of this member. The purpose of this enum is just to provide a limited set of constants: CtoF and FtoC. The IDE will prompt you with two possible values for the second parameter, and you won’t make a mistake providing a random value.

Enum members are initialized with values (either explicitly or implicitly). All examples included in this section had enum members initialized with numbers, but TypeScript allows you to create enums with string values, and we’ll see such examples next.

String enums

In some cases, you may want to declare a limited set of string constants, and you can use string enums for this, i.e. enums that have their members initialized with string values. Say you’re programming a computer game where the player can move in the following directions:

enum Direction {
    Up = "UP",       
    Down = "DOWN",   
    Left = "LEFT",   
    Right = "RIGHT", 
}

When you declare a string enum, you must initialize each member. You may ask, “Why not just use a numeric enum here so TypeScript would automatically initialize its members with any numbers?” The reason is that in some cases you want to give meaningful values to the enum members. For example, you need to debug the program and instead of seeing that the last move was 0, you’ll see that the last move was UP.

And the next question you may ask, “Why declare the enum Direction if I can just declare four string constants with the values UP, DOWN, LEFT, and RIGHT?” You can, but let’s say we have a function with the following signature:

move(where: string)

A developer can make a mistake (or a typo) and invoke this function as move(“North”). But North is not a valid direction, and it’s safer to declare this function using the enum Direction:

move(where: Direction)

As you see, wrong argument value is caught by the compiler (1), and auto-complete (2) prevents mistakes

We made a mistake and provided a string “North” in line 15, and the compile-time error would read “Argument of type ‘”North”‘ is not assignable to the parameter of type ‘Direction’.” In line 20, the IDE offers you a selection of valid enum members so there’s no way you provide the wrong argument.

Now, let’s imagine that you need to keep track of the app state changes. The user can initiate a limited number of actions in each of the views of your app. Say, you want to log the actions taken in the view Products. Initially, the app tries to load products, and this action can either succeed or fail. The user can also search for products. To represent the states of the view Products you may declare a string enum as follows:

enum ProductsActionTypes {
  Search = 'Products Search', 
  Load = 'Products Load All', 
  LoadFailure = 'Products Load All Failure', 
  LoadSuccess = 'Products Load All Success' 
}

// If the function that loads products fails...
console.log(ProductsActionTypes.LoadFailure);  

When the user clicks on the button to load products, you can log the value of the member ProductsActionTypes.Load, which will log the text ‘Products Load All’. If the products were loaded successfully, log the value of ProductsActionTypes.LoadFailure, which will log the text ‘Products Load All Failure’.

Note: Some state management frameworks (e.g. Redux) require the app to emit actions when the app state changes. If we’d declare a string enum like in the above listing, we’d be emitting actions ProductsActionTypes.Load, ProductsActionTypes.LoadSuccess et al.

Note: String enums are not reversible, and you can’t find the member’s name if you know its value.

const enums

If you use the keyword const while declaring enum, its values will be inlined and no JavaScript will be generated. Let’s compare the generated JavaScript of enum vs const enum. The left side of the following screenshot shows the enum declared without the const, and the right side shows the generated JavaScript. For illustration purposes, in the last line, we just print the next move.

Now let’s just add the keyword const on the first line before the enum, and compare the generated JavaScript (on the right) with the one from the screenshot above.

As you see, the JavaScript code for the enum Direction was not generated – it was erased. But the values of the enum member that was actually used in the code (i.e. Direction.Down) was inlined in JavaScript.

Using const with enum results in more concise JavaScript, but keep in mind that since there is no JavaScript code that would represent your enum, you may run into some limitations, e.g. you won’t be able to reverse the numeric enum member name by its value.

Overall, with enums, the readability of your programs increases. Besides, using enum is the step in the right direction: moving away from the type any.

If you like this blog series, consider reading our book “TypeScript Quickly”. So far, only 175 pages are available, but the publisher will be releasing the new content monthly.
An extra bonus: this book will not only introduce you to TypeScript programming, but you’ll also learn how the blockchain technology works while going over multiple sample apps.

Abstract classes in TypeScript

This blog is a part of my TypeScript series, and the previous ones are:

1. Why program in TypeScript
2. Structural vs nominal typing
3. Getting started with TypeScript classes
4. Access modifiers public, private, and protected

My video lessons on TypeScript are here.

If you add the abstract keyword to the class declaration, it can’t be instantiated. An abstract class may include methods that are implemented as well as the abstract ones that are only declared.

And why would you even want to create a class that can’t be instantiated? The reason is that you may want to include some non-implemented methods in a class, but you want to make sure that these methods will be implemented in its subclasses. This concept is easier to grasp while working on a specific task, so let’s consider a coding assignment and see how abstract classes can be used there.

An assignment with abstract classes

A company has employees and contractors. Design the classes to represent workers of this company. Any worker’s object should support the following methods:

constructor(name: string)

changeAddress(newAddress: string)

giveDayOff()

promote(percent: number)

increasePay(percent: number)

In our scenario, to promote means giving one day off and raising the salary by the specified percent. The method increasePay() should raise the yearly salary for employees but increase the hourly rate for contractors. How do you implement methods is irrelevant; a method can just have one console.log() statement.

Let’s work on this assignment. We’ll need to create the classes Employee and Contractor, which should have some common functionality. For example, changing the address and giving a day off should work the same way for contractors and employees, but increasing pay requires different implementation for these categories of workers.

Here’s the plan: we’ll create the abstract class Person with two descendants: Employee and Contractor. The class Person will implement methods changeAddress(), giveDayOff(), and promote(). This class will also include a declaration of the abstract method increasePay(), which will be implemented (differently!) in the subclasses of Person shown next.

abstract class Person {  // 1

constructor(public name: string) { };

changeAddress(newAddress: string ) {  // 2
   console.log(`Changing address to ${newAddress}`);
}

giveDayOff() {  // 2
console.log(`Giving a day off to ${this.name}`);
}

promote(percent: number) {  // 2
   this.giveDayOff();
   this.increasePay(percent);  // 3
}

abstract increasePay(percent: number);  // 4

}

1. Declaring an abstract class
2. Declaring and implementing a method
3. “Invoking” the abstract method
4. Declaring an abstract method

If you don’t want to allow invoking the method giveDayOff() from external scripts, add private to its declaration. If you want to allow invoking giveDayOff() only from the class Person and its descendants, male this method protected.

Note that you are allowed to write a statement that “invokes” the abstract method. Since the class is abstract, it can’t be instantiated, and there is no way that the abstract (unimplemented method) will be actually invoked. If you want to create a descendant of the abstract class that can be instantiated, you must implement all abstract methods of the ancestor. The code in the next listing shows how we implemented the classes Employee and Constructor.

class Employee extends Person {

  increasePay(percent: number) {
    console.log(`Increasing the salary of ${this.name} by ${percent}%`);  // 1
  }
}

class Contractor extends Person {
  increasePay(percent: number) {
    console.log(`Increasing the hourly rate of ${this.name} by ${percent}%`);  // 2
  }
}

1. Implementing the method increasePay() for employees
2. Implementing the method increasePay() for contractors

The next listing shows how can we see our solution in action. We’ll create an array of workers with one employee and one contractor and then iterate through this array invoking the method promote() on each object.

const workers: Person[] = [];  // 1

workers[0] = new Employee('John');
workers[1] = new Contractor('Mary');

workers.forEach(worker => worker.promote(5));  // 2

1. Declaring an array of the superclass type
2. Invoking promote() on each object

The workers array is of type Person, which allows us to store there the instances of descendant objects as well.

Since the descendants of Person don’t declare their own constructors, the constructor of the ancestor will be invoked automatically when we instantiate Employee and Contractor. If any of the descendants declared its own constructor, we’d have to use super() to ensure that the constructor of the Person is invoked.

You can run this code sample in the TypeScript playground, and the browser console will show the following output:

Giving a day off to John
Increasing the salary of John by 5%
Giving a day off to Mary
Increasing the hourly rate of Mary by 5%

The previous code fragment gives an impression that we iterate through the objects of type Person invoking Person.promote(). But realistically, some of the objects can be of type Employee while others are instances of Contractor. The actual type of the object is evaluated only during runtime, which explains why the correct implementation of the increasePay() is invoked on each object. This is an example of polymorphism – a feature that each object-oriented language supports.

Protected constructors

In the previous blog, we declared a private constructor to create a singleton. There’s some use for protected constructors as well. Say you need to declare a class that can’t be instantiated, but its subclasses can. Then, you could declare a protected constructor in the superclass and invoke it using the method super() from the subclass constructor.

This mimics one of the features of abstract classes. But a class with protected constructor wouldn’t let you declare abstract methods unless the class itself is declared as abstract.

TypeScript access modifiers public, private, protected

This blog is a part of my TypeScript series, and the previous ones are:

1. Why program in TypeScript
2. Structural vs nominal typing
3. Getting started with TypeScript classes

TypeScript includes the keywords public, protected, and private to control access to the members of a class i.e. properties or methods.

Class members marked public can be accessed from the internal class methods as well as from the external scripts. This is a default access.

Class members marked as protected can be accessed either from the internal class methods or from its descendants.

The private class members can be accessed from within the class only.

NOTE: If you know languages like Java or C#, you may already know the concept of restricting the access level with private and protected keywords. But TypeScript is a superset of JavaScript, which doesn’t support the private keyword, so the keywords private and protected (as well as public) are removed during the code compilation. The resulting JavaScript won’t include these keywords and you can consider them just as a convenience during development.

The next screenshot illustrates the protected and private access level modifiers. In line 15, the code can access the protected ancestor’s method sayHello(), because its done from the descendant. But when we clicked Ctrl-Space after this. In line 21, the variable age is not shown in the auto–complete list because it’s declared as private and can be accessed only within the class Person.

This code sample shows that the subclass can’t access the private member of the superclass. In general, only a method from the class Person can access private members from this class.

To try this code on your own, visit the TypeScript playground here.

While protected class members are accessible from the descendant’s code, they are not accessible on the class instance. For example, the following code won’t compile and will give you the error “Property ‘sayHello’ is protected and only accessible within class ‘Person’ and its subclasses”:

const empl = new Employee(); +
empl.sayHello(); // error

DISCLAMER: IMO, the protected access level is useless in any programming language. I explained why they are useless in Java back in 2006. Then I continued my witch hunt against seemengly protected creatures in the Adobe Flex framework. As I’m getting older, my motivation to fight protected variables is not as strong as it used to be. Live and let live.

Let’s look at another example of the class Person, which has a constructor, two public and one private property. First, we’ll write a long version of the class declaration.

class Person {
    public firstName: string;
    public lastName: string;
    private age: number;

    constructor(firstName:string, lastName: string, age: number) {
        this.firstName = firstName;
        this.lastName;
        this.age = age;
    }
}

The constructor in the class Person performs a tedious job of assigning the values from its argument to the respective members of this class. By using access qualifiers with the constructor’s arguments, you instruct the TypeScript compiler to create class properties having the same names as constructor’s arguments. The compiler will auto-generate the JavaScript code to assign the values given to the constructor to class properties. This will make the code of the TypeScript class more concise as shown in the next screenshot.

TIP: If you’d use just the readonly qualifier with constructor arguments, TypeScript compiler would also create read-only class variables for them.

In line 8, I create an instance of the class Person passing the initial property values to its constructor, which will assign these values to the respective object’s properties. In line 10, I wanted to print the values of the object’s properties firstName and age, but the latter is marked with a red squiggly line. If you hover the mouse over the erroneous fragment, you’ll see that the TypeScript’s static analyzer (it runs even before the compiler) properly reports an error:

Property age is private and only accessible within class Person.

In the TypeScript playground, the JavaScript code is generated anyway because from the JavaScript perspective, the code in line 10 is perfectly fine. But in your projects, you should always use the compiler’s option noEmitOnError to prevent the generation of JavaScript until all TypeScript syntax errors are fixed.

Implementing a singleton with a private constructor

Imagine, you need to create a single place that serves as a storage of important data in memory representing the current state of the app. Various scripts can have an access to this storage but you want to make sure that only one such object can be created for the entire app, also known as a single source of truth.

Singleton is a popular design pattern that restricts the instantiation of a class to only one object. How do you create a class that you can instantiate only once? It’s a rather trivial task in any object-oriented language that supports the private access qualifier.

Basically, you need to write a class that won’t allow using the new keyword, because with the new, you can create as many instances as you want. The idea is simple – if a class has a private constructor, the operator new will fail.

Then, how to create even a single instance of the class? The thing is that if the class constructor is private, you can access if only within the class, and as the author of this class, you’ll responsibly create it only once by invoking that same new operator from the class method.

But can you invoke a method on a class that was not instantiated? Of course, you can! JavaScript (as well as its big brother TypeScript) support static class members, which are shared between multiple instances of the class.

The next listing shows our implementation of the singleton design pattern in a class AppState, which has the property counter. Let’s assume that the counter represents our app state, which may be updated from multiple scripts in the app.

Any of such scripts must update the only place that stores the value of the counter, which is the singleton instance of AppState. Any script that needs to know the latest value of the counter will also get it from the AppState instance.

The class AppState has a private constructor, which means that no other script can instantiate it using the statement new. It’s perfectly fine to invoke such a constructor from within the AppState class, and we do this in the static method getInstance().

The method getInstance() is static, and this is the only way we can invoke a method in the absence of the class instance.

class AppState {

    counter = 0;  
    private static instanceRef: AppState;

    private constructor() { }

    static getInstance(): AppState {
        if (AppState.instanceRef === undefined) {
            AppState.instanceRef = new AppState();
        } 

        return AppState.instanceRef; 
    }
}

// const appState = new AppState(); // error because of the private constructor

const appState1 = AppState.getInstance(); 

const appState2 = AppState.getInstance();

appState1.counter++;
appState2.counter++;

console.log(appState1.counter); // prints 4 
console.log(appState2.counter); // prints 4

Both console.log() invocations will print 4 as there is only one instance of AppState.

To see this code sample in CodePen, visit this page.