Angular 2: Guarding routes

In this blog I’ll show you how to guard routes in Angular 2 Router.

Let’s consider some scenarios that require a certain validation to be performed to decide if the user (or a program) is allowed to navigate to or leave the route:

* Allow to open the route only if the user is authenticated and authorized to do so.

* Implement a multi-part form that consists of several components, and the user is allowed to navigate to the next form section only if the data entered in the current one is valid.

* Remind the user about the unsaved changes if he or she tries to navigate from the route.

The router has the hooks that give you more control over the navigation to/from a route, and you can use these hooks to implement the any of above scenarios to guard the routes.

Angular includes a number of component lifecycle hooks that allow you to handle important events in the life of a component. First, it worth noting that the route configuration is done outside of the components. You configure routes in an object of type RouterConfig, then give it to the provideRouter() function, which in turn is given to the function bootstrap() that loads your app.
The type RouterConfig is a collection of items that conforms to the Route interface shown below:

export interface Route {
 path?: string;
 pathMatch?: 'full' | 'prefix';
 component?: Type | string;
 redirectTo?: string;
 outlet?: string;
 canActivate?: any[];
 canDeactivate?: any[];
 data?: Data;
 resolve?: ResolveData;
 children?: Route[];
}

While configuring routes you’ll typically use two properties from this interface: path and component. For example, an app that has two links Home and Product Details can specify and bootstrap the routes as follows:

bootstrap(RootComponent, [
    provideRouter([
      {path: '',        component: HomeComponent},
      {path: 'product', component: ProductDetailComponent}]),
    {provide: LocationStrategy, useClass: HashLocationStrategy}
]);

But in this blog I’d like to you to get familiar with the properties canActivate and canDeactivate that allow you to hook up the routes with the guards. Basically you need to write a function(s) implementing the validating logic that will return either true or false and assign it to one of these properties. If canActivate() of the guard returns true, the user can navigate to the route. If canDeactivate() returns true, the user can navigate from the route. Since both canActivate and canDeactivate properties of Route accept an array as a value, you can assign multiple functions (the guards) if you need to check more than one condition to allow or forbid the navigation.

Let’s create a simple app with Home and Product Details links to illustrate how you can protect the product route from the users who are not logged in. To keep the example simple, we won’t use an actual login service, but will generate the login status randomly.

We’ll create a guard class that implements the interface CanActivate, which declares only one function to implement: canActivate(). This function should contain the application logic that returns true or false. If the function returns false (the user is not logged in) the application will not navigate to the route and will print the error message on the console.

import {CanActivate} from "@angular/router";
import {Injectable} from "@angular/core";

@Injectable()
export class LoginGuard implements CanActivate{

  canActivate() {
      return this.checkIfLoggedIn();
  }

  private checkIfLoggedIn(): boolean{

      // A call to the actual login service would go here
      // For now we'll just randomly return true or false

      let loggedIn:boolean = Math.random() < 0.5;

      if(!loggedIn){
          console.log("LoginGuard: The user is not logged in and can't navigate product details");
      }

      return loggedIn;
  }
}

As you see from the code, my implementation of the function canActivate() will randomly return true or false emulating the user’s logged in status.

The next step is to update the router configuration so it uses our guard. The code snippet below shows how the function provideRouter() can look like for the app that has Home and Product Detail routes and the latter is protected by our LoginGuard:

provideRouter([
  {path: '',        component: HomeComponent},
  {path: 'product', component: ProductDetailComponent,
                    canActivate:[LoginGuard]}
])

Adding one or more guards to the array given to the canActivate property will automatically invoke all guards one after the other. If any of the guards returns false, the navigation to the route will be prohibited.

But who will instantiate the class LoginGuard? Angular will do it for us using its dependency injection mechanism, but you have to mention this class in the list of providers which are needed for injection to work. We’ll just add the name LoginGuard to the list of providers in the bootstrap() function of our app:

bootstrap(RootComponent, [
    provideRouter([
      {path: '',        component: HomeComponent},
      {path: 'product', component: ProductDetailComponent,
                        canActivate:[LoginGuard]}]),
    LoginGuard,
    {provide: LocationStrategy, useClass: HashLocationStrategy}
]);

The complete code of the main app script is shown next:

import {bootstrap} from '@angular/platform-browser-dynamic';
import {Component} from '@angular/core';
import {LocationStrategy, HashLocationStrategy} from '@angular/common';
import {provideRouter, ROUTER_DIRECTIVES} from '@angular/router';

import {HomeComponent} from './components/home';
import {ProductDetailComponent} from './components/product';

import {LoginGuard} from './guards/login.guard';

@Component({
    selector: 'basic-routing',
    directives: [ROUTER_DIRECTIVES],
    template: `
        <a [routerLink]="['/']">Home</a>
        <a [routerLink]="['/product']">Product Details</a>
        <router-outlet></router-outlet>
    `
})
class RootComponent {}

bootstrap(RootComponent, [
    provideRouter([
      {path: '',        component: HomeComponent},
      {path: 'product', component: ProductDetailComponent,
                        canActivate:[LoginGuard]}]),
    LoginGuard,
    {provide: LocationStrategy, useClass: HashLocationStrategy}
]);

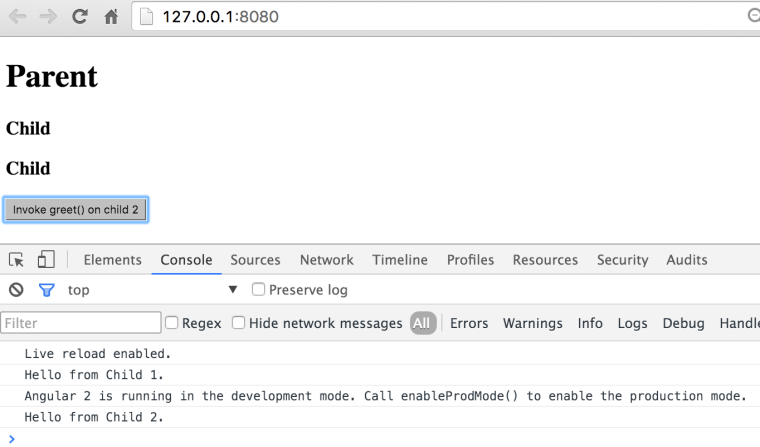
If you run this app and will try to lick on the Product Details link, it’ll either navigate to this route or print the error message on the browser console depending on the randomly generated value in the LoginGuard. The snapshot below was taken after the user tried to click on the Product Details link, but the LoginGuard “decided” that the user is not logged in.

ch3_loginguard

But if our unpredictable LoginGuard “decided” that the user is logged in, the screen will look as follows after clicking on the Product Details link:

nonguarded

Dependency Injection Benefit. Since a guard is injected into your app, you can use it as any other object. For example, you can inject it in your RootComponent:

 constructor (private _loginGuard:LoginGuard){}

Then invoke any methods defined on the guard class, e.g.:

 this._loginGuard.changeLoginStatus(true);

Our LoginGuard implements the method canActivate() without providing any arguments to it. But this method can be used with the following signature:

canActivate(destination: ActivatedRouteSnapshot,
            state: RouterStateSnapshot)

The values of the ActivatedRouteSnapshot and RouterStateSnapshot will be injected by Angular automatically and may become quite handy if you want to analyze the current state of the router. For example, if you’d like to know the name of the route the user tried to navigate to, this is how to do it:

canActivate(destination: ActivatedRouteSnapshot,
            state: RouterStateSnapshot) {

      console.log(destination.component.name);
   ...
}

Implementing the CanDeactivate interface that would control the process of navigating from a route works similarly. Just create a guard class that implements the method canDeactivate(), for example:

import {CanDeactivate, Router} from "@angular/router";
import {Injectable} from "@angular/core";
import {ProductDetailComponent} from "../product.component";

@Injectable()
export class UnsavedChangesGuard implements CanDeactivate<ProductDetailComponent>{

    constructor(private _router:Router){}

    canDeactivate(component: ProductDetailComponent){
      return window.confirm("You have unsaved changes. Still want to leave?");
    }
}

Don’t forget to add the canDeactivate property to the route configuration and inject the new guard in bootstrap(), e.g.:

bootstrap(RootComponent, [
    provideRouter([
      {path: '',        component: HomeComponent},
      {path: 'product', component: ProductDetailComponent,
          canActivate:[LoginGuard], canDeactivate:[UnsavedChangesGuard]}
    ]),
    LoginGuard, UnsavedChangesGuard,
    {provide: LocationStrategy, useClass: HashLocationStrategy}
]);

For a fancier way of displaying confirmation dialogs use the MdDialog component from the Material Design 2 library (see https://github.com/angular/material2). This component will be released in the upcoming Alpha 8.

NOTE: If you want to delay the navigation to a route until certain data structures have been populated, use the property resolve from the Route interface. I’ll write a separate blog showing how to do it.

In this blog I didn’t show you the code of HomeComponent and ProductDetail component, but you can find them in the Github repo with the code samples from Chapter 3 from our book Angular 2 Development with TypeScript.

If you’re interested in learning Angular 2 in depth, enroll into one of our workshops. The next one we’ll run online starting from September 11, 2016.

Angular2, npm, and TypeScript: the first steps

Angular 2 is getting more and more stable. As of July of 2016 it reached the version Release Candidate 4 and I expect to see the official release of this framework not later than in October of this year.

While developing Angular 2 applications in TypeScript is easier than in JavaScript, the initial setup of the project may be intimidating. You need to be familiar with installing and configuring NPM packages and the process of transpiling of the code from TypeScript to JavaScript.

I’d like to offer you an extract from the video from the first session of our recent online training where I show how to install the TypeScript compiler, all required npm modules, and create configuration files for npm and the module loader SystemJS. In this video I was using Angular Release Candidate 1, but you can change the versions from rc.1 to rc.4 and everything will work fine.

Our next 6-week online workshop starts on September 11. It runs on weekends and will give you a solid understanding of how to work on the real-world project with Angular 2 and TypeScript.

If you’re reading this blog after September 11, check the schedule of our upcoming trainings at yakovfain.com.

Dear Publisher, please do not print our book

Disclaimer: I’ve been writing for many publishers and Manning’s process of book publishing is the best I’ve seen so far.

My colleague and I spent a year writing the book on Angular 2. At the same time the Angular team was releasing dozens of alphas, and we kept modifying the code and the text.

Then the Angular team released several betas of Angular 2, and we’ve modified the code and the text.

Then the Angular team released several Release Candidates of Angular 2, and we’ve modified the code and the text.

The good news. Manning has released six versions of MEAP of our book “Angular 2 Development with TypeScript”, which remains Manning’s bestseller for many weeks in a row.

We’re diligently updating the code and the text, but I don’t want this book to be printed on paper. Why? Because the Angular team (understandably) will keep changing the API, and the readers of the printed book will blame us for the outdated text.

This book as well as all other books on software should NOT be printed on paper. The authors should be able to keep changing drafts for as long as the software is being changed. If not printing is not an option, the publishers should offer a print-on-demand service for those readers who like paper.

Back to Angular 2. Over the last year the router has been re-written three times. The final re-write (known as Router 3.0) has been released AFTER the Release Candidate 1.

The Forms API has been changed (currently at 0.2.0) as well after the Release Candidate 1.

We write code in TypeScript, which is a great way to develop JavaScript applications with types support. To integrate the TypeScript code with tons of available JavaScript libraries we need so called type definition files (*.d.ts). There was a Type Definition manager tsd. It’s deprecated in favor of Typings. Cool. We changed everything to work with type declarations known as “ambient”. All of a sudden ambient no more. As of May 2016 it’s called “global”. OK. Changed the text and the code. But. If Manning will publish our book before TypeScript 2.0 is out, it’ll be outdated. Why? Because TypeScript 2.0 will introduce @types that will deprecate Typings.

There is more to whine about. Unit testing. It’s being changed as we speak. OK, we’ll re-write chapter 9 to remove anything specific to Jasmine.

Chapter 10. Build automation. We used Webpack cause it’s the tool to use for prod systems today. Meanwhile, Google shows wonders at the conferences with Angular CLI, which (I’m sure) will become the right way to automate builds of Angular apps. But not this year. At the time of this writing installing Angular CLI is like installing the whole content of npmjs.org. To put it simple, if you want to clone the entire NPM repo, write the following command: npm install -g angular-cli.

Now let’s talk about UI. The Material Design 2 is in the works. But. It has about 15 components now. Cool for demos and conferences, but not for the real world enterprise apps. It’s getting there, but not this year. So what you, the enterprise developer should do? Get Wijmo 5 components. It costs money and is not a silver bullet. But, there are not many choices as of yet.

Job offer. I got an email asking if I’m available for working on a two-month consulting project. The scope is to create an initial setup for Angular 2 projects, prepare the build scripts, and develop a library of reusable UI components. I can do all of this in two months except a library of reusable UI components. Sorry, I’ll pass on this opportunity. Get real. Next year. Maybe.

We’re running our ongoing training classes using our book as a textbook. This allows us to keep our training materials as well as Manning eBook up to date. But I hate to see the future comments pointing at the places where our printed text is wrong.

I used to own a large library of software books, but during the last year I threw away (left at the curb for recycling) about 50 books on software that were printed before 2011. Next month I’ll get rid of all books that were printed before 2014. Unless the book is about data structures or algorithms it’ll go to recycling.

I really like the Manning’s workflow in publishing books. But it’ll be even better if this book will never be printed. We already sold about two thousand e-book downloads. Let’s keep selling files, and we’ll keep them up to date. There is a MEAP program for drafts, and a similar program is needed to keep the drafts updated after the book is “finished”. Dear Manning, please do not print our book or print it on demand!

UPDATE: I had a chance to discuss this blog with Manning. This is what I was told:
1. When Manning sells a printed copy the reader gets the e-Book as well.
2. Their MEAP program can continue even after the books is printed as long as the authors are willing to keep the book up to date. We’re willing.
3. The book goes to printer in small batches, and if the content of the manuscripts has changed, the new print batch can have the new content (Manning can easily do this if page numbering doesn’t change).

I’m wondering what other publishers do to keep printed books current?

Starting an Angular 2 RC.5 project

This blog is updated on August 9, 2016

The current version of Angular is Release Candidate 5. It has been released an hour ago, and I’ve started learning again. The major breaking change is how the app is loaded. The RC.5 introduced the concept of modules and now the app is not loaded by invoking the bootstrap() method. You have wrap the root component of your app into a module, which is a class decorated with the @NgModule() annotation and declare your component (or several components, services, directives, providers, and pipes) inside this annotation.

If the Angular code is dynamically compiled in the browser (not to be confused with transpiling), this is called just-in-time compilation (JIT). If the code is precompiled, it’s called ahead-of-time (AoT) compilation. In this blog we’ll do the JIT compilation.

To start a new project managed by npm, create a new directory (e.g. angular-seed) and open it in the command window. Then run the command npm init -y, which will create the initial version of the package.json configuration file. Normally npm init asks several questions while creating the file, but the -y flag makes it accept the default values for all options. The following example shows the log of this command running in the empty angular-seed directory.

$ npm init -y

Wrote to /Users/username/angular-seed/package.json:

{
  "name": "angular-seed",
  "version": "1.0.0",
  "description": "",
  "main": "index.js",
  "scripts": {
    "test": "echo \"Error: no test specified\" && exit 1"
  },
  "keywords": [],
  "author": "",
  "license": "ISC"
}

Most of the generated configuration is needed either for publishing the project into the npm registry or while installing the package as a dependency for another project. We’ll use npm only for managing project dependencies and automating development and build processes.

Because we’re not going to publish it into the npm registry, you should remove all of the properties except name, description, and scripts. Also, add a “private”: true property because it’s not created by default. It will prevent the package from being accidentally published to the npm registry. The package.json file should look like this:

{
  "name": "angular-seed",
  "description": "An initial npm-managed project for Chapter 2",
  "private": true,
  "scripts": {
    "test": "echo \"Error: no test specified\" && exit 1"
  }
}

The scripts configuration allows you to specify commands that you can run in the command window. By default, npm init creates the test command, which can be run like this: npm test. Let’s replace it with the start command that we’ll be using for launching the live-server that’s we’ll add to the generated package.json a bit later. Here’s the configuration of the scripts property:

{
  ...
  "scripts": {
    "start": "live-server"
  }
}

You can run any npm command from the scripts section using the syntax npm run mycommand, e.g. npm run start. You can also use the shorthand npm start command instead of npm run start. The shorthand syntax is available only for predefined npm scripts (see the npm documentation at https://docs.npmjs.com/misc/scripts).

Now we want npm to download Angular to this project as a dependency. We want Angular with its dependencies to be downloaded to our project directory. We also want local versions of SystemJS, live-server, and the TypeScript compiler.

npm packages often consist of bundles optimized for production use that don’t include the source code of the libraries. Let’s add the dependencies and devDependencies sections to the package.json file right after the license line:

    "dependencies": {
 "@angular/common": "2.0.0-rc.5",
    "@angular/compiler": "2.0.0-rc.5",
    "@angular/core": "2.0.0-rc.5",
    "@angular/forms": "0.3.0",
    "@angular/http": "2.0.0-rc.5",
    "@angular/platform-browser": "2.0.0-rc.5",
    "@angular/platform-browser-dynamic": "2.0.0-rc.5",
    "@angular/router": "3.0.0-rc.1",
    "systemjs": "0.19.36",
    "core-js": "^2.4.0",
    "reflect-metadata": "^0.1.3",
    "rxjs": "5.0.0-beta.6",
    "zone.js": "^0.6.12",
    "angular2-in-memory-web-api": "0.0.15"
  },
  "devDependencies": {
    "live-server": "1.0.0",
    "typescript": "^2.0.0"
  }

NOTE:This version uses the very latest version of Angular Router, which is currently 3.0.0-rc.1.

Now run the command npm install on the command line from the directory where your package.json is located, and npm will start downloading the preceding packages and their dependencies into the node_modules folder. After this process is complete, you’ll see dozens of subdirectories in node_modules, including @angular, systemjs, live-server, and typescript.

angular-seed
├── index.html
├── package.json
└── app
└── app.ts
├──node_modules
    ├── @angular
    ├── systemjs
    ├── typescript
    ├── live-server
    └── …

In the angular-seed folder, let’s create a slightly modified version of index.html with the following content:

<!DOCTYPE html>
<html>
<head>
  <title>Angular seed project</title>
  <meta charset="UTF-8">
  <meta name="viewport" content="width=device-width, initial-scale=1">

  <script src="node_modules/core-js/client/shim.min.js"></script>
  <script src="node_modules/zone.js/dist/zone.js"></script>
  <script src="node_modules/reflect-metadata/Reflect.js"></script>

  <script src="node_modules/typescript/lib/typescript.js"></script>
  <script src="node_modules/systemjs/dist/system.src.js"></script>
  <!-- script src="node_modules/rxjs/bundles/Rx.js"></script -->
  <script src="systemjs.config.js"></script>
  <script>
    System.import('app').catch(function(err){ console.error(err); });
  </script>
</head>

<body>
<app>Loading...</app>
</body>
</html>

The script tags load the required dependencies of Angular from the local directory node_modules. The Angular modules will be loaded according to the SystemJS configuration file systemjs.config.js. Note the commented out script tag for Rx.js. I’ll show you two ways of configuring SystemJS, and in the first version this line is not needed.

Configuring SystemJS. Take 1.

The SystemJS configuration file systemjs.config.js can look as follows:

System.config({
    transpiler: 'typescript',
    typescriptOptions: {emitDecoratorMetadata: true},
    map: {
        'app' : 'app',
        'rxjs': 'node_modules/rxjs',
        '@angular'                    : 'node_modules/@angular'
      },
      packages: {
        'app'                              : {main: 'main', 
                                              defaultExtension: 'ts'},
        'rxjs'                             : {main: 'index.js'},
        '@angular/core'                    : {main: 'index.js'},
        '@angular/common'                  : {main: 'index.js'},
        '@angular/compiler'                : {main: 'index.js'},
        '@angular/router'                  : {main: 'index.js'},
        '@angular/platform-browser'        : {main: 'index.js'},
        '@angular/platform-browser-dynamic': {main: 'index.js'}
      }
});

NOTE:This version loads all Angular modules as separate files, which causes the browser to make 300+ network requests. No good. We can do better.

The app code will consist of three files:
– app.component.ts – the one and only component of our app
– app.module.ts – The declaration of the module that will include our component
– main.ts – the bootstrap of the module

Let’s create the file app.component.ts with the following content:

----
import {Component} from '@angular/core';

@Component({
    selector: 'app',
    template: `<h1>Hello {{ name }}!</h1>`
})
export class AppComponent {
    name: string;

    constructor() {
        this.name = 'Angular 2';
    }
}

Now you need to create a module that will contain our AppComponent. This code we’ll place inside the app.module.ts file:

import { NgModule }      from '@angular/core';
import { BrowserModule } from '@angular/platform-browser';
import { AppComponent }  from './app.component';

@NgModule({
    imports:      [ BrowserModule ],
    declarations: [ AppComponent ],
    bootstrap:    [ AppComponent ]
})
export class AppModule { }

This file just contains the definition of the Angular module. The class is annotated with @NgModule that includes the BrowserModule that every browser must import. Since our module contains only one class, we need to list it in the declarations property, and list it as the bootstrap class.

In the section packages of the SystemJS config file we mapped the name app to main.ts that will look like this:

import { platformBrowserDynamic } from '@angular/platform-browser-dynamic';
import { AppModule }  from './app.module';
platformBrowserDynamic().bootstrapModule(AppModule);

The last line of the above script actually compiles and loads the module.

Start the application by executing the npm start command from the angular-seed directory, and it’ll open your browser and show the message “Loading…” for a couple of seconds, followed by “Hello Angular 2!”. If you check the Network panel in Chrome Developer tools, it shows more than 300 network requests and more than 5MB of the downloaded code. Not all of this code is Angular though. SystemJS uses the TypeScript compiler in the browser, and it weighs 3Mb.

Configuring SystemJS. Take 2.

To lower the number of network requests and the download size let’s change the systemjs.config.js to use the minimized and bundled versions of Angular packages:

System.config({
    transpiler: 'typescript',
    typescriptOptions: {emitDecoratorMetadata: true},
    map: {
      '@angular': 'node_modules/@angular'
    },
    paths: {
      'node_modules/@angular/*': 'node_modules/@angular/*/bundles'
    },
    meta: {
      '@angular/*': {'format': 'cjs'}
    },
    packages: {
        'app'                              : {main: 'main', 
                                              defaultExtension: 'ts'},
       '@angular/core'            :{main: 'core.umd.min.js'},
       '@angular/common'          :{main: 'common.umd.min.js'},
       '@angular/compiler'        :{main: 'compiler.umd.min.js'},
       '@angular/platform-browser':{main: 'platform-browser.umd.min.js'},
       '@angular/platform-browser-dynamic': 
                            {main:'platform-browser-dynamic.umd.min.js'}
    }
});

If you use forms and http, add the following two lines to the above file:

        '@angular/forms'                   : {main: 'forms.umd.min.js'},
        '@angular/http'                    : {main: 'http.umd.min.js'},

NOTE: I’ve removed the Rx.js configuration from this version of systemjs.config.js, and you’ll need to uncomment the line that loads Rx.js in the index.html shown earlier.

If you run the same application, it’ll make only 16 network requests and the download size is less than 5MB (it’ll take just a half a second). Much better, isn’t it? In chapter 10 of our Angular 2 Development with TypeScript book we explain how to minimize a small Angular app to only 150Kb with Webpack.

Using the AoT compilation will decrease the application footprint even more because the app sent to the browser won’t include the internal Angular compiler. After learning how to perform the AoT compilation I’ll write a sequel to this blog.

You can find the source code of our angular-seed project (yes, the RC.5 version) at https://github.com/Farata/angular2typescript/tree/master/chapter2/angular-seed.

That’s all there is to it for the Hello World type application.

I’d like to thank Anton Moiseev, my coauthor of the Angular 2 book for his contribution to this blog. We often run online Angular 2 trainings, and if you’re interested in learning Angular 2 in depth, join one of our workshops (see the dates of the upcoming trainings at https://yakovfain.com/ ).

Angular 2: Exposing Child Component’s API

In Angular 2 a parent component can pass the data to its child via binding to the child’s input parameter marked with the annotation @Input(). I’ll blog about it later, but you can see how it can be done in my blog on implementing the Mediator design pattern.

In this blog I’ll show you another scenario when the parent component simply needs to use the API exposed by the child. You’ll see how a parent component can use the child’s API from both the template and the TypeScript code.

Let’s create a simple application where a child component has the method greet() that will be invoked by the parent. Our Child component will look like this:

@Component({
    selector: 'child',
    template: `<h3>Child</h3>`

})
class Child {
    greet(name) {
        console.log(`Hello from ${name}.`);
    }
}

To illustrate different techniques of calling the child’s API, the parent will use two instances of the same child component.

<child #child1></child>
<child #child2></child>

Here use local template variables that are used to for getting a reference to DOM object that represents an HTML component in the browser’s window. The names of local template variables must start with the hash sign.

To access the first child component from the TypeScript code, the parent component App will declare a variable of type Child annotated with `@ViewChild`. This annotation is provided by Angular for getting a reference to child components. This code will also invoke the method greet() declared in the Child component:

@ViewChild('child1')
firstChild: Child;
  // invoke the child's API
this.firstChild.greet('Child 1');

The second child will be accessed not from the code, but from the parent’s template as simple as this:

<button (click)="child2.greet('Child 2')">Invoke greet() on child 2</button>

The entire code of the application that uses both techniques is shown below.

import {bootstrap} from 'angular2/platform/browser';
import {Component, ViewChild, AfterViewInit} from 'angular2/core';

@Component({
    selector: 'child',
    template: `<h3>Child</h3>`

})
class Child {
    greet(name) {
        console.log(`Hello from ${name}.`);
    }
}

@Component({
    selector: 'app',
    directives: [Child],
    template: `
    <h1>Parent</h1>
    <child #child1></child>
    <child #child2></child>

    <button (click)="child2.greet('Child 2')">Invoke greet() on child 2</button>
  `
})
class App implements AfterViewInit {
    @ViewChild('child1')
    firstChild: Child;

    ngAfterViewInit() {
        this.firstChild.greet('Child 1');
    }
}

bootstrap(App);

If you’ll run this application in the browser with Developer Panel open, it’ll immediately invoke the method greet() on the first child and will print the greeting on the console. This is an illustration of using of the child’s API from the TypeScript code. If you click on the button, the method greet() will be invoked on the second child, which is an illustration of the using child’s API from the template. The browser’s window will look as follows:

child_api

Note that in the above example I used the parent’s component lifecycle hook ngAfterViewInit() for invoking the API on the first child. The child’s greet() method doesn’t change its UI and simply prints the message on the console. But if you’d try to change the UI from greet() Angular would throw an exception that the UI is changed after ngAfterViewInit() was fired. The reason being that this hook is called in the same event loop for both parent and child components, and Angular by default runs in the development mode which does an additional change detection run to check the bindings, and it wouldn’t like the fact that UI has changed again on the same event.

There are two ways to deal with this issue:
1. either run the application in the production mode – invoke enableProdMode() before the bootstrap() – so Angular won’t do the additional bindings check
2. Use setTimeout() for the code updating UI to run it in the next event loop.

If you’re interesting in learning Angular 2, consider enrolling into one of our training classes. The current schedule is published here.

My two cents on the npm scandal

If you haven’t heard the story, here’s the gist of it. A guy named Azer Koçulu published 250(!) open source packages in the popular repository npmjs.org, which is a central repo for all JavaScript developers (it’s like Maven Central for Java developers).  One of the packages was named kik. Unfortunately for Azer (and all of us), there is a company with the same name, and they decided to publish the package with the same name on NPM. Due to the name conflicts, they contacted Azer asking him to rename his package that was already used by many users. Here’s the Kik corporation’s  version of the story. And this is what Azer wrote.

This is really sad. I’m with Azer 100%. There is a corporate world and there is an open source world. The corporate world loves using free and open source libraries and frameworks that help them making money. But they won’t think twice and will invest hundreds of thousands of dollars to win the case against Azer if need be.

Why a company with 270 million users rejected Azer’s offer to buy the name from him for mere $30K? Because they are a bunch of dicks as Azer correctly put it. They want free stuff.

There should be some international law that will make the commercial and the open source worlds live in parallel dimensions. If one corp uses a trademarked term from another corp, it can be sued. But they should not reach out to the open source world imposing their rules there.

We are using the JavaScript framework Jasmine for unit testing. I have a suspicion that there are some other uses of the word Jasmine.  Beside being a plant, a trading companya nail salon in Brooklyn,NY, a Thailand telecom company there are thousands establishments that use this word in their names. Now any of them can write a package that prints Hello World (even a plant can do it), and write a letter to NPM to remove the jasmine package from there.

Guys, this may open a can of worms. kik.com should back off!

Part 2 or is my application at risk

You might by thinking, “I don’t really care cause I’m not using any of Azer’s packages. I’m using Angular developed by a large company that employs hundreds of lawyers”. Wrong. In modern JavaScript ecosystem it’s very difficult to use just one thing. I’ll give you an example using one our simple projects that uses five npm packages: Angular 2, TypeScript, Jasmine, Karma, and live-server. I’ll give you a little quiz. How many packages will be installed on your computer to get these five things? Just take a look at the end of log file of the “npm install” command that I ran on my computer to install these five things.

log

That’s right. Those five packages had dependencies and 263 npm packages where installed on my computer in less than a minute. Some of them were developed by big companies, but most of them were developed by one person like Azer.

To be more specific, my application heavily depends on module loader called SystemJS (see the package #259), which was developed by the guy named Guy Bedford, a respected developer who contributed tons of code to the open source community (btw, Guy is also the author of JSPM package manager). What if for whatever reason Guy will become as angry as Azer and will remove SystemJS from npm? This will affect thousands of projects. These projects won’t stop working, because SystemJS is already installed locally, but lots and lots of people will need to spend time and find a replacement or start fixing builds, bugs and adding features to the local version of SystemJS instead of working on their applications.

Some open source developer nicely illustrated a scenario when an 11-line library responsible for left-padding strings was removed from npmjs.org. Check this out 🙂 David Haney raises the right question, “Have we forgotten how to program?

Part 3 OMG, what do I do?

Nothing. Just accept the reality of today’s open source world. At least I live with an assumption that any of the above 263 packages may stop being developed any moment, and the versions I have already installed are the last ones. At least I have the source code…

Update. NPM has addressed this issue, and Azer won’t be able to unpublish his packages unless they are younger than 24 hours.


Implementing the Mediator Design Pattern in Angular 2

In any component-based framework you’ll need to implement component communications. The main principle is that components should be loosely coupled hence reusable hence testable. The mediator design pattern allows you to arrange component communications via “the man in the middle” so a component A never communicates with the component B directly. If a component needs data, someone will provide the data via bindings to the component’s input properties. Who’s this someone?Ain’t no business of the component. If a component needs to provide some data to the external world, it’ll emit events (with the data payload). Emits to whom? Ain’t no business of the component. Let whoever needs the data listen to the events from this component.

The mediator pattern is one of the ways to arrange a loosely coupled communication between components. In the following video I show an example of one of the ways of implementing Mediator in Angular 2. Here the sibling components communicate via their parent, but this could be also arranged via injecting a service into both component that need to “talk” to each other.

This video is an extract from the online training session I ran recently. If you’re interested of learning Angular 2 in a live session, here’s  my speaking/training schedule. If you can’t attend live events, get consider reading our book:  https://manning.com/books/angular-2-development-with-typescript.

What’s Happening in the JavaScript Ecosystem

Lots of things are happening there. As of today it’s the liveliest software ecosystem. The last time I’ve seen such an interesting gathering was 15 years ago in Java.

The Past

Fifteen years ago Java developers were looking down on the JavaScript folks. It was assumed that JavaScript was only good for highlighting menus and making an impression that the Web site is current by displaying a running clock on the page. Mobile phones still had buttons with one digits and three letters. There were no App stores. Java was promising “Write once run everywhere”, but now we can see that JavaScript actually delivered on this promise.

Say, you are developing in the XYZ language and wrote tons of programs in this language over the last 15 years. During this time new versions of the XYZ were released. The hardware advanced and new versions of operational systems came about. And you decided to take your old XYZ program written in the last century and run it on the brand new iPhone 6 or Android. Voila! It works without changing a line of code! I don’t know about the XYZ language, but programs written in JavaScript 15 years ago still work on iPhones.

js

Having said that, writing in JavaScript was never a pleasant experience. Some people made fun of JavaScript. Making fun of Brendan Eich, who created JavaScript in 10 days, was popular.

Other people started creating multiple libraries and frameworks to lower the pain of writing in plain JavaScript and making it work in different browsers. Ten years ago there were a couple of hundred JavaScript libraries and frameworks. People were overwhelmed by the freedom of choice well explained by Barry Schwartz in this video. The ECMAScript was abandoned. HTML5 was not born yet. In short, Web development was not fun.

The Present

In 2016 the situation is drastically different:

— The ECMAScript (ES) standard is actively being worked on, and its new versions will be released annually. Last year the ES6 (aka ES2015) spec was released and ES7 will be released this year. Now the JavaScript language has classes, lambda expressions (a.k.a. arrow functions), predictable “this”, block scope, generator functions, promises, destructuring, spread and rest operators and more. Some hardcore JavaScript developers immediately started WTF-ing classes as being a lot worse than functions, but these discussions are as useful as arguments about where to put curly braces in the if-statements: on the same or on the new line. Classes are just a syntax sugar that doesn’t change the prototypal inheritance, but reading and writing code is much easier now.

— All major browsers support most of the ES6 syntax.

— Transpilers easily generate ES5 program from the ES6 code so you can deploy the ES6 code today in all browsers.

— Dozens of languages emerged allowing you to write code that gets converted int to JavaScript automatically. The best of the breed is TypeScript created by Anders Hejlsberg from Microsoft. In the past he also created C#, Delphi and Turbo Pascal.

— Tons of open-source JavaScript code are published in various repositories. The most popular repo is npmjs.org, which has more than 200K libraries, frameworks and useful utilities. By the way, npm literally killed bower, his former competitor.

— Google created a super-fast JavaScript engine V8. The Node.js framework allows you to write standalone applications that don’t require browsers. Node servers started to compete with the ones written in Java. Despite the single-threaded architecture of I/O, Node’s asynchronous processing allows handling tens of thousands client requests simultaneously.

— There are build automation tools (we use Webpack), which minimize and optimize the JavaScript code with the further bundling separate files together so browsers don’t need to make dozens of requests to the server to download that home page.

— The WebComponents standard prescribes how to develop custom HTML components. The Material Design principles explain how to develop nice-looking Web pages. Google implemented these principles in a library of custom components called Polymer. We already tried it in the real-world projects, and it works!

– HTTP/2, a major revision of HTTP will substantially speed up the client-server communications.

Libraries and Frameworks

The number of JavaScript libraries and frameworks is comparable to the number of presidential candidates in the Republican Party in the USA. Those (mainly enterprise) folks who want to get everything out of the box and are not afraid to sell themselves into slavery still use Ext JS. This is not an easy to master framework, but it has everything you need to develop back-office enterprise applications.

Developers who want a lighter framework that puts a structure on your app with navigation and data binding usually go with AngularJS 1.x or Ember. They would need to integrate third-party libraries for graphical components, grids, and a usual Twitter’s Bootstrap (to make the app usable on mobile phones and tablets), but it’s doable. Some people prefer the React framework from Facebook, but React is mainly about views, and you’d need to use some third-party libraries to build an app.

Those who don’t like prix fixe meals and prefer a la carte menus pick a bunch of small libraries each of which can do one thing well. They are ready to face the issues while trying to make these libraries work together. Such people charge higher rates and project managers keep their fingers crossed hoping that these developers won’t quit.

Fashion Trends

In this season every top model-developer entering a catwalk wears reactive accessories. Not that “reactive” is something completely new (even our grandmas liked messaging, pub-sub, and the observer-observable pattern), but in today’s asynchronous UI world, reactive is a must have. We need to give a credit to Microsoft (do people still hate it by default?) for beautifully designed reactive extensions, which in JavaScript world go by the name RxJS.

In the reactive world every component or service is implemented as a stream. Everything is a stream. You are a stream. I am a stream. A click on a button spits out the event as a next element of a stream. An HTTP request to a server returns a response as an element of a stream (promises had their 15-min of fame and are considered old fashioned these days). A piece of data pushed over a WebSocket connection is an element of a stream you can subscribe to. And there is a nice little twist to it: a subscriber can regulate the stream volume and lower the pressure if need be.

A year ago a team from Google decided to re-write their super-popular (1.1M devs) framework AngularJS. They started with creating a new language AtScript just for the new Anguar 2, but then invited the TypeScript team from Microsoft (can we start liking Microsoft, just a little bit?), and asked them to add some features to the TypeScript language. Microsoft folks kindly agreed, and Google wrote Angular 2 in TypeScript, which also became a recommended language for developing Angular 2 apps. Now the code of Angular 2 apps is easy to read and write even for Java and C# developers (see this). Needless to say that RxJS is embedded inside Angular 2.

Jokes aside, I really like the Angular 2/TypeScript/RxJS/npm/Webpack combo. During the last ten months I’ve been working with my colleague Anton Moiseev on the book “Angular 2 Development with TypeScript“. So far Manning published 300 pages of this book, and the remaining 150 pages are almost ready. The code faindz will lower the price of the eBook by 39%.

If you prefer to learn Angular 2 in a classroom setting, this year I’ll be teaching Angular 2 classes and my training/speaking schedule is published here.

The Bottom Line

My hat off to Brendan Eich for not over-engineering the language. JavaScript is getting a lot of traction and the demand for professional JavaScript developers will grow by leaps and bounds. Be there and stay current.

Angular 2: High-Level Overview

This article was excerpted from the book “Angular Development With TypeScript” (see http://bit.ly/1QYeqL0). You may also look at my other high-level overview of Angular 2 published by InfoQ.

The Angular 2 framework is a re-write of popular framework AngularJS. In short, the newer version has the following advantages over AngularJS.

  • The code is simpler to write and read
  • It performs better  than AngularJS
  • It’s easier to learn
  • The application architecture is simplified as it’s component-based

This article contains a high-level overview of Angular highlighting improvements comparing to AngularJS. For a more detailed architecture overview of Angular visit product documentation at http://bit.ly/1TQJmwG.

Code Simplification

First of all, an Angular application consists of standard ES6 modules. Typically one module is one file. There is no need to use a framework-specific syntax for loading and using modules. Just use the universal module loader SystemJS (covered in Chapter 2) and add import statements to use functionality implemented in the loaded modules. You don’t need to worry about the proper order of the <script> tags in your HTML files. If a module A needs the functionality from a module B, just import the module B inside module A.

The HTML file of the landing page of your application just includes the framework modules, and your application code is bootstrapped by simple loading of the root component of your application. All child modules will be loaded automatically based on the import statements. Below is a typical content of the index.html of an Angular application. In the top portion you include the required framework modules, and at the bottom you configure the system loader and load the root component located in the file app/my_application.ts. The <app> tag is a selector defined in that root component.

<!DOCTYPE html>
<html>
<head>
  <script src="node_modules/angular2/bundles/angular2-polyfills.js"></script>
  <script src="node_modules/typescript/lib/typescript.js"></script>
  <script src="node_modules/systemjs/dist/system.src.js"></script>
  <script src="node_modules/rxjs/bundles/Rx.js"></script>
  <script src="node_modules/angular2/bundles/angular2.dev.js"></script>

</head>
<body>
  <app>Loading...</app>

  <script>
    System.config({
      transpiler: 'typescript',
      typescriptOptions: {emitDecoratorMetadata: true},
      packages: {app: {defaultExtension: 'ts'}}
    });
    System.import('app/my_application');
  </script>
</body>
</html>

The HTML fragment of each application component is either inlined inside of the component (the template property) or in the file referenced from the component using the property templateURL. The latter option allows designers to work on the UI of your application without the need to learn Angular.

An Angular component is a centerpiece of the new architecture. The next Figure shows a high-level diagram of a sample Angular application.

ch1_angular2_workflow

The simplest way of declaring a component is writing a class in TypeScript (you can use ES5, ES6, or Dart as well). Let’s do an experiment. We’ll give you a super brief intro on how to write Angular components in TypeScript followed by the sample code. See if you can understand the code with minimum explanations.

An annotated TypeScript class represents a component. The annotation @Component contains the property template that declares an HTML fragment to be rendered by the browser. The HTML piece may include the data binding expressions, which can be represented by double curly braces. If a view depends on other components, the @Component annotation has to list them in the property directives. The references to the event handlers are placed in the markup from the @Component section and are implemented as methods of the class.

The annotation @Component also contains a selector declaring the name of the custom tag to be used in HTML document. When Angular sees an HTML element with the name matching a selector, it knows which component implements it. The HTML fragment below illustrates a parent component with one child component :

<body>
  <auction-application>
    <search-product [productID]= "123"></search-product>
  </auction-application>
</body>

A parent component sends the data to its child components using property binding (note the square brackets above), and children communicate with their parents by sending events. The next Figure shows the main page (the parent component) with its child components surrounded with thick borders.

ch2_auction_home_page_components

Below is a code sample of a SearchComponent, and we can include it in an HTML document as <search-product> because its declaration includes the selector property with the same name.

@Component({
  selector: 'search-product',
  template:
     `
<form>
<div>
          <input id="prodToFind" #prod>
          <button (click)="findProduct(prod.value)">Find Product</button>
          Product name: {{product.name}}</div>
</form>

    `
})
class SearchComponent {
   @Input() productID: number;

   product: Product; // code of the Product class is omitted

   findProduct(prodName: string){
	// Implementation of the click handler goes here
   }
   // Other code can go here
}

If you are familiar with any object-oriented language that has classes you should understand most of the above code. The annotated class SearchComponent declares a variable product, which may represent an object with multiple properties, one of which (name) is bound to the view ({{product.name}}). The #prod will have a reference to the hosting <input type=”text” /> element so you don’t need to query DOM to get the entered value.

The (click) notation represents a click event, and the event handler function gets the argument value from the input parameter productID that will be populated by the parent component via binding.

This was just a quick look at the sample component, but we’ll be providing a detailed description of what components are made up of starting from the next chapter.

If you never worked with classes before, no worries. We’ll cover them in Appendices A and B. The next Figure illustrates the inner working of a component.

ch1_angular_component

A component uses the data from a model (the M in the MVC pattern), which can be also represented by a class. In TypeScript the model class for a SearchComponent could look like this:

class Product{
    id: number,
	name: string;
	description: string;
	bid: number;
	price: number;

	// constructor and other methods go here
}

Note that TypeScript allows you to declare class variables with types. To let the UI component SearchComponent know about its model you can refer to it by declaring a class variable, e.g. product:

@Component { // code omitted for brevity}
class SearchComponent {
   product: Product;  // the model

   findProduct(productID){
	   // The implementation of the click handler
	   // for the Find Components button goes here
   }
}

If the search component may return multiple products we can declare an array to store them:

products: Array<Product>;

The generics notation (explained in Appendix B) tells the TypeScript compiler that only the objects of the type Product are allowed to be stored in this array.

In Angular there are no separate controllers (the C in the MVC pattern). The component includes all required code. In our example, the SearchProduct class would contain the code performing the controller’s responsibilities in addition to being a UI component on the HTML view. For a cleaner separation of TypeScript and HTML, the content of the template section of the @Component annotation can be stored in a separate file by using templateURL instead of template, but it’s a matter of your preference.

Developers who know AngularJS can think of a component as a directive with a view, but writing directives without views is still allowed.

Now let’s see how the design of Angular is simpler than of AngularJS. In AngularJS all directives were loaded to the global memory, whereas in Angular you specify the required directives on the component level providing better encapsulation.

You don’t have to deal with the hierarchy of scope objects as in AngularJS. Angular is component based, and the properties are created on the this object, which becomes the component’s scope.

Dependency Injection is a design pattern that inverts the way of creating objects your code depends on. Instead of explicitly creating object instances (e.g. with new) the framework will create and inject them into your code. Angular comes with a dependency injection module. We’ll cover dependency injection in Chapter 4.

In AngularJS there were several ways of injecting dependencies, which could be confusing at times. In Angular you can inject dependencies into the component only via its constructor. The following TypeScript code fragment shows how to inject the ProductService component into the SearchComponent. You just need to specify a provider and declare the constructor argument with the type that matches provider’s type.

@Component({
  selector: 'search-product',
  viewProvider: [ProductService],
  template:[
<div>
...
<div>]
})
class SearchComponent {
  products: Array<Product> = [];

  constructor(productService: ProductService) {
    this.products = this.productService.getProducts();
  }
}

To summarize, Angular is simpler than AngularJS because of the following:

  • Each building block of your app is a component with well encapsulated functionality of a view, controller, and auto-generated change detector.
  • Components can be programmed as annotated classes.
  • A developer doesn’t have to deal with scope hierarchies.
  • Dependent components are injected via the component’s constructor.
  • Two-way binding is turned off by default.
  • Change detection mechanism was re-written and works faster.

The concepts of Angular are easy to understand for Java, C#, and C++ programmers, which represent the majority of enterprise software developers. Like it or not, but a framework becomes popular when it gets adopted by enterprises. Today AngularJS is widely adopted by the enterprises, and AngularJS skills are in big demand. Since developing applications with Angular is easier than with AngularJS this trend should continue.

Performance Improvements


To compare performance of AngularJS and Angular 2 the creators of these frameworks developed a benchmarking tool called Benchpress (see http://bit.ly/1IvgnKZ), which showed some serious performance improvements in the area of rendering and memory use.

The rendering improvements are mainly the result of the internal redesign of the Angular framework. The UI rendering and the application API were separated into two layers, which allows to run the non-UI related code in a separate Web Worker thread. Beside the ability to run the code of these layers concurrently, Web browsers allocate different CPU cores to these threads when available. You can find a detailed description of the new rendering architecture in the document titled Angular 2 Rendering Architecture available at http://bit.ly/1CEXjIl.

Creating a separate layer for rendering has an additional important benefit: an ability to use different renderers for different devices. Every component includes the @Component annotation that contains an HTML template defining the look of the component. If you want to create a component to display stock prices in the Web browser its UI portion may look as follows:

@Component({
  selector: 'stock-price',
  renderer: 'DOMRenderer',
  template: '
<div>The price of an IBM share is $165.50</div>
'
})
class StockPriceComponent {
...
}

Currently, DOMRenderer is the only renderer, so you don’t even need to include it in the @Component annotation. But the Angular team already works on creating native renderers for mobile devices running iOS and Android. Such renderers should be released in the near future, and Angular applications won’t need to run inside the Web View (embedded Web browser) on mobile devices – they’ll use native UI components.

A new and improved change detection mechanism is yet another contributor to better performance. Angular doesn’t use two-way binding unless you manually program it. One-way binding simplifies the detection of the changes in an application that may have lots of interdependent bindings. Now if a component has only internal immutable objects, you can mark it as such so it won’t be checked when a change is detected in another component.

Although Angular 2 is a complete re-design of Angular 1, those of you who use AngularJS can start writing code in Angular 2 style by using ng-forward (see http://bit.ly/1PNXFmH). The other approach is to start gradually switching to a newer version of this framework by running Angular 2 and Angular 1 in the same application (see http://bit.ly/1YixNzE), but this would increase the size of the application.

“To learn more about Angular see the book “Angular Development with TypeScript” at http://bit.ly/1QYeqL0 and save 39% with discount code faindz.  For the up to date information about our Angular 2 training visit this page.


Frustrated by JavaScript?

Frustrated by JavaScript?

I decided to write this blog after reading this post of a frustrated developer (he goes by the nick pistacchio) who couldn’t create a simple single-page application (SPA) in JavaScript in several days. Typically frustration is a result of unmet expectations and this is the case here as well.

If pistacchio would decide to create a simple app using the JavaScript framework he already knew, he could achieve his goal in 2-3 days allocated for this job. The problem is that he decided to achieve two goals:

1. Learn what’s going on in the modern JavaScript ecosystem
2. Develop a simple SPA

The first task takes months of studying, but he had 2-3 days. As a result, he “got stuck in an analysis paralysis loop”. Such paralysis could have happened in any modern technology. Learning the syntax of a programming language is one thing, but mastering frameworks and the tooling is a completely different ball game. My main programming language is Java, and in the past I also was frustrated with JavaScript until I accepted three facts of life:

1. JavaScript is here to stay.
2. JavaScript is THE ONLY programming language that can run on any browsers and any old and new hardware.
3. You can run, you can hide, but you can’t escape JavaScript.

The fact that you can quickly learn how to write Hello World in JavaScript is not the reason to assume that JavaScript is a toy that should just work. You have to study it. Yes, there are way too many large and small libraries. Yes, there are several package managers. Yes, there are various automation tools. This means that you need time to get familiar with some of them and pick a reasonably small gentlemen set that works for you.

I’ve been developing Web applications with Adobe Flex framework for six years. This was the best Web framework I’ve ever seen (batteries included). So what? Flash Player is dead. Accepted it and moved on. I spent two years trying to find a JavaScript framework that would make me as productive as I was with Flex. None. Nada. Nyet.

There seems to be the light at the end of the tunnel though. Here’s what works for me now (subject to change):

Web framework and the language: Angular 2 with TypeScript
Package manager: npm
Preparing application bundles: Webpack
Unit testing: Jasmine with Karma
Deployment: npm scripts
IDE: WebStorm

If this list looks too long take a look at the skills section in the resume of any professional Java developer. If it has less than 10 Java-related tools and frameworks – it’s a resume of a junior developer.

I just came back from a large conference DevNexus where most of the attendees were Java developers. After my presentation on developing with Angular 2 and TypeScript one person stopped by and said, “I used to hate JavaScript, but now I’ll look at it again”. Please do, but take it seriously and allocate enough time for learning the JavaScript ecosystem. Manage your expectations.

P.S. If your JavaScript is a little rusty watch this video, which is an excerpt from one of the online trainings I ran for Java developers.