Migrating your apps from AngularJS to Angular

So you have an Angular JS in prod and you want to migrate it to the latest version of Angular. The first question to answer is why? While talking to our clients, I’ve heard the following answers:

– We have a large app and it has issues with performance.
– Our company is moving to Angular/TypeScript and we want all apps to use these technologies.
– We need to improve performance of our AngularJS app
– Since all new apps will be written in Angular, it’s going to become hard to support apps written in two different languages and frameworks. The pool of developers who can/want write in AngularJS will be shrinking.

Any of the above answers sounds reasonable. But think about it for a moment. You have a working app with a certain functionality. After spending X amount of dollars your end users will get an app with the same functionality. Does it worth the trouble? Let’s say it does and the budget for the migration is approved.

Two approaches for migration

There are a couple of approaches to the AngularJS-Angular migration process.

1. Rewrite the app from scratch.

IMO, this is the best approach if your circumstances permit. A complete re-write can be the most cost-effective strategy. If you’re a manager, put your team through Angular training (live, online, videos, books). Allocate time and budget for getting your developers up to speed with Angular as the learning curve is steep and prior experience with AngularJS is not overly helpful. Then your developers will write the new version of the app as per best practices recommended for Angular/TypeScript projects. Ideally, your team should include a developer who has at least one year of practical development in Angular. If you don’t already have such a developer, hire one. He should be both a developer and a mentor.

But a complete rewrite may not be an option. Your existing (small-to-midsize) AngularJS app is in prod, works well, and the end users keep asking for new features that have to be released in prod on a regular basis. This means that you can’t just stop developing in AngularJS, and spending several months doing greenfield development is not an option.

You can’t do a complete rewrite if an existing app is large (think hundreds of views). In this case, a rewrite could take a couple of years.

2. Gradual migration

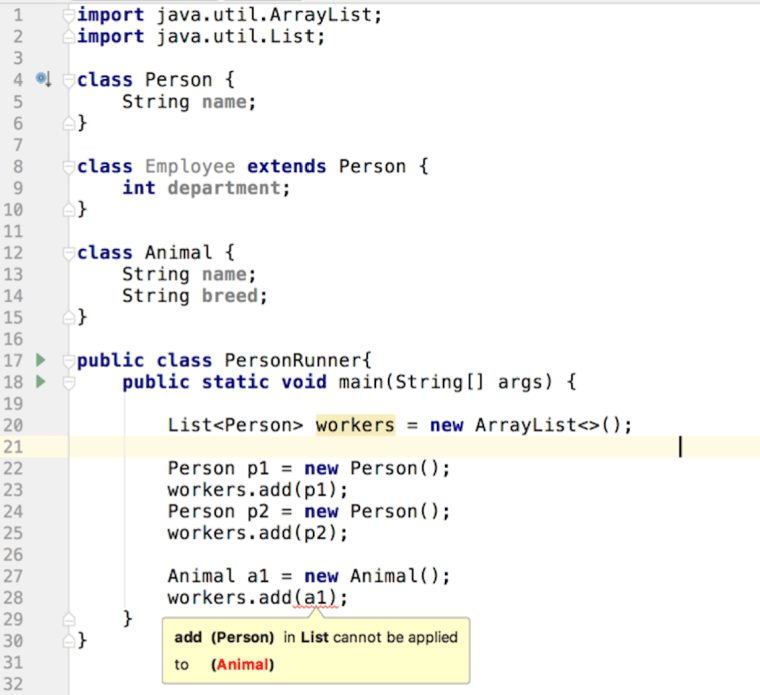
If you decide to go this route, start with reading the document titled “Upgrading from AngularJS“. It’s a well-written document, but you need to understand that it’s about migration from AngularJS to a completely different framework. Don’t be tricked by the statements like “Angular is a reimagined version of the best parts of AngularJS”. Angular is a different framework with different architecture and principles of building apps.

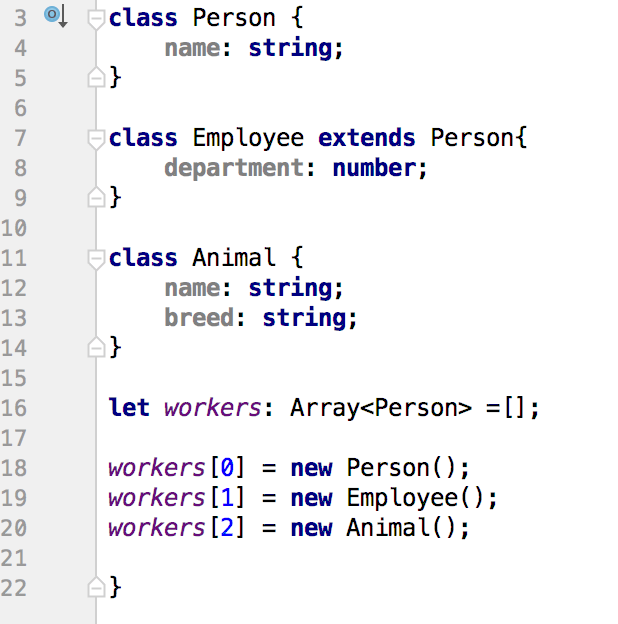
TypeScript, being a superset of JavaScript, requires some investment in learning too. But TypeScript is your friend. The learning curve for any JavaScript/Java/Python/C# developer is not steep, the tooling is great, optional static types make the transition from JavaScript easy plus you’ll get a great help from IDEs (autocomplete and compilation errors). In no time, you’ll see how your productivity is increased compared to writing in JavaScript.

Some die-hard JavaScript experts may continue bad-mouthing TypeScript, but be pragmatic. TypeScript allows making developers of any skill level (not just the superstars) more productive. Don’t trust me? A recent StackOverFlow survey nominated TypeScript as a third most loved language.

Plan your migration

You need to come up with a plan for your migration project. The plan will depend on how your current AngularJS app was written. While the Angular’s migration guide mentioned above recommends preparing your AngularJS app to have one component per file (see Rule 1 in the migration guide) and use module loaders, the chances are slim that your existing AngularJS app followed this rule. Refactoring your AngularJS app just to follow this rule is a project on its own; it may be costly and your refactored app would require additional testing and bug fixing.

The Angular migration guide explains how the AngularJS app should use component directives to simplify migration to Angular. Once again, changing your existing app to follow these guidelines is yet another project.

Depending on the production release schedule of the existing AngularJS app, you can pick one of two approaches for the migration:

– Feature by feature
– Route by route

When you migrate feature by feature, identify a group of component and services implementing this feature in the new Angular code.

Migrating route by route would also require a similar activity, but you’d need to pick a route and identify which components and services would need to be there. The route by route strategy works well if the views of your app are relatively simple and don’t use complex custom components.

If your AngularJS app has complex UI components, you may need to convert them first.

Running Angular and AngularJS side by side

The next step is to learn how the ngUpgrade and UpgradeModule work. The UpgradeModule serves as a bridge between the Angular and AngularJS parts of your app.

No matter how you’ll approach the migration, for some period of time your app will include two frameworks: AngularJS and Angular. When our company is involved with migration projects, we start with creating an Angular app that just bootstraps the existing AngularJS app as is with the help of the UpgradeModule.

With the UpgradeModule, you’ll run a hybrid app that’ll have two parts – one part will include Angular framework, and another – AngularJS. The components and services from the Angular part will communicate with their counterparts from the part written in AngularJS. Read the Angular migration guide about the differences in Dependency Injection (DI), change detection, and working with DOM.

While Angular DI is more flexible and allows either having services as singletons for the entire app or a specific component branch, in AngularJS services are always app-level singletons. This is not a big deal as in a typical Angular app we use app-level singletons anyway. In particular, you can use a singleton and DI for storing the state of the hybrid app. During the migration, you need to identify which services will be injected from Angular to AngularJS and those that will be injected in the opposite direction.

Components of both frameworks need to communicate with each other. If you’re not familiar with how to arrange a loosely-coupled component communication in Angular using injectable services, watch my video on the subject.

While running a mixed Angular/AngularJS app, the Angular framework will be responsible for triggering change detection of the entire app. Angular includes a library zone.js that serves as an execution context for all asynchronous processes of the app. On any change that may need to update a UI, it makes a single pass through the entire component tree and triggers the UI updates. There is no need to invoke $scope.$apply() as it’s done in AngularJS. In a hybrid app, on any async change that would start Angular change detection, the UpgradeModule will invoke $rootScope.$apply() in your AngularJS code.

Finally, roll-up your sleeves, start reading the AngularJS code and gradually implement it in Angular.

Automating deployment

Don’t forget about re-thinking your deployment process. Most likely you have an automated deployment implemented using Gulp or Grunt. In Angular apps most of the features that we had to manually configure in AngularJS are provided by the tool called Angular CLI. We wrap Angular CLI commands into npm scripts and add Gulp tasks if need be. It takes only several lines of code in npm scripts to build the bundles for deployment in Angular. In this video I show how to write a script that will build the Angular bundles and deploy them under a Java Spring server. If I wanted to gzip the files before deployment, I could have added one more line like `“postbuild:prod”: “gulp –gulpfile compress.js”` that invokes my script that uses the Gulp plugin for compression.

Good luck with your migration projects!

Advanced Angular workshop

We started receiving requests for teaching an advanced Angular workshop. Below is a draft of this course outline. The first day will be spent developing the front end of the online store that will look like this.

Advanced Angular Course (draft)

  1. Using Angular Material UI components

    1. Adding @angular/material package to the ngShop application
    2. Configuring custom theme / SCSS
    3. Responsive wed design with Angular Flex Layout library
  2. Modularizing Angular application:

    1. Minimizing the initial app payload by splitting it into modules
    2. Lazy-loaded modules and preloaders
    3. Configuring route resolvers
  3. Application Security with JWT

    1. Intro to JWT-based authentication
    2. Adding a JWT-based Login page
    3. Authorizing access to the Admin module via route guard
    4. Adding JWT token to the HTTP requests required authorized access
    5. Handling Unauthorized errors
  4. Dynamically adding components to your app

    1. Creating a dynamically configurable  Dashboard page
    2. Dynamically adding components with ComponentFactoryResolver
    3. Dynamically adding components with
  5. Advanced work with Forms

    1. Creating custom form controls. ControlValueAccessor.
    2. Splitting complex forms into multiple Angular components
    3. Validating form groups
    4. Refactoring the Checkout page of ngShop
    5. Adding an inventory page with a data grid
  6. End-to-end testing with Protractor

  7. Production deployment

    1. Customizing Webpack build configuration and  ng eject
    2. Building Angular application on the Continuous Integration server
    3. Running tests on CI
    4. Automatic deployments to the nginx server
    5. Configuring HTTPS
    6. Combining multiple Angular apps under a single domain
    7. Server-side rendering with Angular Universal
  8. Refactoring ngShop to introduce state management  with ngrx

    1. Benefits of  unidirectional data flow
    2. Managing state with @ngrx/store
    3. Time-travelling debugging with @ngrx/store-devtools
    4. Using  HTTP APIs with @ngrx/effects library
    5. Integration with the router via @ngrx/router library


My presentations and workshops


This is a list of presentations and workshops that Yakov Fain offers. If you’d like to invite Yakov to deliver these talks/workshops at your organization, please send an email at training@faratasystems.com. To get familiar with Yakov’s teaching style, watch his Youtube Java tutorial.

Presentations

Modern JavaScript – 70 min

In this presentation, you’ll learn how to write code using the latest syntax of JavaScript. While most of the apps use the ES5 version of the language, majority of the modern web browsers fully support the ES6 specification. Some of them started supporting the ES7 and ES8 syntax. In this presentation you’ll learn how to use classes, fat arrow functions, destructuring, spread and rest operators, promises, async-await, and modules.

Mastering TypeScript – 90 min

In this presentation, you’ll learn how to write code in TypeScript, one of the most loved languages today.TypeScript is a superset of JavaScript, which allows you to be more productive in writing JavaScript applications. Per StackOverflow developers survey TypeScript is the 3rd place in the most loved languages and 5th in most wanted. The syntax of this language is pretty easy to pick up for anyone who’s familiar with such object-oriented languages as Java or C#. During this presentation, you’ll learn the syntax of TypeScript and will understand the benefits it brings to the table.

Angular Tooling – 90 min

Learning Angular is easier than AngularJS, and developing in TypeScript is more productive than in JavaScript. But you need to know your tools to create, bundle, and deploy your app.This presentation is not about the Angular syntax. We’ll discuss the development process with Angular starting from setting up the project to deploying an optimized application. Most part of this presentation is about using Angular CLI. We’ll start with generating a new project, and then discuss such subjects as configuring proxies, working with environment variables, automating builds with npm scripts, and more.

Communication with the server via HTTP and WebSocket protocols in Angular – 90 min

In this session, you’ll see how to create an Angular 4 app that can communicate with the servers via a pull (HTTP) and push (WebSocket) modes. We’ll program a simple Node server and then will go through a number of code samples that communicate with it using HTTP and WebSocket protocols. We’ll start with creating a simple NodeJS server, and then will enable it to handle HTTP requests from an Angular app. Then you’ll see how to wrap a service into an observable stream. Finally, we’ll teach our server to perform a data push to an Angular client using the WebSocket protocol.

Angular for Java developers – 90 min

Angular is a complete re-write of the super popular Web framework AngularJS. Angular is a component-based framework that will have an effect in JavaScript community similar to what Spring framework did for Java. This presentation is a high-level overview of Angular, which in combination with TypeScript, finally made Web development understandable for Java developers. At the end of the presentation, you’ll see how to deploy Angular app can communicate with the Spring Boot backend.

Make a facelift to your Angular app with UI libraries – 90 min

In this presentation, you’ll see how to create a nice looking UI with Angular Material 2 and PrimeNG components.Commercial applications need to be good looking, which means that you should pick up a rich library of UI components for your app. While Angular Material 2 library offers two dozen of great looking components, this may not be enough for your application needs. The good news is that there are other libraries that you can use. In this presentation, we’ll start with an overview of Angular Material 2 components. Then we’ll proceed with another open-source library called PrimeNG, which offers more than 70 UI components.

Implementing inter-component communication in Angular – 90 min

Angular is a component-based framework with a well-defined API for passing data to and getting data from a component. Any application is a tree of components that often need to communicate with each other. You’ll see how to create reusable application components that can exchange data with each other in a loosely-coupled manner. You’ll see how components can communicate via a common parent or via an injectable service. You’ll see how to pass data using the router, input and output parameters, events and callbacks. You’ll also learn how to use projection to pass HTML fragments to a component’s template. You’ll see how to pass parameters to routes. We’ll also touch upon the incorporation of the third-party JavaScript libraries into an Angular 4 app.

Working with the Angular router – 90 min

The Angular framework includes a powerful component router. In this session, you’ll see how to use the router that comes with Angular 4. We’ll start with configuring the navigation in a simple app. Then you’ll see how to pass data to routes, work child routes, and create apps with multiple router outlets (auxiliary routes). We’ll also review a unit-test configuration for testing the app router. Finally, you’ll see how to lazy load modules using the router.

Using Observable Streams in Angular – 90 min

Angular includes RxJS, which is a library of reactive extensions built on the premise that everything is an observable stream. Angular includes RxJS, which is a library of reactive extensions built on the premise that everything is an observable stream. Observables introduce the push model to your application. First, we’ll get familiar with the RxJS library, and then will continue reviewing observables in Angular.You’ll see how observables are used to handle events, forms, the router, and HTTP requests. We’ll talk about using subjects, implementing the mediator design pattern, and more.

RxJS essentials – 90 min

Libraries of reactive extensions exist in many programming languages. RxJS 5 is a popular library of reactive extensions for JavaScript. This library is used for transforming and composing streams of data. RxJS promotes the push model where the data flow through the algorithms of your application. RxJS is not a framework and can be used in any JavaScript app. Using RxJS allows writing certain portions of your app by composing functions where you see fit. You’ll learn how to create observable data streams, what are the roles of observers and subscribers, how to apply and compose operators to process the data emitted by observables, how to compose multiple data streams and more.

Reactive thinking with RxJava2 – 70 min

This presentation is about asynchronous programming in Java, where the streams of data are handled in a non-blocking fashion. We’ll talk about Reactive Streams and specifically about the RxJava2 library that may change the way you design Java applications. You’ll see how to consume streams of events, deal with backpressure, and apply a variety of operators offered by this library, which requires a different way of thinking about writing code.

JHipster: Bringing together Angular and Spring Boot – 70 min

JHipster is a popular open-source code generator that automates creation and configuration of a Web project that uses the Angular framework on the front and Java Spring Boot on the back. We’ll start with a simple example where an Angular app consumes the REST service from Spring Boot. Then we’ll proceed with an intro to JHipster followed by the generation of a new Angular/Spring Boot app from scratch. This will be a CRUD app of the following architecture: a gateway (the front end), a microservice (the back end), and a service discovery server.

Hands-on workshops

Developing Web apps with Angular and TypeScript – 3 days

Participants of this workshop will gain practical skills while exploring the best practices and principles of developing Angular applications and get familiar with multiple sample applications illustrating solutions for real-world challenges. During this course, we’ll cover all the latest APIs (routing, dependency injection, forms). At the end of each day, the participants will spend an hour working on the front end of a sample application “Online Auction”.

Angular Material 2 Applied – 1 day

This hands-on workshop is for developers who are already familiar with Angular. Under the instructor’s guidance, participants will work on the front end of the online store application, which uses Angular and the library of UI components Angular Material 2. By the end of the day, each participant will develop an online store with a shopping cart the will look and work like this one. This workshop assumes participants are already familiar with Angular. This workshop is NOT an Angular intro.


BIO

Yakov Fain works as a Solutions Architect at Farata Systems that offers consulting and training services in developing of the Web Apps with Angular and Java. A Java Champion, he has taught multiple classes and workshops on the web and Java-related technologies, presented at international conferences, and published more than a thousand blog posts (see https://yakovfain.com). Yakov authored and co-authored a number of technical books on programming including the Amazon bestseller “Angular 2 Development with TypeScript”. He leads Princeton Java Users Group.

Why enterprises welcome Angular

This year I already ran about ten Angular workshops and made several presentations at various conferences (e.g. DevoxxUS, DevNexus, BuzzJS, JEEConf). Over the last 20 years, I’ve been running workshops on different software but I don’t recall seeing such a positive reception of any new software as I see with the latest Angular framework in the enterprise world.

I was thinking of why enterprise developers like it so much, and here what I came up with:

– Getting started with a new project is a breeze thanks to Angular CLI code generator

– TypeScript is an optionally-typed object-oriented language with many constructs that Java and C# developers already know (classes, inheritance, interfaces, generics, annotations)

– A typical enterprise Java developer hates JavaScript, but from what I’ve seen so far, they like TypeScript. No wonder that a recent survey on StackOverflow lists TypeScript as a third most loved language.

– Even though you write code in TypeScript, you can still use thousands of existing JS libraries in your app. With 3K+ type definition files your IDE will offer auto-complete and will show compile-time errors if you try to use the API of these libraries incorrectly

– Most popular IDEs offer great support for TypeScript

– Angular offers a clean separation of the UI (templates) and business logic (TypeScript)

– Angular is not an MVC, but a component-based framework with a clean way of arranging loosely-coupled communication with components

– The Angular rendering engine allows to replace HTML with a third-party markup, and there are already products that offer another markup for developing the UI for mobile apps.

– Angular supports modularization and lazy loading, which allows to substantially decrease the size of the landing page of the app (think perceived performance and module re-usability)

– The size of the landing page of literally any app can be as low as two-tree hundred kilobytes (not counting the app images and third-party JavaScript libraries).

– Angular Universal supports server-side rendering

– There is already a large community of Angular developers, and the questions on StackOverflow are answered pretty fast

– Bundling and optimizing the app code for deployment is simple and doesn’t require you to write complex scripts and manually configure the tools

– From a project manager’s perspective, adopting Angular is a safe bet. If you need to replace or bring a new Angular developer to the team, he/she already knows the set of all required modules and how they operate. This would not be the case with other libraries or frameworks (e.g. React) that would require someone to pick multiple building blocks from third-party vendors, which may be different for each enterprise app.

This is all good, but what has to be done to increase the adoption of Angular in the enterprises?

– The Angular team should substantially increase the speed of developing new UI components in the Angular Material 2 library. They release hight quality components, but there are only 26 of them at the time of this writing, which is not enough for the enterprise apps. Currently, we have to use third-party UI libraries in addition to Angular Material to fill the gaps.

– I’d change the priorities in Angular Material 2 component developments. The lack of a data table component (similar to angular-ui-grid for AngularJS) is a serious obstacle in adopting Angular. I realize that the data table is probably the most complex UI component, but it’s crucial for the most enterprise apps. You can find data table components elsewhere, but in the ideal platform, all batteries are included.

– Implement the responsive layout in Angular Material 2. Currently, you can use either Bootstrap or the flex-layout library, but again, it would be nice to have everything as a part of the Angular package.

Finally, I’d like to mention some specific use cases. Currently, I’m working on a project to migrate a large codebase written in Adobe Flex framework. Moving the code from Flex to Angular is smooth. Within the next couple of weeks, I’ll blog providing more details.

I’d also like to bring the attention of Java developers to a very interesting project called JHipster. It’s a code generator that allows you to generate a complete Angular/Spring Boot app with configured controllers, services, and entities. With JHipster you can either generate a monolith or microservices app with generated config files for deployment on popular cloud platforms.

If you’re not familiar with Angular yet, listen to my conversation with the folks at Software Engineering Radio podcast where I answered multiple questions about Angular. If you’re a Java developer, watch my presentation at the DevoxxUS conference.

While typically I run private Angular workshops by requests, in about a month I’ll be running a public online workshop with my colleague and the co-author of our Angular book.

Update. The initial version of Angular Material DataTable has been released on July 6, 2017.

Software training – does the class size matter?

I run public and private training pretty often, and the question about the class size often comes up. In this write-up, I’ll share my experience in teaching groups of people of various sizes and the cost efficiency of live training.

While pre-recorded video courses and online webinars are popular because of their availability to masses, live training in a classroom remains in big demand for several reasons:

  • The groups are relatively small
  • The instructor is accessible to each and every participant
  • If a participant has an issue on his/her computer, the instructor can help this person

So what’s the good size of the group? I’ve seen live hands-on workshops at the conferences that included 50+ people. This is a lot of people and typically the instructor would need an assistant who can go around the room and help participants as needed. This will allow the instructor to stick to the curricula and cover all topics listed in the course outline.

The quality of the courseware is super important. I prepare the courseware myself, which allows me to put more people in the room because all the course exercises just work, and I don’t need to waste time on fixing the code. Allowing larger groups helps me in getting more requests for corporate trainings. Our company doesn’t charge “per participant”, so the training becomes a lot more affordable for our clients.

If you are a development manager facing the need to train your team on new technology, you may face a dilemma: order an in-house training or let your developers to self-study. The math is pretty simple. Say you have a group of 7 senior developers who need to learn a new technology and can study on their own. Let’s assume that each developer earns $500 a day. If self-studying of this technology would take 10 days, the cost of such self-training for your organization is $35K (500*10*7). Inviting an instructor would let you train the same people in 3 days, which would cost you $10.5K (500*3*7) plus instructor’s fees, which will be less expensive and provide better results.

In some cases, it may be even more cost-efficient to enroll your developers into a public training if available. I’d like to use this opportunity and invite you to our next online public workshop on Angular, where the size of the group is about 25 people. The enrollment fee is nominal, and the quality of the training is great. Just check our refund policy.

TypeScript generics and animal workers

I’ve been using Java generics for years, and when I saw their syntax in TypeScript, I simply put a checkmark in the list of TypeScript features that I already know and understand.I was wrong. Let me show you something.

Below is a Java code sample that illustrates the use of generics. I’ve created a class Person and its subclass Employee. Then I created a standalone class Animal. Finally, I used the generic notation to ensure that if anyone would try to add an instance of Animal to the collection of workers, the Java compiler would complain, and it did:

Then I re-wrote the same program in TypeScript, and its compiler didn’t complain:

But if I’ll comment out the property name in the class Animal, the TypeScript compiler will complain:

This may lead to the following conclusions:

1. In TypeScript, if you use a type as a parameter in generics, it’ll allow any other type as long as it has the same properties (e.g. Person.name and Animal.name)
2. In TypeScript, animals can be workers

If there is something in TypeScript documentation that has different explanations to this behavior, please let me know. Generics is an interesting subject and I’ll write another blog soon.

Yarn package manager: yarn.lock

Yesterday, I was running yet another Angular workshop. After explaining how to install dependencies using npm, I show how to use Yarn (see this blog), a faster alternative to npm, and suggest that the students should consider using Yarn.

Before the workshop, I give handouts with several projects to the group and then ask the group to open a particular project, install the dependencies and run the app. Usually, everything goes smoothly, but this time many people started to complain about a runtime error. In this app, I was using themes from Angular Material 2, but the app couldn’t find the file “node_modules/@angular/material/core/theming/prebuilt/indigo-pink.css”.

I was strange. I tested all the projects two days before the class. After checking the content of the node_modules directory on Paul’s computer, I couldn’t find even the directory node_modules/@angular/material/core let alone that CSS file.

Then I asked if everyone gets this error? Everyone except Jim got this error. Jim was using Yarn for installing dependencies while everyone else was using npm. After learning this, I guessed what was the problem.

I’ using Yarn too, and all my projects included the file yarn.lock, which is created after the initial install storing all packages and their versions there were installed for the project. When you do the yarn install next time, it checks if the file yarn.lock is present, it installs exactly packages of those versions that were listed in yarn.lock. This file can be checked into the version control repo used by your team to ensure that everyone would have exactly the same dependencies.

Now let me explain what happened in the classroom. The package.json in that project included the dependency

"@angular/material": "^2.0.0-beta.2"

The file yarn.lock in that project had the following:

"@angular/material@^2.0.0-beta.2":
  version "2.0.0-beta.2"
  resolved "https://registry.yarnpkg.com/@angular/material/-/material-2.0.0-beta.2.tgz#65ee8733990347b7518b7f42113e02e069dc109b"

Hence, when Jim ran his Yarn install, he got Angular Material 2 2.0.0-beta.2, which had the file “node_modules/@angular/material/core/theming/prebuilt/indigo-pink.css”

But last week, a new version (Beta.3) of Angular Material 2 has been released with a breaking change – they rearranged the file structure:

So the students who didn’t use Yarn, got the latest version while my project used “the old” location of that CSS file.

Fixing this issue in the app was an easy task, but I wanted you to appreciate that Yarn gives you predictability in the projects that have multiple dependencies. Some library author introduces a breaking change, and your app gives a runtime error.

After fixing the CSS location in the app, I deleted my yarn.lock file and re-ran the install. The newly created yarn.lock has this fragment:

"@angular/material@^2.0.0-beta.2":
  version "2.0.0-beta.3"
  resolved "https://registry.yarnpkg.com/@angular/material/-/material-2.0.0-beta.3.tgz#ec31dee61d7300ece28fee476852db236ded1e13"

The first line indicates the dependency as it was listed in my package.json, and the second line shows the actual version that has been installed. Now my project is working again… until the next breaking change.

Update. Here’s another situation I ran into that would prove the usefulness of yarn.lock.

Angular CLI: multiple apps in the same project

You may need to have an Angular project that has multiple apps so you can run the build of a particular app, say depending on the customer you’re preparing the build for. In my case, I wanted to create a project with multiple apps that I use in my Angular workshops. Having a single project with multiple apps allows you to run a time-consuming npm or yarn install once and just modify the name of the app you want to run.

For example, you may have multiple versions of the main bootstrap file that load different root modules. The file .angular-cli.json has the apps section with the property main, and to run a particular app, I’d instruct the students to modify .angular-cli.json to point at a particular app, e.g. "main": "main1.ts". To run another app, I’d instruct them to change this line to "main": "main2.ts".

But then I figured out that you can configure multiple apps in the same .angular-cli.json and run the build for a particular app by name. The apps property is an array, and you just need to configure each app there. For example, the following fragment shows how I configured two applications – app1 and app2 in the same .angular-cli.json:

"apps": [
    { "name":"app1",
      "root": "src",
      "outDir": "dist",
      "assets": [
        "assets",
        "favicon.ico"
      ],
      "index": "index.html",
      "main": "main-resolver.ts",
      "polyfills": "polyfills.ts",
      "test": "test.ts",
      "tsconfig": "tsconfig.app.json",
      "testTsconfig": "tsconfig.spec.json",
      "prefix": "app",
      "styles": [
        "styles.css",
       "../node_modules/@angular/material/core/theming/prebuilt/indigo-pink.css"
      ],
      "scripts": [],
      "environmentSource": "environments/environment.ts",
      "environments": {
        "dev": "environments/environment.ts",
        "prod": "environments/environment.prod.ts"
      }
    },
    { "name":"app2",
      "root": "src",
      "outDir": "dist2",
      "assets": [
        "assets",
        "favicon.ico"
      ],
      "index": "index.html",
      "main": "main-luxury.ts",
      "polyfills": "polyfills.ts",
      "test": "test.ts",
      "tsconfig": "tsconfig.app.json",
      "testTsconfig": "tsconfig.spec.json",
      "prefix": "app",
      "styles": [
        "styles.css",
      "scripts": [],
      "environmentSource": "environments/environment.ts",
      "environments": {
        "dev": "environments/environment.ts",
        "prod": "environments/environment.prod.ts"
      }
    }
  ],

Now to bootstrap the app main-resolver.ts I run the following command:

ng serve --app app1

To bootstrap the main-luxury.ts, I run this:

ng serve --app app2

You can also refer to each app by its index in the apps array:

ng serve --app 0
or
ng serve --app 1

The option –app is available for the ng build command as well. The following screenshot shows my project after I built the app1 into dist and app 2 into dist2.

This is a pretty useful Angular CLI feature and I wanted to share my findings with you.

Update. The angular team is working on the Angular Elements module that will allow you to create Angular widgets that you’ll be able to embed into any HTML app. This should allow you to have multiple apps on the same HTML page as well. This feature should be available in the upcoming Angular 6 releases.
Also, Angular CLI 6 makes it easier to configure multiple apps in the same project in their new configuration file angular.json (a replacement for .angular-cli.json).

RX: Reactive Libraries

Over the last several years, the term “reactive programming” became popular in many programming languages. Reactive Manifesto was published although it gives a rather generic definition of reactive systems http://www.reactivemanifesto.org. Yes, an app should response fast (Responsive), remain functional in case of errors (Resilient), be flexible in regards to increasing/decreasing computational resources (Elastic), and be based on asynchronous events (Message Driven).

Declaring the principles is a good start, but how to apply these principles in a concrete app? Let’a talk about reactive extensions libraries available for many programming languages.

About seven years ago, Erik Meijer from Microsoft created Reactive Extensions (Rx) – a set of libraries Rx.NET for processing asynchronous event-driven data streams. For example, someone posted a tweet and you received an immediate notification.

A non-reactive way of receiving tweets would be visiting twitter.com every now and then and reload the page hoping that one of the people you follow posted a new tweet – this is known as polling. The load on the server will substantially increase if every user will keep polling the server. The push model is a lot more efficient – just subscribe to the tweeter feed and get the tweets asynchronously pushed to you as they become available.

An online auction is another use case for the async data push. A user bids on the product, but other users may overbid her. Bids should be implemented as a stream that allows subscription so the users won’t need to constantly check if their offers are still the winning ones.

Another example is a stream on stock prices during the working ours of a stock exchange. Or take a stream of signals from a sensor (e.g. an accelerometer in your phone). Even the process of dragging the mouse over the screen can be treated as a stream of coordinates of the mouse pointer.

Five years ago, Microsoft released Rx.NET as an open source project. People liked it and the library was ported to other programming languages: RxCpp, RxJS, RxPHP, Rx.rb, Rx.py, RxJava, RxSwift, RxScala, RxKotlin.

Disclaimer. This post is not a Rx tutorial, but a brief introduction of the main Rx players. I work with RxJS and RxJava, but in this post, I’ll be using code samples in JavaScript

Let’s get familiar with the main concepts of Rx libraries, but first consider this non-reactive code:

int a1 = 2;

int b1 = 4;


int c1 = a1 + b1;  // c1 = 6


a1 = 55;           // c1 = 6, but should be 59    
b1 = 20;           // c1 = 6, but should be 75

After the execution of this code, c1 is still equal to 6. Sure enough, we could add more code to recalculate c1 after the values of both a1 and b1 changed, but a more proper way to handle this is by making c1 to be immediately recalculated as soon as either a1 or b1 change as in Excel spreadsheet. In other words, it would be nice to switch to the push model, where the new and asynchronously changed values are pushed to their consumer. We want to move away from the pull model, where the consumer is constantly asking the producer, “Do you have something new for me?… How about now?… Maybe now you have something?”

Observable, Observer, Subscriber

The main players of any Rx library are Observable, Observer, and Subscriber.

* Observable – an object or a function that emits sequences of data over time (a.k.a. producer)

* Observer – an object or a function that knows how to process the sequences of data (a.k.a. consumer)

* Subscriber – an object or a function that connects an Observable with Observer(s)

After looking at this diagram, many software developers will say, “We already know this. This is a pub-sub messaging with the implementation of the Observer pattern.” To some extent, this is correct, but there’s more to it:

1. Rx is meant for the asynchronous non-blocking data processing.

2. Rx offers a simple API with dedicated channels for sending data, errors, and the end-of-stream signal.

3. Any Rx library has about a hundred operators that can be applied to the data stream en route. Operators are easily composable.

4. Some of the Rx implementations (e.g. RxJava2) support the backpressure well. This is a scenario when a producer emits data faster than a consumer can handle.

5. You don’t need special messaging servers to use a Rx library. Everything you need is a part of your app.

6. In languages that support multi-threading, working with threads as well as switching between the threads is easier.Android developers will appreciate this because the UI rendering has to be done in the main thread while the calculation in others.

So how an Observable sends the data to the Observer? An Observer can implement three methods (their names may slightly vary depending on the language you use):

* next() – here’s a new value from the stream
* error() – here’s an error happened in the stream
* complete() – the stream’s over

In the next code sample, the function getData() turns the array with beers into an Observable and returns it back. Returns to whom? To the subscriber, when some other code invokes subscribe(). A subscriber – getData().subscribe(myObserver) – passes an Observer, as an argument to the function subscribe(). Accordingly, an Observer can implement three functions:

* Handling the next element from the stream
* Handling the stream error
* Handling the end of stream, if needed

// Defining the function that returns an Observable
function getData(){

    var beers = [
        {name: "Stella", country: "Belgium", price: 9.50},
        {name: "Sam Adams", country: "USA", price: 8.50},
        {name: "Bud Light", country: "USA", price: 6.50},
        {name: "Brooklyn Lager", country: "USA", price: 8.00},
        {name: "Sapporo", country: "Japan", price: 7.50}
    ];

// The observer will be provided at the time of subscription
    return Rx.Observable.create( observer => {

              beers.forEach( beer => observer.next(beer));
              observer.complete();
           }
    );
}

// Calling the function that subscribe to the observable
// The function subscribe() receives the Observer, represented by three functions
getData()
     .subscribe(
         beer  => console.log("Subscriber got " + beer),   // handling the arrived data
         error => console.err(error),                      // an error arrived
            () > console.log("The stream is over")         // the signal that the stream completed arrived
);

Our Observer consists of three fat arrow functions (=>). This syntax was introduced in the ECMAScript 6 spec. Our fat arrow callbacks may be invoked only after we invoked subscribe(). You can see this code sample in action here (open the browser’s console and click on the Run button).

Operators

Operators are functions that can transform the stream data between the moments when the Observable sent them and the function subscribe() received them. In other words, we can transform the data en route. Rx libraries have lots of operators.

Each operator is a function that takes an Observable as an argument, transforms (or ignores) it, and returns another Observable. Since the input and output of any operator have the same type, you can chain them up. Here’s how you can filter out the beer that’s more expensive than 8 dollars and convert the instances of the Beer object into strings.

Studying Rx operators require a time investment, and I’m planning to write more about them. The RX docs often include marble diagrams that help in understanding what a particular operator does. As an example, the marble diagram for the filter operator looks as follows:

On top, the incoming stream (an Observable) is represented by various geometrical shapes. Then the filter operator ignores every element but circles, and the resulting Observables will contain only the circles. When you look at the circle, visualize beers that are cheaper than eight dollars.

Still, how to make c1=a1+b1 reactive?

First, convert a1 and b1 into streams, for example:

const a1 = Rx.Observable.from([2, 55]);

But this stream will shoot 2 and 55 instantaneously, so let’s add the time dimension. To emulate a delay you can use another stream that just emits sequential numbers and join it using the zip operator with the stream that emits 2 and 55:

const a1 = Rx.Observable.from([2, 55])
  .zip(Rx.Observable.interval(1200), x => x);

When someone subscribes to a1, it’ll emit 2 and in 1.2 seconds 55. Similarly, let’s create a stream for b1 but with a delay of 1.5 seconds. Then, using streams composition and the operator combineLatest, we combine streams a1 and b1 and add their latest values. The entire code will look as follows:

const a1 = Rx.Observable.from([2, 55])
  .zip(Rx.Observable.interval(1200), x => x);
  
const b1 = Rx.Observable.from([4, 20])
  .zip(Rx.Observable.interval(1500), x => x);

a1.combineLatest(b1, (x, y) => x + y)
  .subscribe(val => console.log("c1=" + val));

To see this code in action, visit the Plunker at http://bit.ly/2nphn0k, open the browser’s console and click on the button Run. you’ll see how c1 is recalculated as soon as either a1 or b1 is changing.

If you haven’t worked with reactive libraries, take a look at the one available for your programming language and start using it in a real-world project.

A word of caution. Rx libraries allow you to write less code, but the code readability suffer. The person who reads the code needs to know Rx as well.

On the positive side, Rx libraries don’t require you to change the architecture of the entire project. Use them where you can make the async data to flow through a sequence of algorithms (think operators).

Update In the beginning of this post I made a statement that this blog is not a tutorial, but after reading one of the comments, I decided to add a link to the video of my recent presentation in New York at BuzzJS. During the first 25 min of this presentation, I was using just RxJS.

Categories Rx

Angular 4: Changes in the router

Angular 4 comes with some useful changes in the router. Let’s take a look at the changes in receiving parameters by a route and in the CanDeactivate guard (see here).

A route can receive the parameters either using a snapshot property of the ActivatedRoute or by subscribing to its property param. Now there is a property paramMap that allows you to either get a particular parameter by using the method get() or get all parameters by invoking getAll().

Here’s how to receive a parameter id that’s not changing in the parent:

export class ProductDetailComponentParam {
  productID: string;

  constructor(route: ActivatedRoute) {
    this.productID = route.snapshot.paramMap.get('id');
  }
}

If the parameter id is changing in the parent (as described here), you can subscribe to the stream of id’s as follows:

export class ProductDetailComponentParam {
  productID: string;

  constructor(route: ActivatedRoute) {

    route.paramMap.subscribe(
     params => this.productID = params.get('id')
     );
  }
}

The CanDeactivate guard now allows you to be more specific and conditionally prohibit navigating from a route depending on where the user is planning to navigate. The interface CanDeactivate now has an optional parameter nextState, which you can check to decide if you want to prohibit the navigation or not. The next code snippet shows the guard that would display a warning popup only if the user is trying to navigate to the home route represented by the path ‘/’. The navigation to any other routes remains unguarded.

@Injectable()
export class UnsavedChangesGuard implements CanDeactivate<ProductDetailComponent>{

    constructor(private _router:Router){}

    canDeactivate(component: ProductDetailComponent, 
                  currentRoute: ActivatedRouteSnapshot,
                  currentState: RouterStateSnapshot, 
                  nextState?: RouterStateSnapshot){

        let canLeave: boolean = true;

        // If the user wants to go to home component
        if (nextState.url === '/') {
          canLeave = window.confirm("You have unsaved changes. Still want to go home?");
        }
        return canLeave;

    }
}

Angular 4 was just released and there might be some other goodies in the router, but I just wanted to share with you these convenient additions.